Join Eric Min’s PRL Full Badge Hunt Ride December 28
Zwift CEO Eric Min is an avid Zwifter, reaching level 100 a few months ago after riding more than 80,000 km on the platform.
Over the past 10 years he’s led group rides, raced, and ridden every bit of tarmac in Zwift’s virtual worlds… including some roads none of us have ever seen!
But do you know what he hasn’t done yet? London’s The PRL Full – the longest route in Zwift.
That’s going to change soon, though. Next Saturday at 4pm UTC/11am ET/8am PT, Eric aims to cross this final route off his list. And he’s inviting the Zwift community to ride it with him, because long days in the saddle are always better with friends!
The PRL Full route was released with the original London map back in 2018, and the intent was to mimic the length (but not the actual roads) of the IRL Prudential Ride London event.
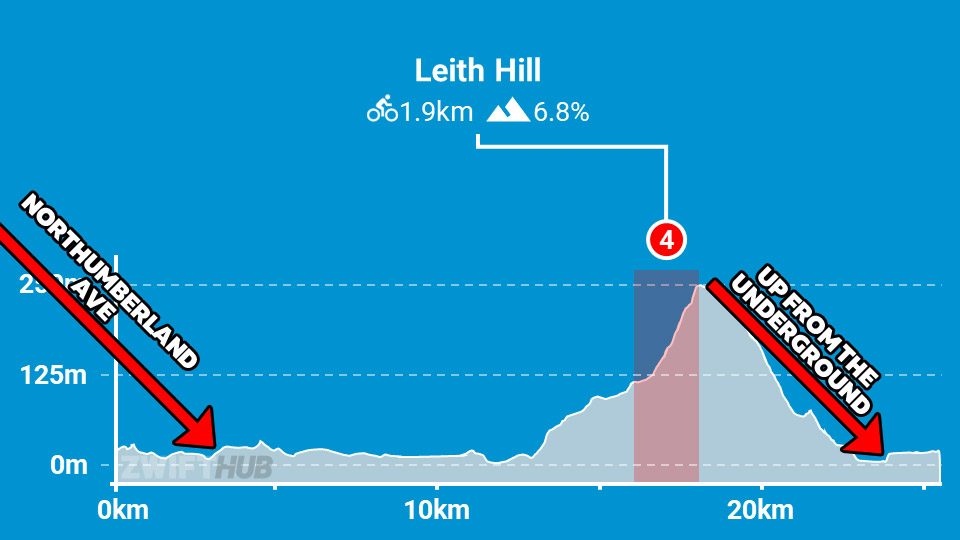
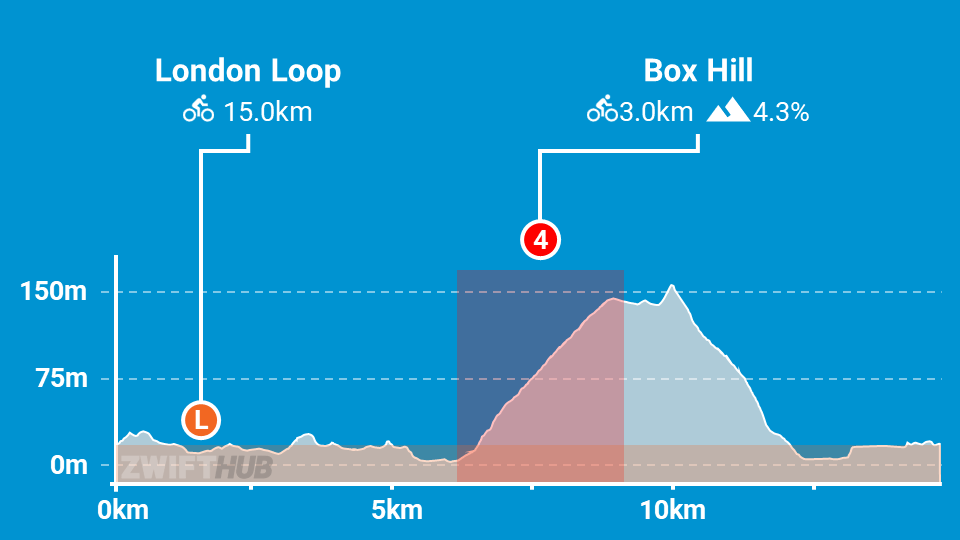
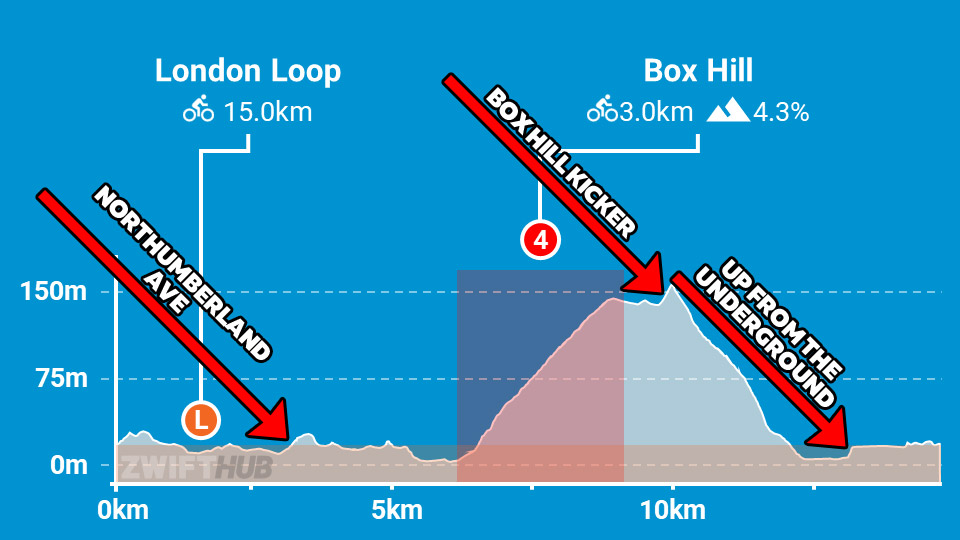
In contrast to Zwift’s other long routes, The PRL Full is quite simple: it’s just 11 laps of the London Loop, followed by a bit more riding to get you onto The Mall where you finish at the Classique forward sprint:
But simple doesn’t mean easy. The route is 173.5km (107.8 miles) long, with 2625m (8,599′) of elevation gain. Strava KOM holder Stefan Kirchmair did it in 3 hours and 58 minutes during a Zwift Insider badge hunt ride in March of 2021. But the rest of us mortals will need to plan on a ride that takes 5+ hours. (Our ZI Metrics estimate stays 280 minutes at 4 W/kg, 313 minutes at 3 W/kg, and 397 minutes at 2 W/kg.)
The big feature of the London Loop is Box Hill – 3km/1.9 miles long with 136m (446′) of elevation gain for an average gradient of 4.4%. It’s not a particularly long or steep climb, but 11x up any climb is a challenge!
Show up on time. Yes, late join is enabled for this ride, but if you arrive late the game will place you with other riders partway into the route, which means you won’t earn the route badge. Ouch.
This is not a race – it’s a group ride. You can treat it as a race if you’d like, of course, but the ride will break up naturally into pace groups. Find riders working at your target pace and work together. Don’t burn your legs up early.
The VeloViewer Leaderboard shows that top riders crush The PRL Full in under 4.5 hours. But most mortals require 5-7 hours, with plenty taking even longer. You do you. Be sure to plan accordingly.
Because of its repetitive nature, this route is best tackled in a group. Discord and in-game chat will help pass the time as well.
Prep your fuel and get good rest the night before. It’ll be a long ride!
Join Me Discord
Zwift Insider’s Discord server will be open for voice chat during the ride, and I’ll be signed in as I ride the course with everyone else. (I bet I can even convince Eric Min to join us.)
This really helps pass the time, so we highly encourage it!
This event happens right in the middle of the Rapha Festive 500, and finishing it will let you check off over 30% of the 500km challenge! (Plus, finishers will unlock the new Rapha Festive 500 kit.)
Best Bike Split Announces Zwift Training API Integration
Last week Best Bike Split and Zwift announced a new level of integration via Zwift’s new Training API, making it easier than ever to execute Best Bike Split-created workouts directly in Zwift.
About Best Bike Split
Trusted by some of the top pro teams in the world, Best Bike Split’s proprietary math and physics engine uses your power data, course info, and race day conditions to predict your race performance and create the perfect power plan so you can hit your best bike split ever.
It’s super-popular with TT specialists and triathletes, for obvious reasons.
Best Bike Split doesn’t have a training calendar tool like some of Zwift’s other Training API partners (see list at bottom of post). Rather, Best Bike Split helps you create powerful and accurate workouts based on real course info, so you can train to do your best on race day. Once the workouts have been created, this new Training API integration lets Best Bike Split premium subscribers click to send workouts straight to Zwift.
There are three types of workouts Best Bike Split can create and send to Zwift:
Race Plans: create a structured workout that mimics the power requirements of your personalized race plan for a particular course on race day. Great for training for specific time trials!
Analytics: upload your ride activity to Best Bike Split, which then creates a structured workout that replicates those efforts.
AI Workout Builder: an innovative tool that lets cyclists and coaches create highly personalized, structured workouts tailored to specific race scenarios and individual training goals.
Pricing
You’ll need to pay for Best Bike Split Premium in order to access most of its useful features, including Zwift integration. Cost is $19/month, or get a big discount by paying annually ($119/year works out to $9.92/month).
Connecting Best Bike Split + Zwift
All of your interaction with Best Bike Split is done via the website (bestbikesplit.com). Visit the site, create your account, then connect it to Zwift under My Account/Connect Zwift:
Exporting to Zwift
Pull up any Race Plan, Analytics, or AI Workout on Best Bike Split, and you’ll see a “Zwift Uploads” section at the bottom-right. Click the button to send it to your Zwift “For You” carousel.
You can also go to Workouts → Custom and select “Best Bike Split” to see workouts you’ve exported.
It should be noted that Best Bike Split has allowed you to export their workouts to .zwo files for years, but this new integration just makes the process smoother by sending the workout directly to your Zwift profile so you don’t need to bother with moving files into the proper folders.
Complete List of Training API Partners
Best Bike Split is just the latest to be added to the growing list of Training API partners at Zwift. Here’s the complete list, which will be updated as new partners are added:
Zwift recently announced plans for their first-ever large-scale community meetup, but it’s much more than a simple meet and greet. It’s a full-on Zwift community cycling holiday combined with fireside chats and other fun connecting events fueled by the infectious energy of Zwift’s global community.
Dubbed Zwift Community Live (ZCL) 2025, it’s all happening in Mallorca on April 3-6, 2025. Tickets are close to selling out, but there’s still time to register.
I sat down for a quick chat with Zwift CEO and Co-Founder Eric Min to talk about what they’ve got planned for the event. (He was actually in Spain at the time, checking out the Zwift Academy finals in person.) I asked him about his goals for this event, because it’s something he’s really been spearheading. He said:
After 10 years, it’s time to bring out community together to ride, connect, and strengthen the bonds we’ve built online. We’re social creatures, and virtual is great. But there’s nothing that replaces the real human connection.
If this is successful, we anticipate this may have the ability to bring thousands of people every year. Whether it’s in Mallorca or somewhere else. We want the first year to be somewhat of a pilot, and hopefully it will go well. We’ll learn, then we’ll scale it further the following year. The ambition is that this would be an annual event.
Here are some details Eric shared about ZCL 2025 that haven’t been released anywhere else…
IRL Rides
We’ll have three days of guided group rides on iconic Mallorcan roads like Formentor and Sa Calobra. Each day will feature short, medium, and long ride options.
Which rides is Eric doing? Perhaps unsurprisingly, he told me, “I’m going to be on the biggest, longest rides. Weather permitting. The roads along the coast are amazing, and I think at that time of year there won’t be so many cars. Just tens of thousands of cyclists taking over Mallorca!”
About the Hotel
Our home base for Zwift Community Live 2025 is the Iberostar Playa de Muro Village located in the charming town of Alcúdia on Mallorca’s north coast. This hotel is reserved exclusively for Zwift Community Live, and Eric actually stayed there two nights recently to “test it out.” He told me, “It’s a 5-star hotel for the price of a 3-star hotel.”
Located right by the beach, this stunning hotel offers single or double-occupancy rooms with breakfast and dinner included. It looks to be the perfect spot to unwind after a day of riding, connect with fellow Zwifters, and recharge for the next adventure. Four things worth noting about our ZCL accommodations:
Exclusive Access: The Iberostar Selection Playa de Muro will open its doors exclusively for ZCL 2025, providing a private and tailored experience for us.
Prime Location: Situated in the heart of Alcúdia, which is known for its pristine beaches, historic charm, and world-class cycling.
Cycling Amenities: The hotel offers bike storage, maintenance facilities, and recovery areas, so our gear will be as ready for the rides as we are! There’s also a full-service bike shop directly across the street if needed.
Luxurious Comfort: It’s a getaway, right? Relax in beautifully designed rooms, enjoy spa treatments, or unwind by the pool with views of the Mediterranean.
Special Guests
Zwift is still finalizing the list of special guests for ZCL 2025, including heads of the biggest community groups on Zwift. In addition, they will bring a selection of their ambassadors and VIP’s. So far they’ve shared with me the following names:
Matthew Stephens – Former pro cyclist and commentator.
Riders from Alpecin-Deceuninck and Canyon//SRAM teams.
Representatives from GCN
I also understand there will be more big names will be unveiled in the coming months
It’s the other guests I’m most excited about, though. 🤗 I’ll be there with my wife, and we’re stoked to meet lots of Zwifters in person who we’ve only seen in Watopia. I’m particularly looking forward to finally meeting Zwift’s event guru James Bailey, and I know we’ll also be hanging out with Beccah Niesen, who led the charge in us developing Zwift Insider’s women’s racing pages.
Like me, Eric Min sees this as an opportunity for “everyday Zwifters” to meet up. While meeting and riding with pros and influencers is fun in its own way, Eric says, “This is just as much about Zwifters meeting Zwifters.” It’s an opportunity for Zwift micro-communities (like race teams) to come together.
Daily Schedule
This rough schedule is going to be dialed in as the event draws nearer, of course. But this should give you a basic idea of what to expect each day:
April 3
Pick up rental bikes
Shake out rides
Evening dinner for all guests
Special guest speakers
April 4, 5, 6
Guided group rides (see “IRL Rides” above)
Evening dinner for all guests
Special guest speakers
April 7
Departures (guests may stay longer at their own expense)
And More
Eric let me know about a few more things Zwift has planned for the weekend, including:
Previews of what’s coming next on Zwift, including powerful new tools and fresh roads!
Nightly fireside chats featuring special guests, led by Matt Stephens
A Flanders watch party (the race happens on April 6)
How To Register
Attending ZCL 2025 is no small investment, and Zwift realizes this. “We make no money on this event,” Eric said. “In fact, we invest in it, and we’ve negotiated the best possible rates for the guests.”
Tickets start at €1150, and all the details are on the webpage provided by Zwift’s event partner, Huerzeler – The Cycling Experience. Options include high-end bike rentals to help ease travel logistics…
Upon its release, the Zwift Ride received incredible reviews due to its versatility and budget-friendly price point. Now, after 6 months, one reviewer provides a long-term perspective. Does it live up to the hype?
Also included in this week’s top picks are videos about Zwift racing and new Zwift setups.
Zwift Ride 500-Mile Review: the Good, the Bad, and the Caveats
Since receiving the Zwift Ride, Ben Delaney has clocked over 500 miles on the smart frame. In this video, Ben provides a long-term review of the Zwift Ride w/KICKR Core.
The Longest Zwift Race I’ve Done
With some unpleasant weather rolling through the area, Jeff from Norcal Cycling hops in a Zwift Epic Race. Watch as Jeff provides a complete breakdown of his race – can he take the win?
Finally Build My Ultimate Zwift Pain Cave!
Since moving, Thomas has not found the time to properly set up his indoor cycling setup. In this video, The Cycling Tatooist puts together his ultimate Zwift pain cave.
Your Zwift Racing Score drastically changed. Here’s Why!
Wondering why your Zwift Racing Score keeps changing? Adam from Road to A shares the reasoning behind these big changes.
4 Months Off… Zwift Race // Injury Comeback ep. 1
After 4 months off of Zwift racing, junior cyclist Brendan is back at it. Watch as Brendan breaks down his first Zwift race back.
Got a Great Zwift Video?
Share the link below and we may feature it in an upcoming post!
Zwift version 1.80 begins its phased rollout today. While not a major release, Zwifters will be happy to learn that this update brings the new minimap route profile view to all maps. Let’s dive into the details!
Minimap Route Profile Now On All Maps
The new minimap route profile was enabled for Watopia around a month ago, and today’s update rolls out that same view on all other Zwift maps. This will be especially helpful on confusing maps like Neokyo and NYC!
The new profile view clearly shows your full route, progress, any leaderboard segment banners, and how far you have left to go to finish the route. It also shows a lap counter in events, and a blue lead-in section for routes with lead-ins.
Note: if you make a manual turn and deviate from a route at an intersection, the original overview will be shown instead.
New “Screen Shake Effect” Toggle
The screen shake effect can now be disabled in Settings under the Audio & Video tab:
When disabled, the screen will no longer shake when riding on rough surfaces like cobblestones and wooden bridges. Here’s a quick demo showing how gameplay appears with it turned on and off:
More Release Notes
Zwift provided notes on additional tweaks and bug fixes in this update (notes in italics from me):
Fixed an issue that could cause the “Start Ride” button to not be selected by default when viewing a workout.
Fixed an issue that could potentially show incorrect elevation in the dynamic elevation display for the climb in Jarvis and The Grade in Watopia.
Fixed incorrect pedestrian walking animations in New York.
Fixed an issue that could cause the elapsed time icon to overlap with the time value.
Fixed an issue that could cause the “More Power!” alert to overlap with the average power value shown during ramp test workouts.
Fixed an issue that could cause the speed unit shown in the HUD to overlap with the distance value.
Fixed an issue that could cause the in-game leaderboard sidebar to overlap with the upcoming event countdown.
Fixed an issue that could prevent the Shorelines and Summits route in Watopia from being completed if scheduled for multiple laps in an event.
Corrected the peak difficulty of the Tractor Pulls workout which was previously higher than intended. (It asked for 25-second pulls, at 50rpm and 300% of FTP!)
Training Stress Score (TSS) has been renamed to Stress Points (SP). (This is surely a result of TrainingPeaks acquiring IndieVelo…)
Android
Fixed missing bridge railings in the Shisa Shakedown route in Makuri Islands.
Fixed an issue that could cause the Zwifter’s level to not be shown in the HUD after receiving a Ride On.
iOS, tvOS
Fixed an issue that could cause the Zwifter’s level to not be shown in the HUD after receiving a Ride On.
As you may or may not know, each of these sections consists of two activities: first a workout, then a test. I cover the endurance workout and test below.
Endurance Elevator Workout
The Endurance Elevator workout has you tackle multiple longer intervals at or near your FTP. The full workout is 59 minutes long with 3 hard intervals, while the lite version is 33 minutes long with 2 intervals. Here’s what the workouts look like with my FTP set at 310W:
I went with the full 59-minute workout and did it as an on-demand workout because that was the only way to get it done early. I chose to ride the workout on Watopia’s Road to Sky route because I prefer the visuals of a steady climb when doing longer, steady work at sweet spot or threshold.
Watch me ride this workout:
I went into this workout figuring it would involve some steady suffering. But it turned out to be significantly harder than anticipated. The toughest workout so far in this program, in fact!
After a warmup with three 30-second efforts to get your blood pumping, riders are tasked with completing 3 intervals at or near FTP. Here are my intervals:
10 minutes at 310W (100% FTP) and 90rpm
9-minute ramp from 280-340W (90-110% of FTP) broken into 3 cadence-based blocks
3 minutes at 85rpm
3 minutes at 80rpm
3 minutes at 75rpm
10 minutes at 310W (100% FTP) broken into 5 cadence-based blocks
2 minutes at 90rpm
1 minute standing at 70rpm
2 minutes at 90rpm
1 minute standing at 70rpm
4 minutes at 100rpm
Each of these big blocks was significantly harder than the previous one, and I felt like the cadence targets made them significantly more difficult. Some people say “you can ignore the cadence targets” but that’s not always true… cadence affects a workout, and coaches set particular targets for good reason. So I tried to hit those targets, even though it put me further outside my comfort zone.
For the first 10-minute interval, I spun up to a comfortable cadence around 100rpm, then realized the workout was calling for 90rpm. So I dropped it, and finished the interval right on target. I was pedaling slower than I would naturally, but it didn’t feel like I was mashing the pedals.
The second interval, a 9-minute ramp, dropped the cadence even further. Gah! As the power ramped from 90% of FTP to 110%, it told me to drop my cadence from 85rpm to 80rpm to 75rpm. That hurt. Holding power over threshold at 75rpm feels like it really sapped the strength in my legs.
The low cadence targets really sapped my legs, but they also simulated climbing nicely
Then I had one more 10-minute section at FTP left. This one surprised me with its difficulty. The first two minutes at 90rpm weren’t terrible, but I could already feel that the previous 9-minute ramp at low cadence had noticeably drained my strength.
Then I stood up for the 1-minute interval as instructed, and tried to hold the 70rpm target… and I couldn’t! It was a weird feeling, like I didn’t have the body weight to stomp on the pedals at a high enough cadence. It would have taken me really engaging my core and arms so I could force my pedal strokes down in order to hit the cadence target – but I just didn’t have the strength.
So I mashed through that interval at 55-60rpm, then sat down and tried to get my cadence up to the 90rpm target. At this point, my heart rate was at its highest point thus far in the workout (175bpm).
Soon enough, it was time to stand for another minute. This block was even worse, with me only able to hold around 50rpm. I was on the edge of the ERG spiral of death, and it was all I could do to keep those pedals turning over.
When I finished slogging through that block, it was time for the final 4 minutes at FTP. And the workout called for 100rpm cadence! Grrr… I would have happily down 100rpm early in the workout, but now my legs were so dead I couldn’t get my legs over 75rpm. So I just gutted out the final 4 minutes, even though everything in me wanted to hit that left button to drop the FTP bias by a few percent. My heart rate was pegged at 180, a few beats over threshold, and there it sat until I finished my last FTP interval.
Tank emptied
Takeaways from the Endurance Elevator Workout
This was the first Zwift Camp: Baseline stage I had completed where I didn’t get an email from Zwift immediately after finishing. It makes sense – I hadn’t unlocked any new virtual goodies, and there weren’t any test results to display. But I’m not ashamed to admit that after all that hard work, I wish Zwift had sent me some sort of attaboy.
My first takeaway from this workout was that low cadence work really saps my legs, but I probably need to do more of it if I want to climb well. On Zwift, a combination of lower trainer difficulty and lots of virtual gears lets me spin at a higher cadence no matter how steep the climbs may be. But that’s now how it works outdoors.
The other takeaway is a reminder that my body can go further than I might think. When we get pushed to the edge, whether or not we continue pushing becomes a question of mental strength. I’ll be honest: knowing I would be writing this post and sharing my video helped motivate me not to throw in the towel!
Endurance Test
The test for the endurance portion of Zwift Camp: Baseline isn’t like the Sprint or Attacking tests, which were structured workouts. Instead, Zwift has you ride the Elevation Evaluation route:
Using this route as an endurance test began as a good idea from Zwift, and it could have been a really cool experience for everyone if done right. Unfortunately, the way it actually unfolds in game for the everyday Zwifter leaves a lot to be desired. I’ll unpack this more below, but first I want to make say two things clearly that aren’t spelled out by Zwift for this final stage:
The whole goal of this final workout is to put in your best 10-minute power effort at some point during the route. I recommend beginning this effort at the bottom of The Grade KOM, because that lets you make use of the timer in game as your 10-minute timer, plus you’ll see an average power readout as well.
You have to complete the full Elevation Evaluation route for your effort to count as a stage 6 completion. There’s a fair amount of riding to be done even after you climb to the top of The Grade. Just use it to spin your legs out, and make sure you ride through the finish at the Sasquatch Sprint before ending your ride.
Watch me complete the Elevation Evaluation Route/Test:
I started my endurance test with a separate ride, actually. I knew that the Elevation Evaluation route only has a ~3km lead-in when ridden as a free ride, and I wanted a longer warmup. So I jumped in with some robopacers for 30 minutes to break a sweat, spin up the legs, and get the heart rate up.
Hot Tip #1: knowing this is a 10-minute test should help you set your power target quite precisely. There are various ways of doing this. I did two things: I looked at my 2024 power curve in Strava, which showed my best 10-minute power was 344W this year. I also looked at the new way Zwift computes FTP (see chart on this post) and did the math to see I would need to hold 359W (my FTP of 310/0.862) in order for Zwift’s computed FTP to match what I have on my profile.
359W seemed way too high for me to hold for 10 minutes, but 340W seemed doable. So I decided I would target 340W, then increase the power later in the test if I was able.
After my warmup, I saved my activity, then picked the Elevation Evaluation route from stage 6 of the Zwift Camp: Baseline section of my homepage. (I was doing this ride as an on-demand free ride of the route, not an event, because the events won’t be scheduled until next week.)
Recommendation to ZHQ: this page should include text explaining the goal of the ride. Right now it says nothing about what I’m supposed to do. Is this a maximal effort across the entire route? Should I do my best for the full The Grade FTP test? (The fact that it’s a 10-minute test isn’t just well-hidden, it’s not communicated anywhere.)
Hot Tip #2: As I neared the base of the KOM, I reduced my trainer difficulty to 0. This is because I knew there was that flat spot partly up the KOM, and I didn’t want to worry about shifting to keep the resistance (and my power) up during what would be a very suffery portion of the 10-minute effort. Setting trainer difficulty to 0 meant I wouldn’t feel any resistance changes due to gradient at all, so I could control the resistance completely by my shifting.
Hot Tip #3: Even though you can do your maximal 10-minute effort at any time during your Elevation Evaluation ride, plan to begin it right at the start line of The Grade KOM. This is the smart move because it gives you an on-screen timer so you know when you’ve hit 10 minutes, plus it shows your power average on screen, so you’ll know how you’re tracking against your target.
I was feeling good as I started out, and at the 2:30 mark (25% in) I was averaging 355W. But I knew it couldn’t stay that high, so I tried to drop my power closer to 340W so I could sustain the effort.
Just past the 5-minute mark, I hit the flat spot on The Grade. But with trainer difficulty at 0, I didn’t need to shift to keep my power up! #winning My power average was 352W at the halfway mark.
The span from 5-8 minutes was probably the hardest for me, because that was the time when my legs were burning and my mind was asking, “Can I sustain this effort for several more minutes?” At the 7:30 mark (75% done) my power average was 350W, and I was suffering.
Once I hit 2 minutes to go, I knew I could hold close to my 340W target through to the end. (You can do anything for 2 minutes, right?) As I neared 1 minute to go, I tried to up my power and empty the tank. When the clock hit 10 minutes, my on-screen power average was 349W, and as the timer ticked over, my avatar almost came to a stop as I finished my effort with hardly anything left. Whew!
Takeaways from the Endurance Test
My 350W average for 10 minutes was a personal best for 2024, so I was stoked with that result. Here’s my endurance performance report, showing my new PB plus my previous 90-day best:
I’m not sure if I could have paced it any better than I did, or pushed any harder, so I don’t have any personal takeaways from the test. I do, however, have some takeaways for Zwift based on my experience with this final Zwift Camp: Baseline stage.
Takeaways for Zwift
First, as already mentioned above, Zwift needs to communicate what they’re looking for in this final endurance test. I reached out and it sounds like they’ll be at least talking about the 10-minute power goal in the event description text, but that doesn’t even come close to solving the problem. Because we know lots of people don’t read that text, plus many folks will complete the tests as an on-demand workout outside of an event!
Zwift’s original intent was to use Elevation Evaluation as a “route-based workout”, where riders would ride the route together in an event, with popup text instructing them on how to execute the test. But for some reason, that ended up not happening, which means riders are sort of left to figure it out for themselves.
At this point in Zwift Camp: Baseline, I’m not sure there’s an easy fix for the 200,000+ people who have joined and will soon be completing the final workout.
Recommendation to ZHQ: maybe Zwift could send an email to everyone after they complete stage 5, detailing what to do for stage 6?
I didn’t receive a performance report email after my endurance test like I did with the Attack and Sprint tests, which seems odd. In talking to internal contacts within Zwift, it looks like there was some sort of bug where a trigger didn’t fire after I finished the route. Zwift needs to be really sure that this sort of triggering is working in a rock-solid fashion, because it’s really important for people to see the reports they’re expecting after giving it their all.
Recommendation to ZHQ: riders should get their endurance performance report emailed over as soon as they save their Zwift activity.
Perhaps even more oddly, I didn’t get my “Zwift Camp: Baseline Performance Report” until almost 24 hours after I completed this final test. That’s way too long to wait for the big final report that everyone wants at the conclusion of the Camp. Why not send it right away? Zwift has their tech-based reasons, but again, I think they need to look at user experience and try to maximize it.
Recommendation to ZHQ: riders should get their Zwift Camp: Baseline Performance Report emailed over as soon as they save their Zwift activity.
The performance report said my “Rider Strength” is versatility. That is, I’m not a sprinter, attacker, or endurance-focused rider… I’m sort of equally good at all three. Or equally bad? 😁 Regardless, here’s the full Zwift Camp: Baseline Performance Report email I received:
As you can see, the email contains the following:
Rider Strength: this section will tell you whether your strength is sprinting, attacking, endurance, or if you’re rather balanced like me. Zwift figures this out by comparing your power numbers to the universe of Zwifters.
Rider Limiter: basically, your lowest percentile ranking against the universe of active Zwifters.
Looking to improve? Zwift points me to the upcoming Endurance Challenge (workouts to help me boost my endurance) which will be available December 23rd. The email also points me to the “Fondo” training plan.
Zwift Baseline wheels blurb: the bottom of the email has a blurb about the wheels you unlock by finishing Zwift Camp: Baseline. It calls them “performance wheels,” but this a more hype than they deserve, since they’re nothing special.
Recommendations to ZHQ: this email could be improved in lots of ways, but at the same time, I get it: Zwift Camp: Baseline was sort of a “proof of concept”, a first go at something Zwift will undoubtedly do again, and in a bigger way. A few improvements I’d love to see:
Under “Looking to Improve?”, I want to be able to click and see the details for the Endurance Challenge or the recommended Training Plan(s).
More details: keep the email simple, but let me click and see my numbers again plus my percentile rank for each of the three tests (sprint, attack, endurance) somewhere under my Zwift.com profile.
Don’t pitch the wheel unlock like it’s something special. Either give me some really unique-looking wheels that I’d want to roll in casual riding just because of their appearance, or give me some wheels that perform really well. The Baseline wheels are just… not super cool looking, and not fast.
Concluding Thoughts
As I’ve already said, I love where Zwift is going with Zwift Camp: Baseline. There’s so much potential for this idea of assessing rider abilities, then recommending next steps.
The Zwift Camp: Baseline program felt a little bit thrown together in places, particularly on stage 6. And you know what? I’m OK with that, as long as Zwift takes feedback on board and iterates to improve the product. Because that’s how development works! I’ve done my best to detail my feedback in my series of walkthrough posts, and I know for a fact Zwift has been reading these articles, and everyone’s comments, to make tweaks to the program on the fly and also improve future versions of it. So that’s all good.
Overall, in going through Zwift Camp: Baseline myself, as well as conversing with folks within ZHQ about it, I really think this is just the start of bigger and better things to come in this space from Zwift. So I’m looking forward to what comes next.
Watch this space for details on the Sprinting, Attacking, and Endurance Challenges releasing on December 23rd as a followup to Zwift Camp: Baseline.
Questions or Comments?
That’s a wrap on Zwift Camp: Baseline for me. How’s it going for you? Share your thoughts or questions below!
If you’ve been on Zwift in the past few days, you probably noticed Christmas is in the air. Santa is flying around Watopia, the trees are decorated, and ugly Christmas sweater kits are showing up in the peloton!
Christmas Sweater kitThe blimp is now Santa’s sleighHQ has been working overtime hanging lights…
Finding Your Ugly Christmas Sweater
Everyone has the ugly sweater kit in their Zwift closet–it’s just hidden behind the default grey Zwift kit! While Zwifting, hit “T” on the keyboard (or visit Menu>Garage), then click “Jersey” to change your top.
Click the default Zwift kit (grey with orange Z), then dash away, dash away, dash away down the road!
Rapha’s Festive 500 began in 2010 as a simple challenge: brave the winter elements and ride 500 kilometers between December 24-31. Since then, riders have covered over 300 million Festive kilometers, including many virtual kilometers after Covid lockdowns opened the Festive 500 challenge to virtual rides.
This year, as in years past, Zwift is working with Rapha to host events and give unlocks to finishers. Here are all the details…
The Challenge
Your task is to ride 500 kilometers (310.7 miles) in eight days, from December 24-31. Outdoor bike, e-bike, handcycle, and virtual rides all count toward the total.
This is all tracked through Strava, so you’ll need to sign up for the Strava Challenge and upload your rides to Strava to be considered an official finisher.
RoboPacer-Led Festive 500 Events
Any miles you do on Zwift count toward the Festive 500 challenge, but Zwift is spinning up RoboPacer-led events to encourage riders to go the distance. Events are scheduled every two hours, and each event includes multiple pace options led by RoboPacers:
A: 4.2 w/kg RoboPacer
B: 3.2 w/kg RoboPacer
C: 2.6 w/kg RoboPacer
D: 2.2 w/kg RoboPacer
E: 1.5 w/kg RoboPacer
Events will be 50 kilometers long and held on the following routes/dates:
RoboPacers are always active in Zwift, leading always-on group rides at a variety of paces.
Zwift will be breaking the RoboPacers out of their normal schedule and moving them to flatter routes during Festive 500 week, so help riders rack up the miles.
Zwift CEO Eric Min is holding a ride on London’s PRL Full on December 28 at 8am ET. (It’s the last route badge he needs to earn). There might be some special kit unlock(s) associated with this ride… watch for a post about it in the coming days.
Check out the ride calendar in Zwift Companion or this ZwiftHacks link to find more fun, long Festive 500 rides.
Questions or Comments?
Are you up for the challenge? I know I’m in, just like last year. Share below!