Why short races might be better (and more fun) than long races
In the 20 years that I’ve been riding and racing bicycles, I’ve come across many people who sport the belief that longer rides and races are better than short ones. And while this in itself is a completely valid opinion, sometimes those expressing this view go as far as belittling anyone that chooses to participate in short races, making it seem that short events are only for the new and inexperienced or the “slow and weak”!
In triathlon (which I did for 10 years) this belief is even more widespread and extreme. A lot of people I know and raced against turned to long-distance racing even while trying to juggle their busy working and family lives and constantly battling with their own bodies. In my tri years I competed in some Olympic-distance races, but most of the time I chose the so-called “sprint” distance. (How anybody could call a 750m swim, 20k bike race and 5k run a “sprint” is still a mystery to me!)
But the same belief is held by the majority of cyclists as well it seems, and is also prevalent in our Zwifty universe. So I want to offer a sort of counterbalance. Here are some of the reasons why I think shorter might be better than longer:
Short races take less time, so they’re easier to fit in. Very handy when you’re time-crunched!
Short races require less recovery time, so you can get on with your normal life sooner. This also means you can ride or race again, sooner!
Short Zwift races are over sooner (duh), but that also means you don’t end up spending several hours trying to get your pulse down to finally get some sleep (yes, I’ve been there several times when I did go for a longer race in the evening after a long work day 😉)
Short races give you the option to really go full gas and enjoy the adrenaline rush. I’ve done some longer races on Zwift (longest was 90 km) which can really turn into a slog. Short races always leave me energetic and happy!
Short races are more inclusive. They lower the entry barrier for those not able or willing to go long.
Like most things in life: quality is what matters, not quantity. And the argument that a short race is not worth the traveling or even to put on all your kit is irrelevant for Zwift racing!
As an extreme example: a guy like Usain Bolt did not have trouble going to all the hassle for races of less than 10 seconds, and you’d be crazy to call him a newbie, weakling or to belittle his impressive career for the fact that he chose short races.
So no problem if you continue to go long, but please give us “shorties” some respect… and maybe try it once in a while. It’s fun!
What about You?
Do you prefer short races, or long? Why? Share below!
How the Race Was Lost: Richmond Blowup (TdZ Stage 6)
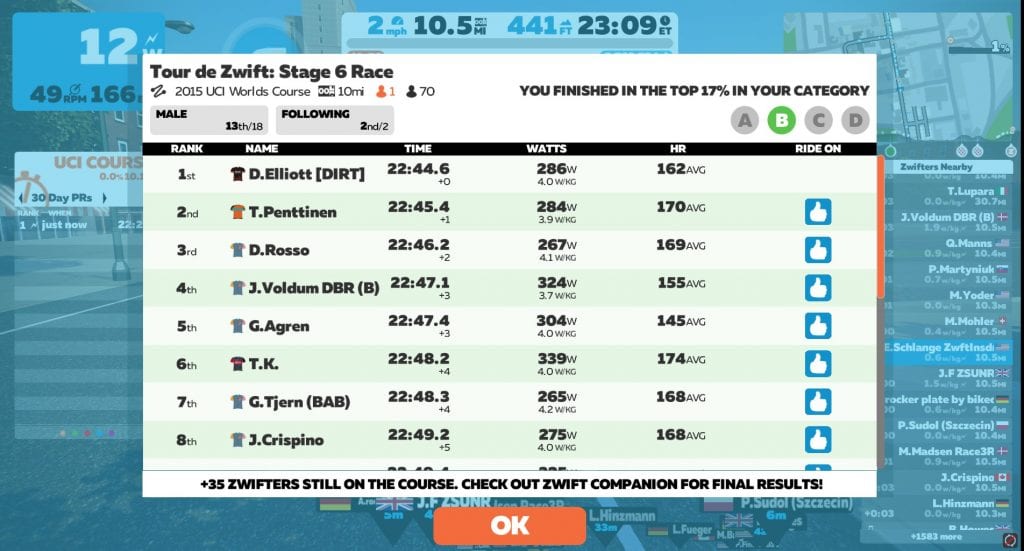
We’re nearing the end of Tour de Zwift 2020, and I’ve been racing each stage. This morning was stage 6: 1 lap of Richmond’s 2015 UCI Worlds route. I was excited to race it, because this is one of my favorite race routes in all of Zwift. I was also dreading it, because I knew it would take everything I had to stay with the front of the race over its three climbs.
Ode to Richmond
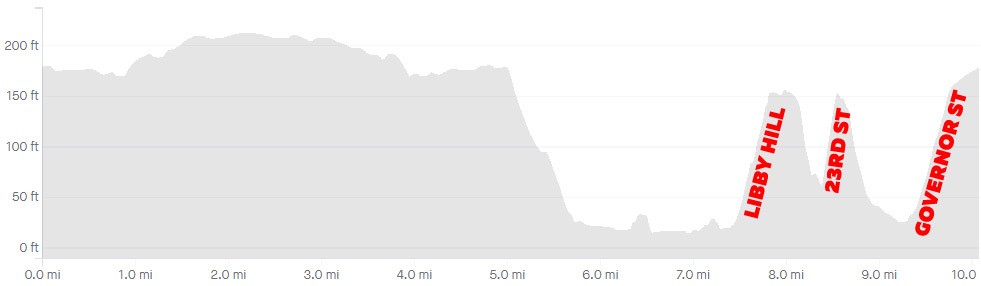
Richmond is the first course I remember racing after joining Zwift back in October 2015. Between Tuesday night ZTR races (3 laps!) and Friday TFC races, I worked my way from a middling to competitive C in that first winter, destroying myself up Libby Hill, 23rd Street, and Governor Street each lap.
I’ll confess – I’m not ashamed. I love Richmond. And it’s an unreasonable love in so many ways, because I’ve never won a race here. The climbs, especially the final Governor Street slog, just destroy me. And the course’s visuals aren’t anything special. But there’s something about how the route lays out which I just love – the flat first half, the hilly back half. Two timed sprint segments on the flat front, two timed KOMs on the butt-kicking back.
And that Libby Hill climb, even though it rips my legs off, is super cool. The cobbles, the twisty-turny road. Best climb in Zwift.
The Warmup
Today’s race was at 7:10am, so I set my alarm for 6am. Hopped out of bed, grabbed my kit, then headed upstairs for my typical pre-race ritual: a piece of caffeine gum and some PR lotion on the legs. Hopped on early and got a nice 35-minute, ~12-mile warmup in on Tempus Fugit.
There were lots of riders on course (like most Saturday mornings), including DIRT teammate Dustin Elliot, who had emailed me earlier in the week to ask when I’d be racing Stage 6. We set up a plan to race this morning together, so he hopped on and warmed up with me in the desert.
The Start
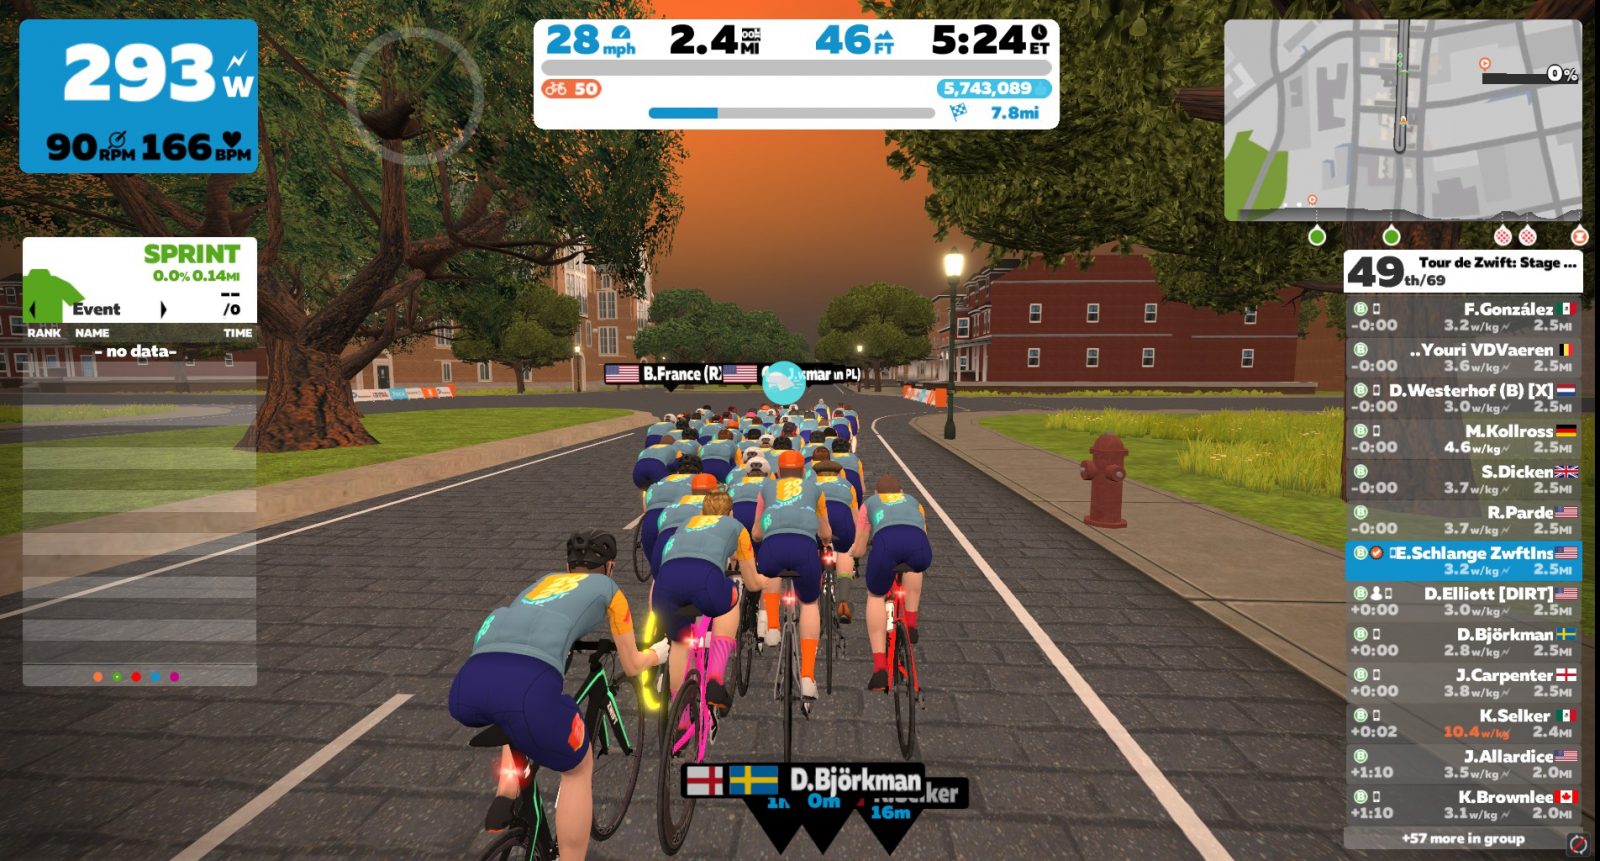
We began with 69 riders, and while the pace was high (we averaged 30.2mph to the foot of Libby Hill), I wasn’t on the rivet. I averaged 285 watts between the start of the race and the beginning of the Libby Hill climb, and my heart rate was 164 – a good hard tempo pace for me.
Unfortunately, it was also a good pace for just about everyone else. In this race, more than any other TdZ stage so far, lots of riders held onto the front – we had 53 of the original 69 still in the front pack when we hit the first climb.
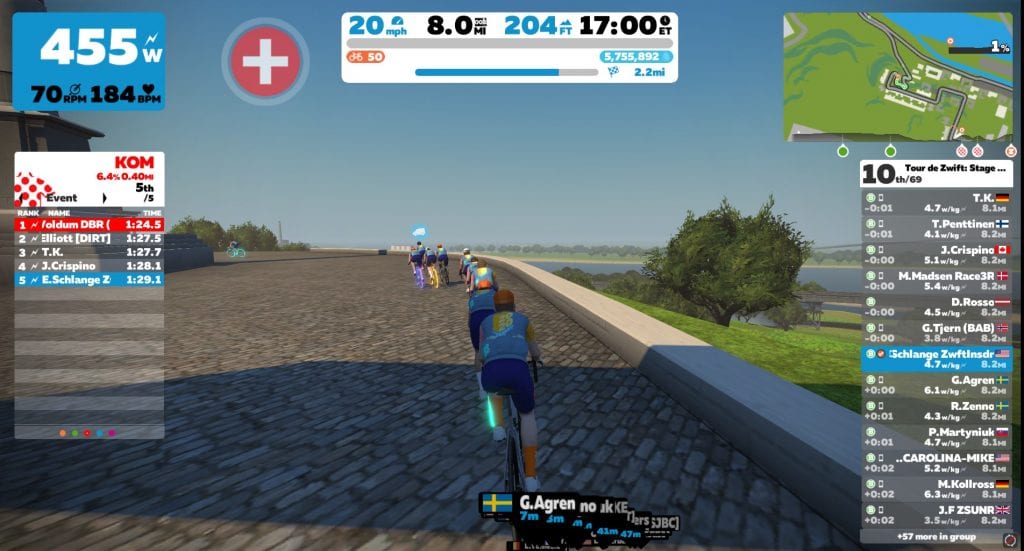
Libby Hill
Do you play race scenarios in your mind prior to the event? I certainly do. For whatever reason (probably because I know the course so well), I had been thinking about this stage a lot more than the other TdZ stages. Here’s the decision I had come to: I had to go all-in to stay with the front pack up Libby Hill. Because if you get dropped there, you’re not coming back.
So I set my mind on that – I would push to hold the wheel of the front pack up Libby, even if I felt like I was going to blow up. And I reminded myself that I would need to keep pushing over the top, because that’s where it’s really easy to get gapped and lose the race. I should know – I’ve done that plenty of times.
Shoutout time: Jonathan Levie (of Zwift Hype fame) launched incredible attacks on the first two Richmond climbs in yesterday’s Pro-Am race. The guy flew up those climbs! I knew I wouldn’t be matching his speed, but I hoped I could channel my inner Levie just a bit in my race.
The first half of Libby Hill (see Strava segment) is actually a paved straightaway which levels out before the road turns to cobbles for the twisty second half. I stayed seated for the first half, making sure I stayed near the front. And when we hit the cobbles I activated my feather powerup, shifted, got out of the saddle, and hammered.
Cresting Libby, still in contact!
45 seconds later we crossed the KOM banner, and I was still in touch with the front group. Yes! (Looking at Strava after the race, I tied my PR for the Libby Hill Climb: 1 minute, 29 seconds).
I kept pushing so I wouldn’t get dropped as the group sped up over the top. Fortunately, the Zwift gods had gifted me an aero powerup, which I used to help me stay in touch with the front group and recover a bit. The race was breaking up, and I knew I had to stay on a wheel or I’d get swallowed by the group close behind.
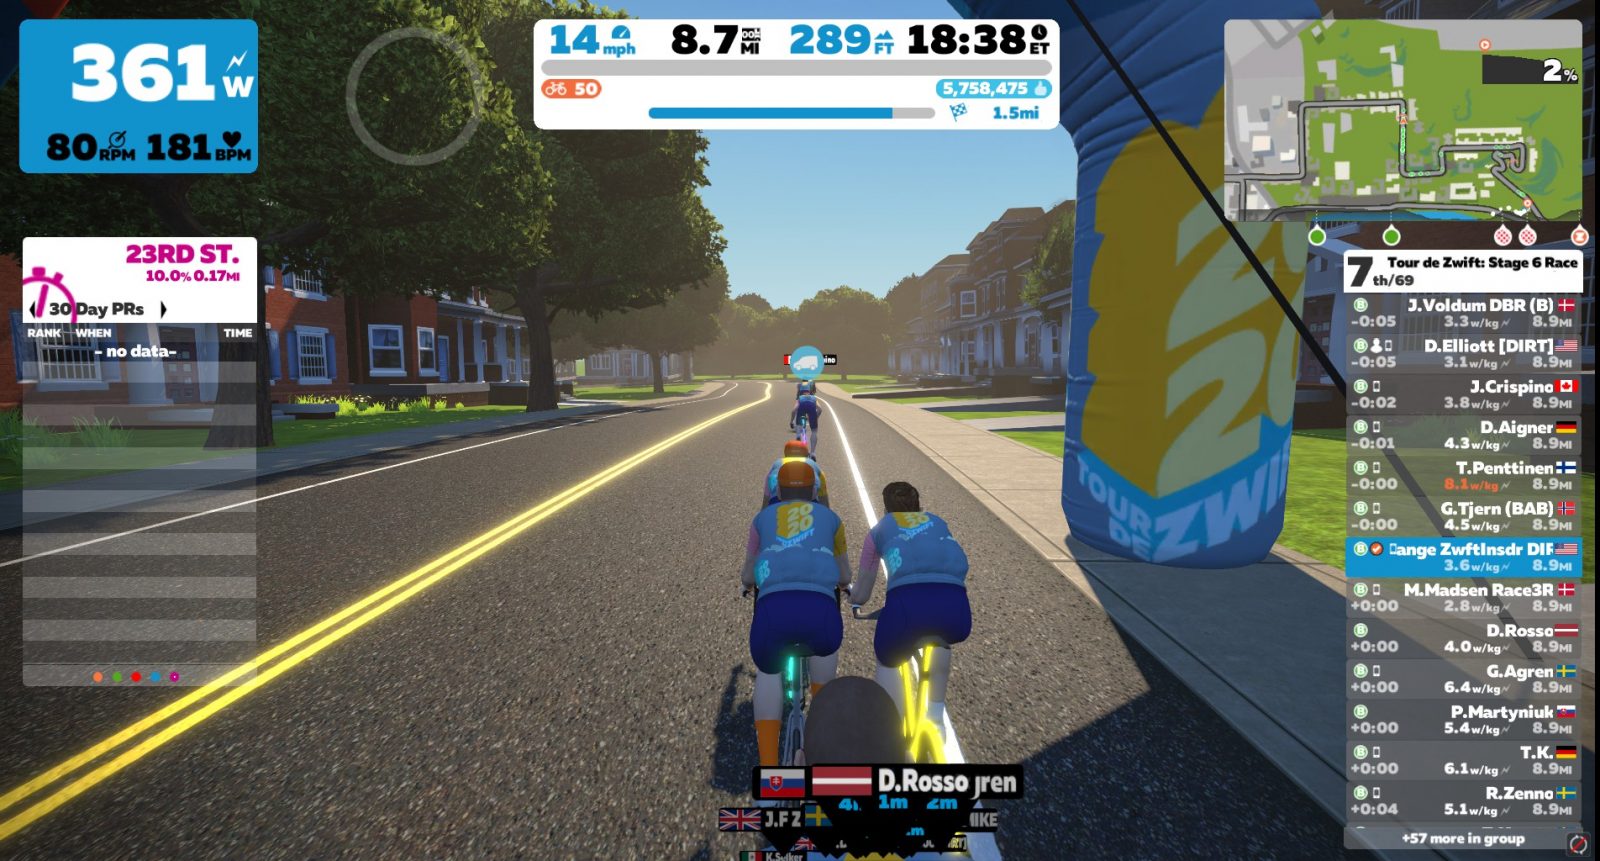
23rd Street
The next climb came quickly. Where Libby Hill is a 90-second effort, 23rd Street is closer to 30 seconds. It’s a good thing 23rd Street is short, because my legs have never recovered at this point! Once again I shifted, stood up, and went all in. Same rule as Libby Hill: stay with the front group at all costs. Conserve nothing.
But I blew up.
The podium rides away
As we crossed the KOM banner, a big gap was opening ahead. The stronger climbers in the group had beasted it up the climb, then continued to hold their power as the road leveled out. Me? I was gasping for air and wondering where my legs had gone. And Linkin Park was ironically singing in my earbuds: “I tried so hard, and got so far. But in the end… it doesn’t even matter…”
As the podium rode away, I found myself in a group of 7 riders. We were the 3rd group on the road. My teammate Dustin was at the front with one other rider, then 3 were chasing them, with us behind. Just one climb remained.
Governor Street
This is the climb that gets me the most on Richmond. It’s only ~2 minutes long, and not quite as steep as Libby, but my legs are always tired by the time I get here. I had a feather powerup which I deployed when the climb began, but it didn’t help much. I was toast. My pack rode away from me, and my new goal became staying away from the group behind.
Waving goodbye to my chase group
The End
One rider chasing from behind caught me as we finished the final climb. Governor Street ends in a false flat, staying around 1% all the way to the finish line. It feels like an insulting, slow-motion slap in the face. It’s brutal, and many riders get caught out by starting their sprint too early.
Lucky for me, I had no sprint left. The next rider was a few seconds back and not going hard either, so we threw in our towels by silent mutual agreement and crossed the line, completely spent. 22 seconds behind the winner, in 13th place.
As I caught my breath and scrolled up in the results, I was happy to see my buddy Dustin took the win in the race! What a stud.
We used Discord to chat during the race, and it was clear he was having a much easier time of it than I was. Looking at his power numbers, this course suits him well – he’s got the wattage to hang on in the flats, and the watts per kilo to attack the climbs and shake off the heavier hangers-on like myself.
I’d like to say I contributed to his win in some way, but that would be a complete lie. I was just trying to survive, but he killed it!
DIRT win!
Takeaways
Once again, it’s the climbs that got me. Check out my heart rate graph overlayed on the course profile!
I’m not sure there’s anything I could have done to get a better result in this race. I couldn’t have gone any harder to hold the wheels of those who got away, and if I had eased off to hang with the group that eventually caught me, I would have gained, at most, a single place in the overall results.
So I’m happy with the execution of my race plan. It didn’t lead to a win, but I maximized my results, and at the end of the day, that’s all you can do.
One good thing: this race is a good reminder that I need to shed a few pounds to be more competitive. I’ve been working on doing so for the past week, and I’m down a couple of pounds and feeling good. Fewer cookies. More riding. It’s not rocket science, but that doesn’t make it easy!
What About You?
Have you raced stage 6 yet? How did it go? Share below!
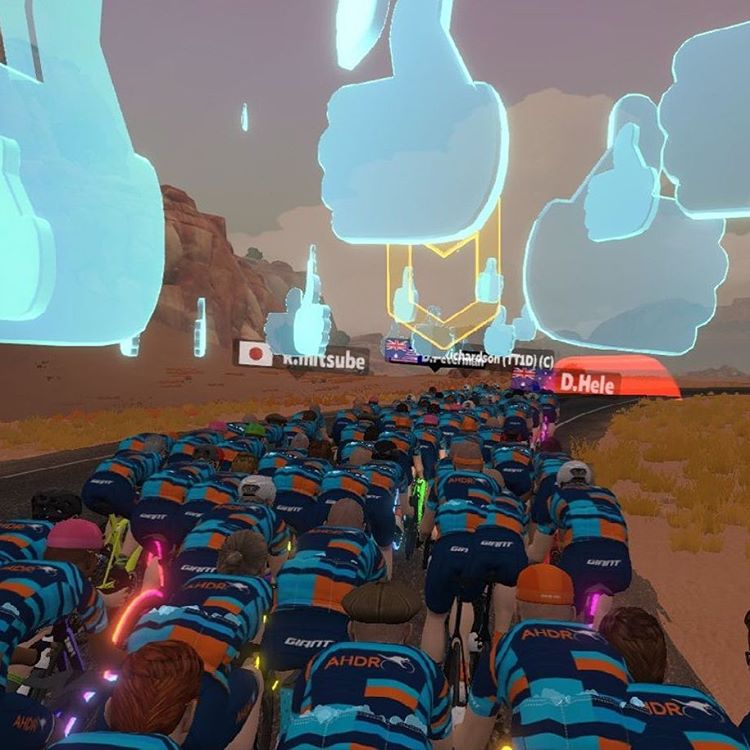
The humble “Ride On” is one of the unsung hero ingredients in Zwift’s magic sauce. Think for a moment what Zwifting would be without those glowing blue thumbs. Yes, we could still ride and run in our virtual paradise. But that feeling of being connected to others around us would be diminished substantially.
The Ride On helps tie Zwifters together socially. And it encourages each of us each to push forward in our journey toward fitness. Here are my top four favorite Ride Ons:
The one from some dude I ran into free riding one day. We ended up traversing Watopian slopes together for 2+ hours, developing a bond as we suffered together.
The ones from my DIRT teammates. Many of us have followed hundreds of other DIRT guys, so we can easily show support for one another.
The one from my local riding buddy. We’ll see each other IRL soon enough, but in between that, he’s letting me know he supports my efforts.
The one from Eric Min. It feels like some sort of validation/appreciation for my hard work – on Zwift, and on Zwift Insider.
With that preamble, I humbly offer three Ride On wishes – feature requests which I believe would improve the Ride On experience for everyone. Read on!
We used to be able to tap our rider arrow in Companion and give 5 Ride Ons to nearby riders while we were in an event. That feature was taken away quite a while ago. I’m not sure why, although I would guess it had to do with some group rides calling for “Thumbderstorms” where riders handed out scads of Ride Ons to others. Perhaps it caused some server or graphics performance issues?
Regardless, we need this feature back.
It’s silly, really: I can tap my arrow and give a Ride On to 5 nearby Zwifters when I’m free-riding, but I can’t do that in an event. Here’s the thing: it’s in the events that I want to do this most!
When I’m free-riding, I don’t generally hang with other riders for long – most of their names just become a blur after a while. But in an event, you get to know other riders. You message with them, you compete against them, you work together with them. Camaraderie is forged in the fires of mutual suffering! Those are the times when I want to give a Ride On. But doing so is way too much hassle right now – especially in a race or hard ride situation.
I can do it from my keyboard, clicking on a rider’s name, hitting the thumb icon, then clicking “Back to me”. Or I can do it from Companion, clicking to view nearby riders, then tapping a name, then tapping to give them a Ride On, then tapping to get out of that screen.
But I really just want to tap my arrow in Companion and give Ride Ons to those around me in an event. Easy peasy.
Rapidly Reciprocating Ride Ons
Update: Zwift’s Play Controllers have a handy button (Z) to reciprocate a Ride On.
If a nearby rider gives me a Ride On, a button shows next to their name for a few seconds for me to click and return their thumbs up.
Problem is, that button is a pain to get to, especially if I’m pushing my effort at the time. So many times I’ve tried to mouse over to that button, only to have it disappear before I could get there.
What I’d really like to have is one or both of these:
A keyboard shortcut to return the Ride On. Anytime a nearby gives me a Ride On, I could just tap the “R” key to give them a Ride On back. Of course, not everyone has a keyboard on Zwift, so…
A Companion button to return a Ride On
Tweaking “Your Week On Zwift” Ride On Count
The “Your Week On Zwift” email is cool, but I’d like the number for my “given” Ride Ons to include all those I give when I’m not on Zwift. The “Received” number, at least in my case, is largely made up of Ride Ons given by people who aren’t actively on Zwift when they give me the Ride On. So my “Received” number is always much higher than “Given”, even though that’s not the case in reality.
Most of my Ride Ons are given via the Companion app when I’m not Zwifting. I love hitting that button at the top-right that gives a Ride On to all my active friends – usually 40 or more, sometimes over 100!
I’d like the email summary’s “Given” number to include my offline Ride Ons because I want to see how many Ride Ons I’m really giving each week, so I can compete with myself to give even more!
Your Ride On Thoughts
Got other ideas for improvements to the Ride On system? Share below!
ZwiftPower is an incredibly useful tool for Zwift racers. Not only does it show final race results (including crucial features like disqualification of those who don’t conform to race rules), it also ranks riders, lets you search upcoming events, and browse segment leaderboards for all timed laps, KOMs, and sprints in game.
This week, James Hodges (the programmer behind ZwiftPower) released a new feature: team rankings! Find it under Rankings>Teams.
The rankings are separated by gender as well as category, so while one team may be top-ranked in the A category, another team may be winning in C.
How Ranking Works
To understand how team rankings work, you first need to know that all riders on ZwiftPower have their own individual ranking score. The lower your score, the better.
(We won’t go into the details of how that ranking score is calculated, as it is rather complex and already explained thoroughly on ZwiftPower’s site. Go to Standings then click FAQ in the top-left to read how scoring works.)
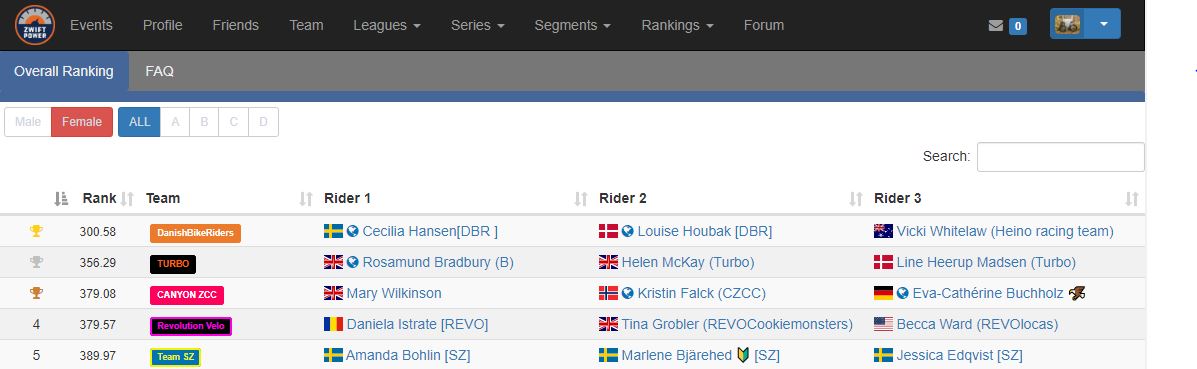
To calculate team rankings, ZwiftPower chooses the 3 highest-ranked team members for each category then averages their ranking score to create an overall team score. Teams are ranked on this overall score.
Example: currently the highest-ranked women’s A team is DanishBikeRiders. The three highest-ranked riders on that team are:
If you average their points, you get 300.58. This puts them in 1st place, ahead of Team TURBO whose score is 356.29.
More Competition, More Teamwork
This new team rankings feature adds some new levels of competition to Zwift racing:
Team competition: entire teams, but especially the three highest-ranked riders in each team, now have an extra incentive to perform well, as their rankings affect the overall team score.
Competition within teams: if you’re close to being one of your team’s top three riders, but haven’t quite made it, this may give you more motivation to improve your results.
It also sets up a situation where lower-ranked riders have an incentive to work for higher-ranked team members whose score is affecting the overall team score. And teamwork is always a good thing.
So kudos to James at ZwiftPower for rolling out yet another killer feature. Keep up the good work!
Your Thoughts
What do you think of ZwiftPower’s new team rankings? If you’re on a team, have you heard any talk about trying to boost your team’s ranking? Share below!
Bologna’s tough climb launched a dramatic breakaway in Stage 4 of the Tour de Zwift Pro-Am. Men from 22 teams took to the start, including pro teams Canyon DHB, Hagens Berman Axeon, Ribble Weldtite, and Virtus. Two laps of the course included two ascents of its steep hill, finishing at the top. Racers earned points for their teams according to their positions at the top of the first climb and the finish line.
Scottie Weiss of team Cryo-Gen attacked the first hill at a brutal pace. He had been disqualified in Stage 2 because, as stated by Zwift, his “performance could not be verified with outdoor or test data.” He was allowed to race again using different equipment, and he rode like a fire had been lit under him. Only Virtus’ Christopher McGlinchey joined him out front. Could they stay ahead? Would their teams beat the previous winners, Canyon ZCC?
Hosts OJ Borg and Hannah Walker set the stage for the race, and Hannah joins Nathan Guerra to provide commentary. Before it starts, you’ll also see the inspiring story of Zwift racer and community leader Rachael Elliott.
Alongside the Tour de Zwift in 2020, Zwift is hosting a series of invitational Pro-Am races that feature both professional and amateur cyclists. These points-based races are live-streamed so you can follow the action. See the schedule here >
Help Us Help Others: Take Our Zwift Cycling Training Plan Survey!
January and February are the most common months for Zwifters to start up a new training plan, and we want to help you pick the best Zwift Training Plan for you. So we’re surveying Zwifters to learn about their experience with Zwift’s cycling training plans!
Your responses will be used in a report posted on Zwift Insider which includes ratings and comments for all Zwift training plans, from Zwifters who have actually worked through the plans.
If you’ve ever started a Zwift training plan for cycling (even if you didn’t finish it!), please click the link below to take our quick survey. It should only take 1-2 minutes to complete, if like many Zwifters you’ve only tried one or two training plans.
After their dominant performance in Stage 1 of the Tour de Zwift ProAm, could anyone dethrone DBR (Danish Bike Riders)? Sixteen other teams of women, including pro teams Twenty20 and Canyon//SRAM, stepped up to the challenge. Only team Turbo came close last time.
Stage 3 took racers to the reverse hilly route on Watopia for two laps. Riders earned points for their teams based on their position across the line at the two QOM (Queen of the Mountain) banners, the two sprint banners, and the finish. The team with the most points would win the glory.
The top 5 riders at the first sprint banner were all from different teams, setting up an exciting race. But DBR started to show their strength with Cecilia Hansen and Louise Houbak on the first climb…
See a full replay of the race below, including Nathan Guerra’s live commentary. Hosts OJ Borg and Raya Hubbell introduce the teams and some riders to watch, before Zwift Insider’s very own Eric Schlange takes us through the course!
Alongside the Tour de Zwift in 2020, Zwift is hosting a series of invitational Pro-Am races that feature both professional and amateur cyclists. These points-based races are live-streamed so you can follow the action. See the schedule here >
When it launched in 2014, Zwift grabbed cyclists’ attention because it enabled real-time interaction between riders: a social platform. And this is truer today more than ever: the interaction with other humans, the camaraderie developed over time, and the friendships built on the platform are motivating and valuable.
But sometimes, you may just want to ride or run solo, and there’s nothing wrong with that! We’ve had several Zwifters ask us how to do this easily – here are three ways.
Solution #1: Turn Off Your Internet Connection
Once you’ve logged in and started your Zwift activity, turn off the Internet connection on your Zwift device. This will remove all other Zwifters from view, and remove you from their view.
It is quite easy to turn the Internet connection off on most devices – a click or two on Mac, PC, iOS, and Android. It’s more of a hassle on AppleTV, but can be done there through the Settings menu or by simply unplugging your ethernet cable if you’re using a wired connection.
Here’s the important part: reconnect the Internet before you save your activity and exit Zwift! This will allow the activity data to sync up with your account at my.zwift.com as well as Strava or other third-party connected apps.
Gotchas
Turning off the Internet may be the simplest way to ride alone on Zwift, but it also means your Zwift device will be without an Internet connection during your activity, which may be an annoyance. Additionally, your fans won’t be able to give you a ride on during your activity. If either of these an issue, try this next approach…
Solution #2: Firewall
This solution is really only practical if you’re running Zwift on a Mac or PC. Both macOS and Windows have built-in software firewalls that allow you to easily create rules governing the data flowing in and out of your computer. The nice thing about the firewall approach is it lets you maintain an Internet connection on your device while riding solo on Zwift.
Simply put: if you turn off outbound traffic to certain UDP and TCP ports via a firewall, all riders on course will be hidden and you will be hidden from their screens.
You will need to set up and enable two different firewall rules – one for UDP traffic, the other for TCP.
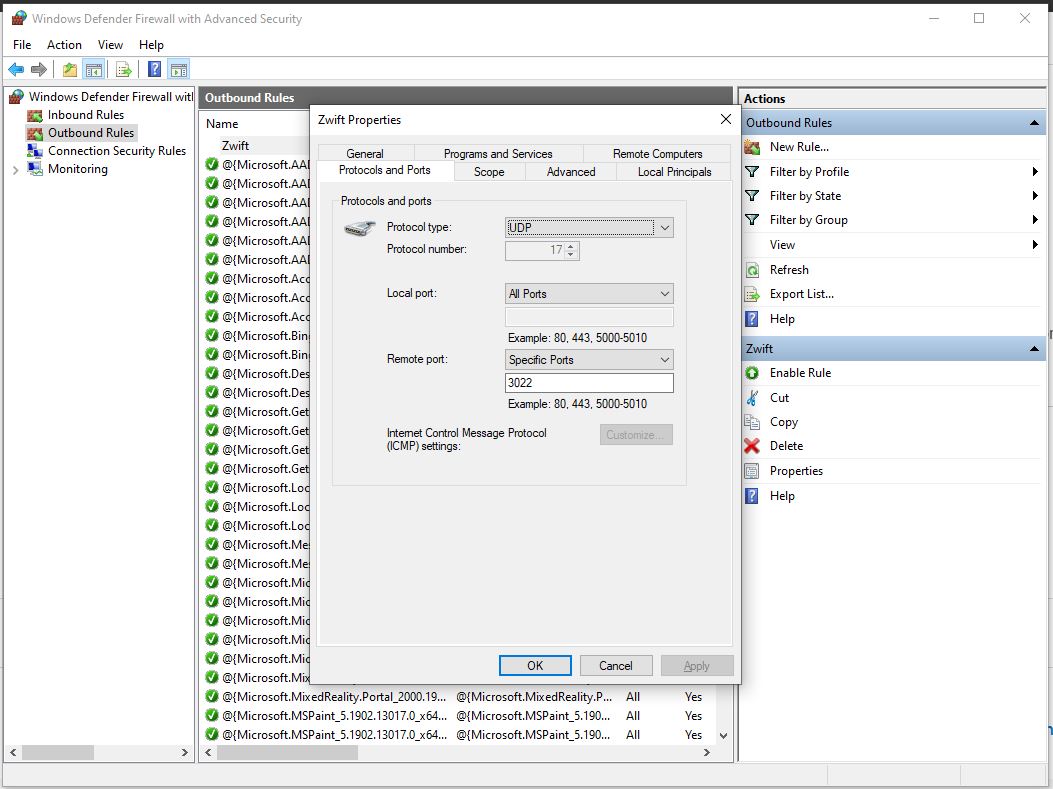
Setting up your UDP firewall rule on Windows 10:
Open up the Windows Defender Firewall app
Click “Outbound” then click “New Rule”
Select “Port” from “What type of rule would you like to create?”
Select UDP, and enter 3022,3024 as the “Specific remote port”
Choose “Block the connection” (which is the default)
Let the rule apply to Domain, Private, and Public (which is the default)
Give it a name such as “Zwift Solo UDP” and click “Finish”
Done! The rule will automatically be enabled, but you can click to disable it and ride with others anytime you’d like.
Setting up your TCP firewall rule on Windows 10:
Open up the Windows Defender Firewall app
Click “Outbound” then click “New Rule”
Select “Port” from “What type of rule would you like to create?”
Select TCP, and enter 3023,3025 as the “Specific remote port”
Choose “Block the connection” (which is the default)
Let the rule apply to Domain, Private, and Public (which is the default)
Give it a name such as “Zwift Solo TCP” and click “Finish”
Done! The rule will automatically be enabled, but you can click to disable it and ride with others anytime you’d like.
We won’t include instructions for macOS or other Windows versions here, but the rules are pretty simple to create, and you can always delete the rule if you think you messed something up.
Gotchas
We use this firewall method for much of our Zwift Insider Labs speed tests, and occasionally we’ve had issues with Zwift crashing if we boot up Zwift with the firewall enabled and begin our activity. To avoid this, boot up Zwift with the firewall setting disabled, then only enable it after you’ve begun your activity.
With the advent of Pack Dynamics 3.0, we’ve found that if you start riding with your firewall rules not enabled, then turn them on, riders will still appear on screen. The only ways around this are:
Enable your firewall rules before you get into the game
After you enable the firewall rules from in the game, and you’re still seeing riders around you, try popping into a different world. You shouldn’t see any riders there. Then go back to the original world you were in – riders won’t show there either.
Solution #3: World Hack
This last solution doesn’t ensure you’ll be riding solo, but it will greatly reduce the number of riders on course. If you use the world tag hack to access a world that isn’t today’s scheduled guest world, the only Zwifters there will be other world hackers or those participating in an event – and chances are those event participants will be hidden from view.
World hacking, therefore, is a nice way to get yourself into a barely-populated map, if that’s what you’re looking for. Learn all about the world tag hack >
Questions or comments?
Do you like to ride alone on Zwift sometimes? How do you accomplish it? Share below!
Each brief lap included an ascent of Innsbruck’s “leg snapper,” a short but brutal hill that threatened to end some teams’ chances early.
Community teams went head-to-head with pro teams Canyon p/b Soreen, Hagens Berman Axeon, NTT, Ribble, SEG Racing Academy, and Vitus. They weren’t just aiming to cross the finish line first, but also each lap’s intermediate sprint banner. Riders earned points for their team based on their position in the sprints and at the finish.
Alongside the Tour de Zwift in 2020, Zwift is hosting a series of invitational Pro-Am races that feature both professional and amateur cyclists. These points-based races are live-streamed so you can follow the action. See the schedule here >
In 2020, alongside open Tour de Zwift group rides and races, Zwift is hosting a series of invitational Pro-Am races featuring both professional and amateur cyclists. These are held once every four days, before the start of the next Tour de Zwift stage. And they’re also live-streamed so you can follow the action! See the schedule >
In Stage 1, women from 12 teams raced two laps of the Classique course in London. In this points-based race, each team competed to earn the most points at two intermediate sprints and the final finish banner. Riders earned points based on their position through the banner at each of these times, with the first person across getting the largest amount.
The race’s short length guaranteed it would be intense. The sprints in the middle meant the women could not let their guard down. How did the community teams fare against the pros in Canyon//SRAM and Twenty20?
 than long races")
")