Zwifters have recently seen the release of a highly anticipated feature, the Coffee Stop. Included in this week’s top 5 Zwift videos is a video all about the new feature plus a roast of a Zwifter’s race, a rundown of the latest game release, a first Zwift race back, and an incredibly fast category B race.
Zwift Coffee Stop Feature: All The Details // Q&A
Shane Miller, GPLama is back with a video covering the details of Zwift’s new Coffee Stop feature, including some Q&A for the feature’s functions.
Rob’s Sunday Zwift Racing Roast
Everyone loves a good laugh. As a host of the In The Drops podcast, Zwifty Zwifter (Rob) provides commentary for another Zwifters race, pointing out the rider’s mistakes and giving advice to viewers. Also, take a look at that cool overlay!
Zwift Game Update + 2 Hidden Updates
Mac users rejoice! Tariq Ali from Smart Bike Trainers recently discovered that Zwift has made a few graphical improvements for M2 devices. In this video, he gives a rundown of the latest release along with details on a few changes that Zwifters might not have noticed.
Back to Zwift Racing
After a four-week break from racing on Zwift, Matt from Target 2.5 takes a look at his latest race, the Target 2.5 Chase Race. Throughout the video, he provides an update on his fitness and provides commentary on the race.
Incredibly Fast Category B Race
Oli Chi from ZRace Central recently raced in Stage 2 of the Crit Club series, and it ended up being one of the fastest races he has ever done. Watch as he fights to stick with the group around the twists and turns of the Downtown Dolphin course.
Got a Great Zwift Video?
Share the link below and we may feature it in an upcoming post!
In the past month we’ve seen an unprecedented number of unreleased Zwift features leaked in various Facebook groups, YouTube videos, and Reddit posts. Some of these leaks are clearly purposeful teasers on Zwift’s part, while some were found by curious Zwifters/hackers who know how to dig deep.
Today I’ll try to summarize these leaks in a single post. But I must preface this with two disclaimers:
Just because a feature was found by a Zwifter/hacker (Zwacker?) doesn’t mean its launch is imminent. We’ve documented various Zwacker finds over the years that never made it into the live game.
The features, visuals, etc uncovered by Zwackers should be considered “under construction” at this time. Some of them, such as the Climb Portals, are clearly unfinished.
With that said, let’s dig into six different things Zwifters have uncovered in recent Zwift updates!
Climb Portals
Zwift has already announced their upcoming “Climb Portal” feature, set to arrive sometime this summer (read more here) in Watopia and France. We’ve now seen two video leaks of this feature.
Then YouTuber thePainCave posted this video of the France alternative, which is labeled “Cote de Pike” in game. Cote de Pike is a 1.4-mile climb featured in the 2023 Tour de France:
It’s worth mentioning that the sort of “unskinned” environment shown in these Climb Portal leaks is not what we’ll see in the final product. Sources within Zwift tell us these leaks show GPS-accurate gradients, but not the proper visuals – not surprising given the hacky nature of accessing the Climb Portal!
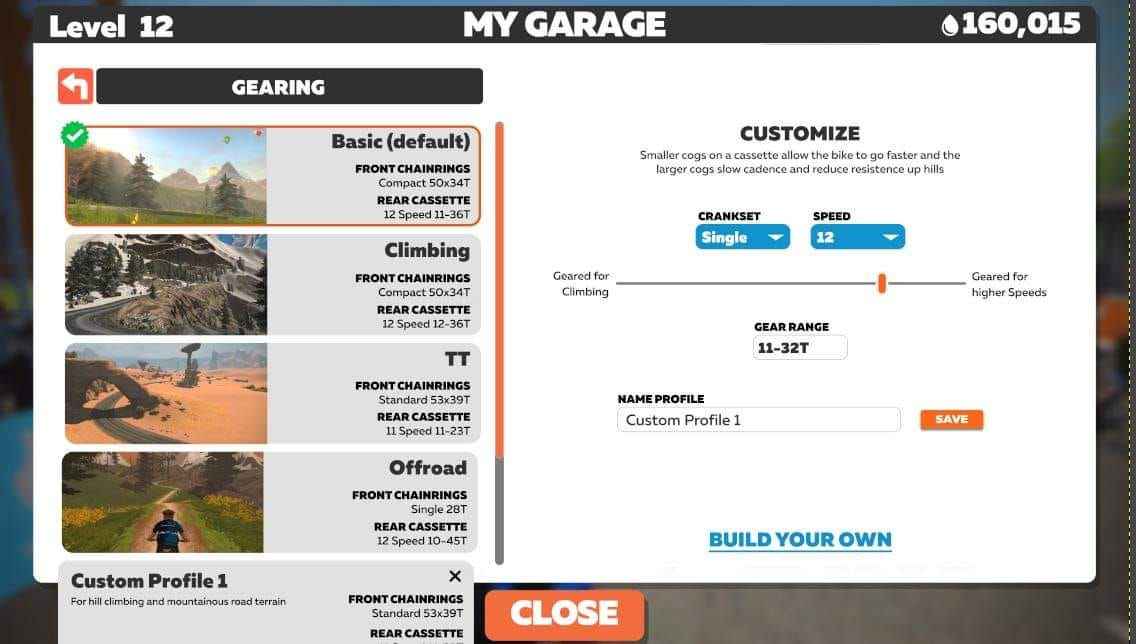
Z Cog
The eagle-eyed James Eastwood spotted this photo in the game files of version 1.39:
What is it? It’s a screenshot of a UI we’ve never seen, where Zwifters can save different bike profiles based on the front chainrings and rear cassette setup. (Hopefully that bike profile includes a frame and wheels!)
What are we looking at here? We think it’s a config screen for Z Cog, a piece of hardware first leaked by Zwift in December 2021, when they leaked the Zwift Wheel trainer concept. Back then, Zwift said “Z Cog: Zwift Wheel is built around a single cog design with virtual shifting, unlocking compatibility with all bikes from the box.”
Very interesting. Z Cog seems to be hardware you install on your smart trainer in place of a normal cassette, then use some sort of shifting interface to virtually shift using your trainer’s resistance. Your physical chain would no longer shift between different cogs on your cassette – rather, your trainer’s resistance would change to emulate moving between cogs.
This would open up a whole world of virtual gearing options – and let low-geared riders on mountain or gravel bikes avoid spinning out in sprints.
A source at Zwift told me this image caught them by surprise as well, since it was linked to the “paused” smart trainer plans from December 2021… so it’s possible Z Cog isn’t even an active project at this time. But if it is active, there are big Z Cog questions left unanswered at this point. Would this only work with the Zwift Hub trainer? And how do you control the virtual shifting? Speaking of controllers…
Clearly this is Zwift purposely teasing some sort of hardware. What are they teasing exactly?
On the Facebook thread, Zwifter Jack Lee pointed out that Zwift recently filed for FCC ID approval for a product named “Play Controller” (see the filing here). Digging into that filing you can see there are left and right controllers, they are battery-powered, and Bluetooth-enabled.
Braking
We’ve assumed that Zwift is working on braking ever since they added the pens to the top of Alpe du Zwift and Ventoux.
James Eastwood posted a video of an Alpe du Zwift descent where the rider is braking into the corner. You can see a slight red path ahead of the rider as they brake, and it turns green when the rider is at the proper speed:
While auto-braking can easily be done by the game (it already exists on London’s Classique hairpin), it would make sense for Zwift’s new “Play” controller to include braking capabilities. Much like steering (where Zwift auto-steers for riders without steering hardware while allowing those with hardware to manually steer), it would make sense for Zwift to allow for manual braking, while auto-braking anyone who enters a turn too quickly.
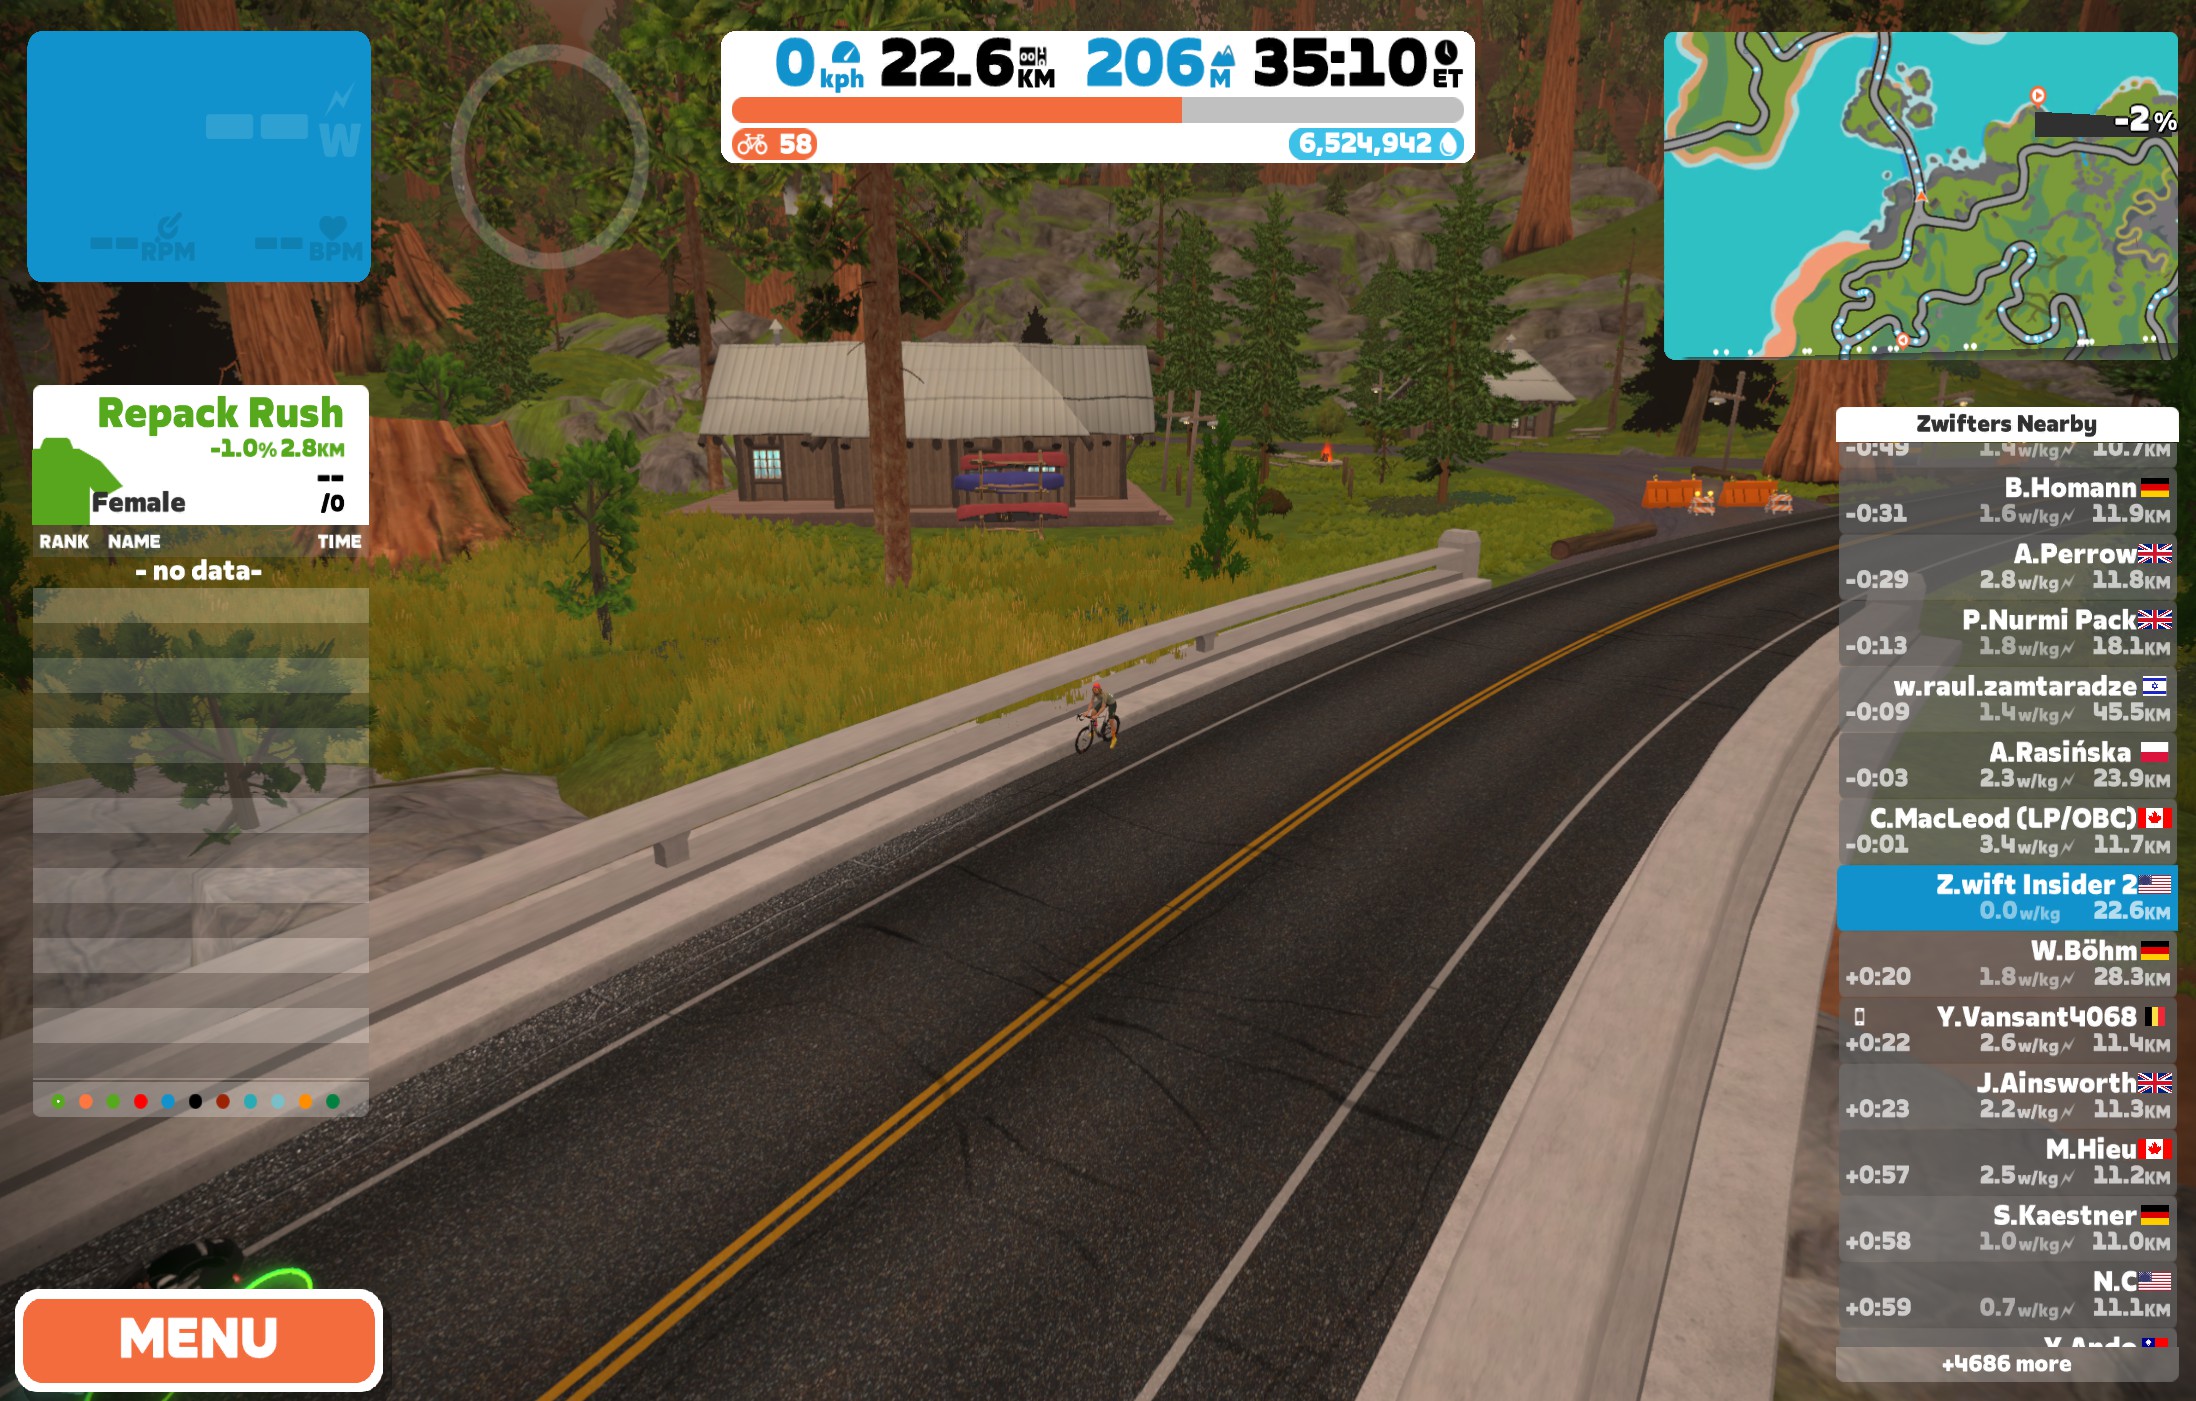
Repack Ridge (Rush)
When Zwift released version 1.39 on May 3, they included this note: “Repack Ridge is temporarily closed while we work on exciting improvements.”
Riders can visit the entrance to Repack Ridge and see a new paved section, new start pens, and more. This paved road rambles near Repack Ridge’s dirt singletrack, but extends longer and eventually meets up with the road descending from Saddle Springs, just before crossing the bridge to Ocean Boulevard. Based on the leaderboard title seen in Dave Higgins’ Climb Portal link (approve), this new road appears to be named “Repack Rush”.
Entrance (near Repack Ridge entrance)Exit (bottom of descent from Titans Grove exit)
What does Zwift have going on here? On Zwifter appears to have hacked in and posted a video on YouTube showing the new Repack roads, and they’ve got some very interesting features.
The new Repack appears to be a new steering game with time bonuses and sections to ride over (or avoid) which either boost or reduce your speed.
All of this is reminiscent of “game” discovered by Zwift Hype years go which lived inside one of the temples in Watopia’s Mayan Jungle. That game never went public, but this new Repack road seems to be much more intentional, and we think it will go live soon.
Teleporting
Zwift co-founder and co-CEO Eric Min is famous for leaking upcoming features in his Strava activities. Last week, he posted this Zwift ride which clearly shows him bouncing around various Watopia roads:
What do you think of these unreleased features? Are any particularly exciting or surprising to you? I think braking could really change the feel of races, especially on courses like Crit City.
Zwift released Pack Dynamics 4 in early April, and over this past weekend announced three race events testing the next iteration, labeled Pack Dynamics 4.1.
If you’d like, you can read the entire announcement from Zwift’s David P., who led the charge on PD4 and is continuing to lead the charge with dialing in Zwift’s Pack Dynamics. I’ve summarized it below.
Pack Dynamics 4.1 Changes
Harder Overtaking
Overtaking someone that is not drafting should now be harder. With the goal of reducing “churning” at the front of groups, for you to overtake someone that is not drafting you will need to put out enough “net power”.
Net power is the power to overcome the opposing forces as if you are not drafting. So basically you will be “tested” as if you are not drafting to see if your power is enough to produce the speed to overtake. This doesn’t necessarily mean you need to do more raw power or watts/kg than the person in front.
Dynamic CdA Changes
Zwift now has the possibility to configure CdA penalties or bonuses in three different situations:
While drafting
While not drafting and “attacking”
While not drafting
For this initial iteration, there are only changes to the first two situations.
While drafting, you will have an increased CdA, which is the equivalent of you raising your upper body and having a greater frontal area, just like you see your avatar doing.
If you are not drafting and your power is 10% above your last 10-second average power you will get a 5% CdA decrease, which is the equivalent of a more aero position.
Zwift says they have not changed the baseline CdA (while not drafting), because that would involve a big discussion into slowing everything down on Zwift, which is what David calls a “last resort measure.”
Draft Cone Changes
Zwift can now configure some important parameters of the drafting mechanics:
Draft cone angle
Draft fall-off
Draft scale
For the first test events the draft cone will be narrower, the fall-off will be “steeper” (meaning the draft will be stronger closer to someone but will diminish greatly when there is a gap), and also the draft scale will be higher in “high draft situations”, so deep in a big group the draft will be stronger.
Ride a Test Event
The three test events happen tomorrow – see them and future PD41 test events at zwift.com/events/tag/pd41. They are all 2-lap events on the Sand And Sequoias route, which is a nice choice for testing flat roads as well as rolling roads and climbs. Categories will start separately.
Zwift says it’s possible that pack behavior in the first events will be very different from usual. However, if the changes are in a good state, other race organizers may soon be able to request PD41 for their events so that more events start using it, just like last time with the PD 4 tests.
Questions or Comments?
If you participate in a test event, be sure to post your feedback on the forum thread.
30+ Twitch Zwift streamers. 147 hours. One purpose: suffering to raise money to fight and cure childhood cancer. It’s the third annual “Kilometers 4 Kiddos” fundraising event!
Starting today (Monday, May 22) at 6pm Mountain Time (midnight UTC), more than 30 cyclists (and maybe a few runners) will each livestream back-to-back, 3-hour blocks on Twitch to raise money for St. Jude Children’s Research Hospital.
Most of their activities will take place on Zwift, and each streamer will be creating and tackling their own challenges in the name of fundraising. Some might do monstrous climbs to entice you to support them, while others may sprint whenever you donate. Some are adding lighthearted fun to their suffering, like wearing a costume or dancing during their workout for donations. Everyone has created their own form of misery or amusement to make sure every dollar donated is worth your time and money.
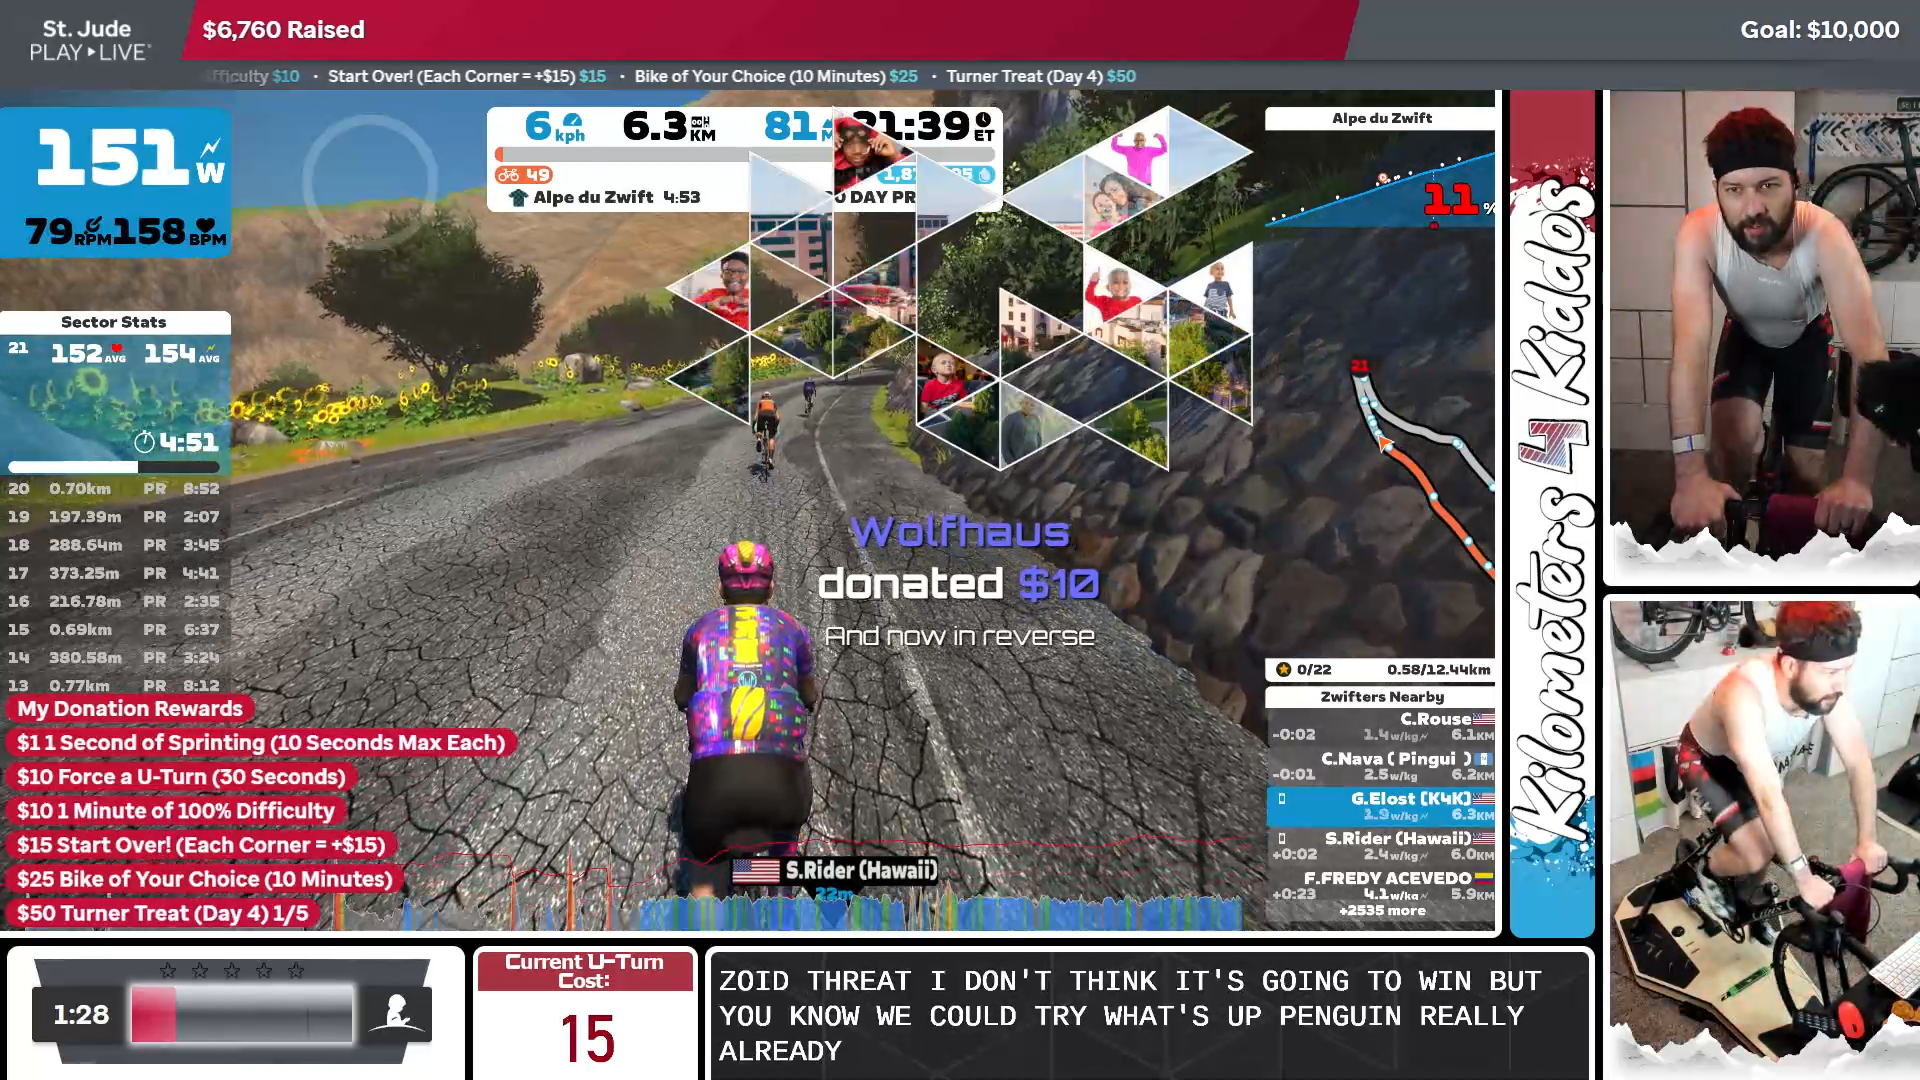
GeneralElost’s viewers donate to make him U-Turn on the Alpe du Zwift during the Kilometers 4 Kiddos charity campaign
How to Watch
There will be 147 hours of Zwift or other cycling-related content to watch this week, and it’s sure to be entertaining. You can catch the action live or after the event by going to any participating streamer’s Twitch channel.
To know who is streaming and when, head over to kilometers4kiddos.org and check the schedule on the main page. Click on the link beside a person’s name to go to their stream. If you’re not familiar with Twitch, you can navigate to twitch.tv and plug in the rider’s username after the backslash, or just check out the Zwift category and look for “K4K” in the title. A Twitch account is not required to watch, but joining the chat can make things more fun!
How to Support
Want to help support the cause by donating? Stop by any Zwifter’s stream you want to support and look for their Tiltify link in order to donate. Tiltify is a safe third party that works directly with charities to make sure 100% of all money donated makes it to their pocket. You will get a receipt to use for your taxes.
Watching live will let you interact with streamers when you donate, redeeming “rewards” for challenges or something fun. If you don’t get the chance to do that, make sure to check out the team page. You can pick an individual rider’s campaign to support or just donate to the main team (all funds go to the same place).
You can help without donating, too, by spreading the word or just cheering the Zwifters on in their streams.
About Kilometers 4 Kiddos
The streaming marathon was started and is organized by GeneralElost, who goes by that name on both Twitch and Zwift. The previous two campaigns together raised a total of $58,000, and the collective goal for this year is $30,000.
“I’ve been fundraising on stream for St. Jude for 6 years now,” he says. “A few years ago, I felt comfortable to a point where I wanted to bring new fundraisers into the fold. It’s best to keep it to what you do best, and at the time, that was Zwift. And I like a challenge.”
Each Zwifter has their own reason for joining the fundraiser, whether they’re inspired by their own experiences, their loved ones, or just the chance to help a great cause through their love of cycling.
“I had childhood cancer when I was 6, and if I can make sure no other child has to go through what I did, I can feel like I accomplished something,” GeneralElost says.
“Cancer [really] sucks and I don’t want anyone to have to go through it,” says jhardy66617. “I lost my mom to cancer, and I can’t imagine a parent having to go through that with a confused kid who doesn’t understand why they’re in pain and the kids on TV get to go to Disney.”
The mission of St. Jude Children’s Research Hospital is to advance cures, and means of prevention, for pediatric catastrophic diseases through research and treatment. Consistent with the vision of founder Danny Thomas, no child is denied treatment based on race, religion, or a family’s ability to pay. Unlike any other hospital, the majority of funding comes from individual contributions. And thanks to generous donors, families never receive a bill from St. Jude.
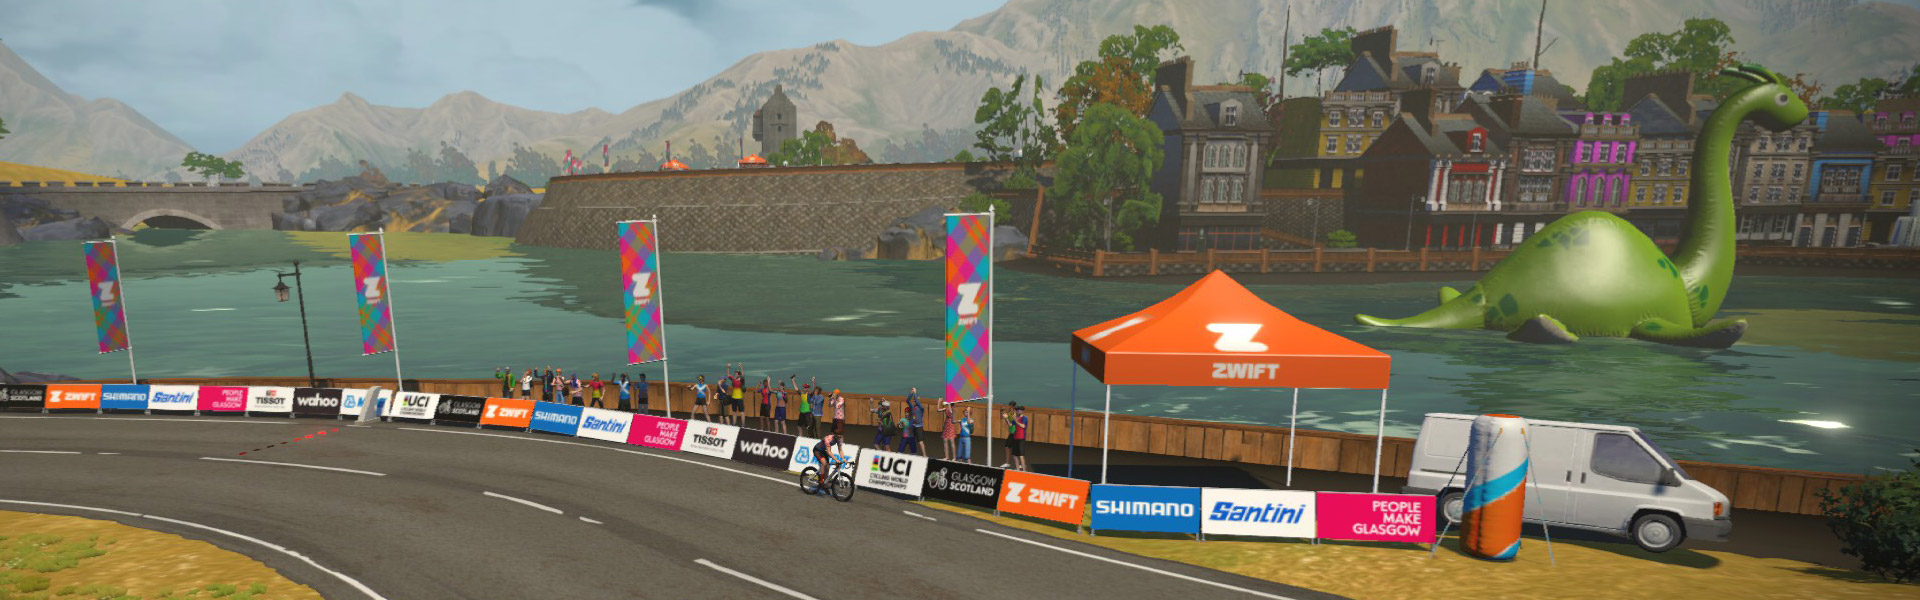
Zwift’s Scotland map has beautiful views and purpose-built racing segments including the Sgurr climb, Glasgow Crit Circuit, and of course Breakaway Brae.
But there are only 5 official Scotland routes, so we decided it was time to create some thoughtful new Rebel Routes. Today we introduce the shortest Scotland Rebel Route thus far.
At just 1.89km in length, “Nessie’s Loop” is the shortest of our new Scotland Rebel Routes. This quick loop always has the Loch in its center and includes the rarely-ridden Breakaway Brae Reverse climb each time around.
One of this route’s Nessies!
About Rebel Routes
“Rebel Routes” are Zwift rides not available on Zwift’s routes list, thus requiring manual navigation.
The reward for your rebel ride? Exploring a new route, knowing you’ve gone where few Zwifters have gone before. And a Strava segment rank in the tens or hundreds instead of the thousands! Rebel Routes are also included as a separate category on our Veloviewer Route Hunter leaderboard.
Route Description
We begin by choosing Loch Loop from the list of Scotland routes and flip a u-turn at the start to get us pointed in the right direction. This puts us on the right path for a lead-in of approximately 3km which takes us up through Corkscrew Castle and over Breakaway Brae Reverse to the Breakaway Brae banner where our loop begins.
This short loop begins in the “Tower” and descends almost immediately before taking a hard right onto the Loch bypass road which winds its way over the Loch. Look right for the inflatable Nessie – or look left and you may spot the real Nessie.
Turn another right and you’re climbing back to the Tower. Hit it hard when you see the Breakaway Brae Reverse start line and grab the polka dot leader’s jersey!
Once you hit the Breakaway Brae banner a second time, you’ve completed the loop. Ready for another go?
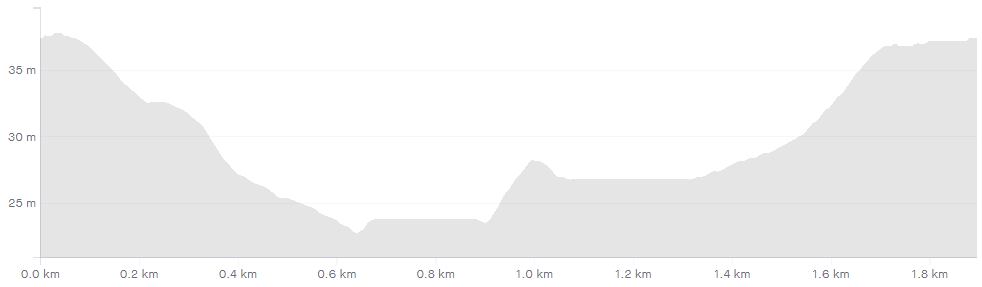
Profile
A few short flat spots on this circuit, but you’re essentially descending at the start then climbing to the finish. Wash, rinse, repeat!
Getting Started + Lead-In
The easiest way to get started is to choose Loch Loop from the list of Scotland routes. Flip a u-turn at the start, then ride a short lead-in (approximately 3km) to the Breakaway Brae KOM banner where the loop begins.
Turn by Turn
Here are the turns you’ll need to make to successfully complete Nessie’s Loop after starting from the Loch Loop spawn point:
U-Turn
Straight (left) to Tower (this is during the 3km lead-in portion)
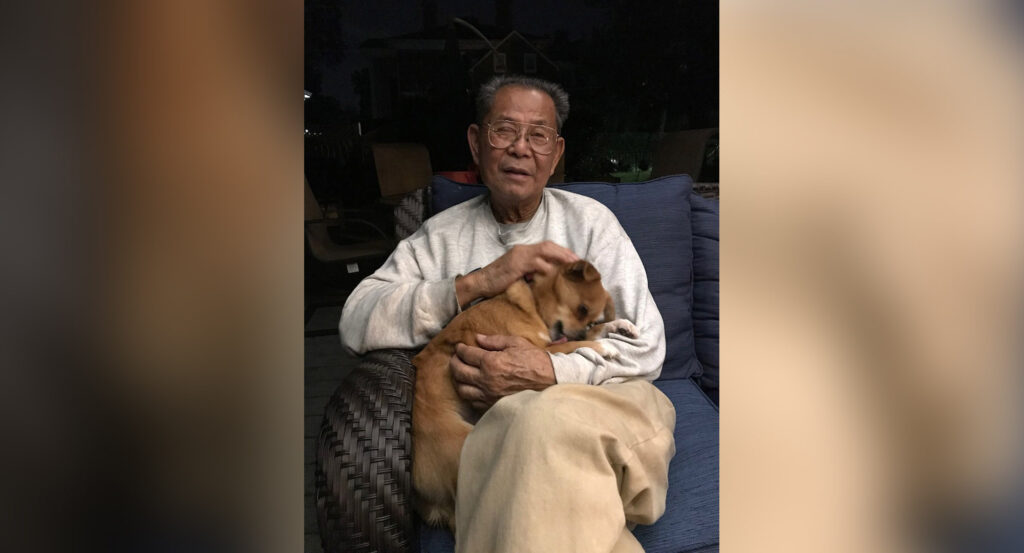
For some time now I’ve been off kilter. Specifically since August 10th of last year. Why August 10th? That’s the day my dad died. Dementia took him. It was horrible to watch.
Everybody deals with grief differently. I know this. I never realized it would affect me this way. Up until his health began to decline I was active. I was motivated. I was doing. Since? meh. It’s had a profound effect on me. I’ve found myself retreating to my own corner of the world. I feel like I’ve alienated myself. I’m unmotivated. I’m going through the motions. I’m phoning it in as they say.
I hear of so many people who have a close bond to a parent. A mom. A dad. A grandparent. An uncle or aunt even. A really tight bond. Best friends, some would say. I don’t think I had that with my dad. Or at least I didn’t think I did. Don’t get me wrong, the relationship I had wasn’t contemptuous or distant. Just not buddy buddy. My dad just wasn’t that type of person anyway. But I find myself missing the various interactions we DID have. I miss being able to talk with him and teach him about the Tour de France. I miss being able to tell and show him the new installs on the RV or the latest gadget I discovered. I miss the quirky way he always answered our weekly Sunday phone calls. I just miss him.
When he died, I told him that I would honor him in some way. I vowed that, in 2023, I would do something, anything, to memorialize his struggle. On June 21st, the longest day of the year, I will do just that. I’m going to push myself physically and mentally harder than I’ve ever pushed myself before. My dad struggled for months. I can struggle for one day.
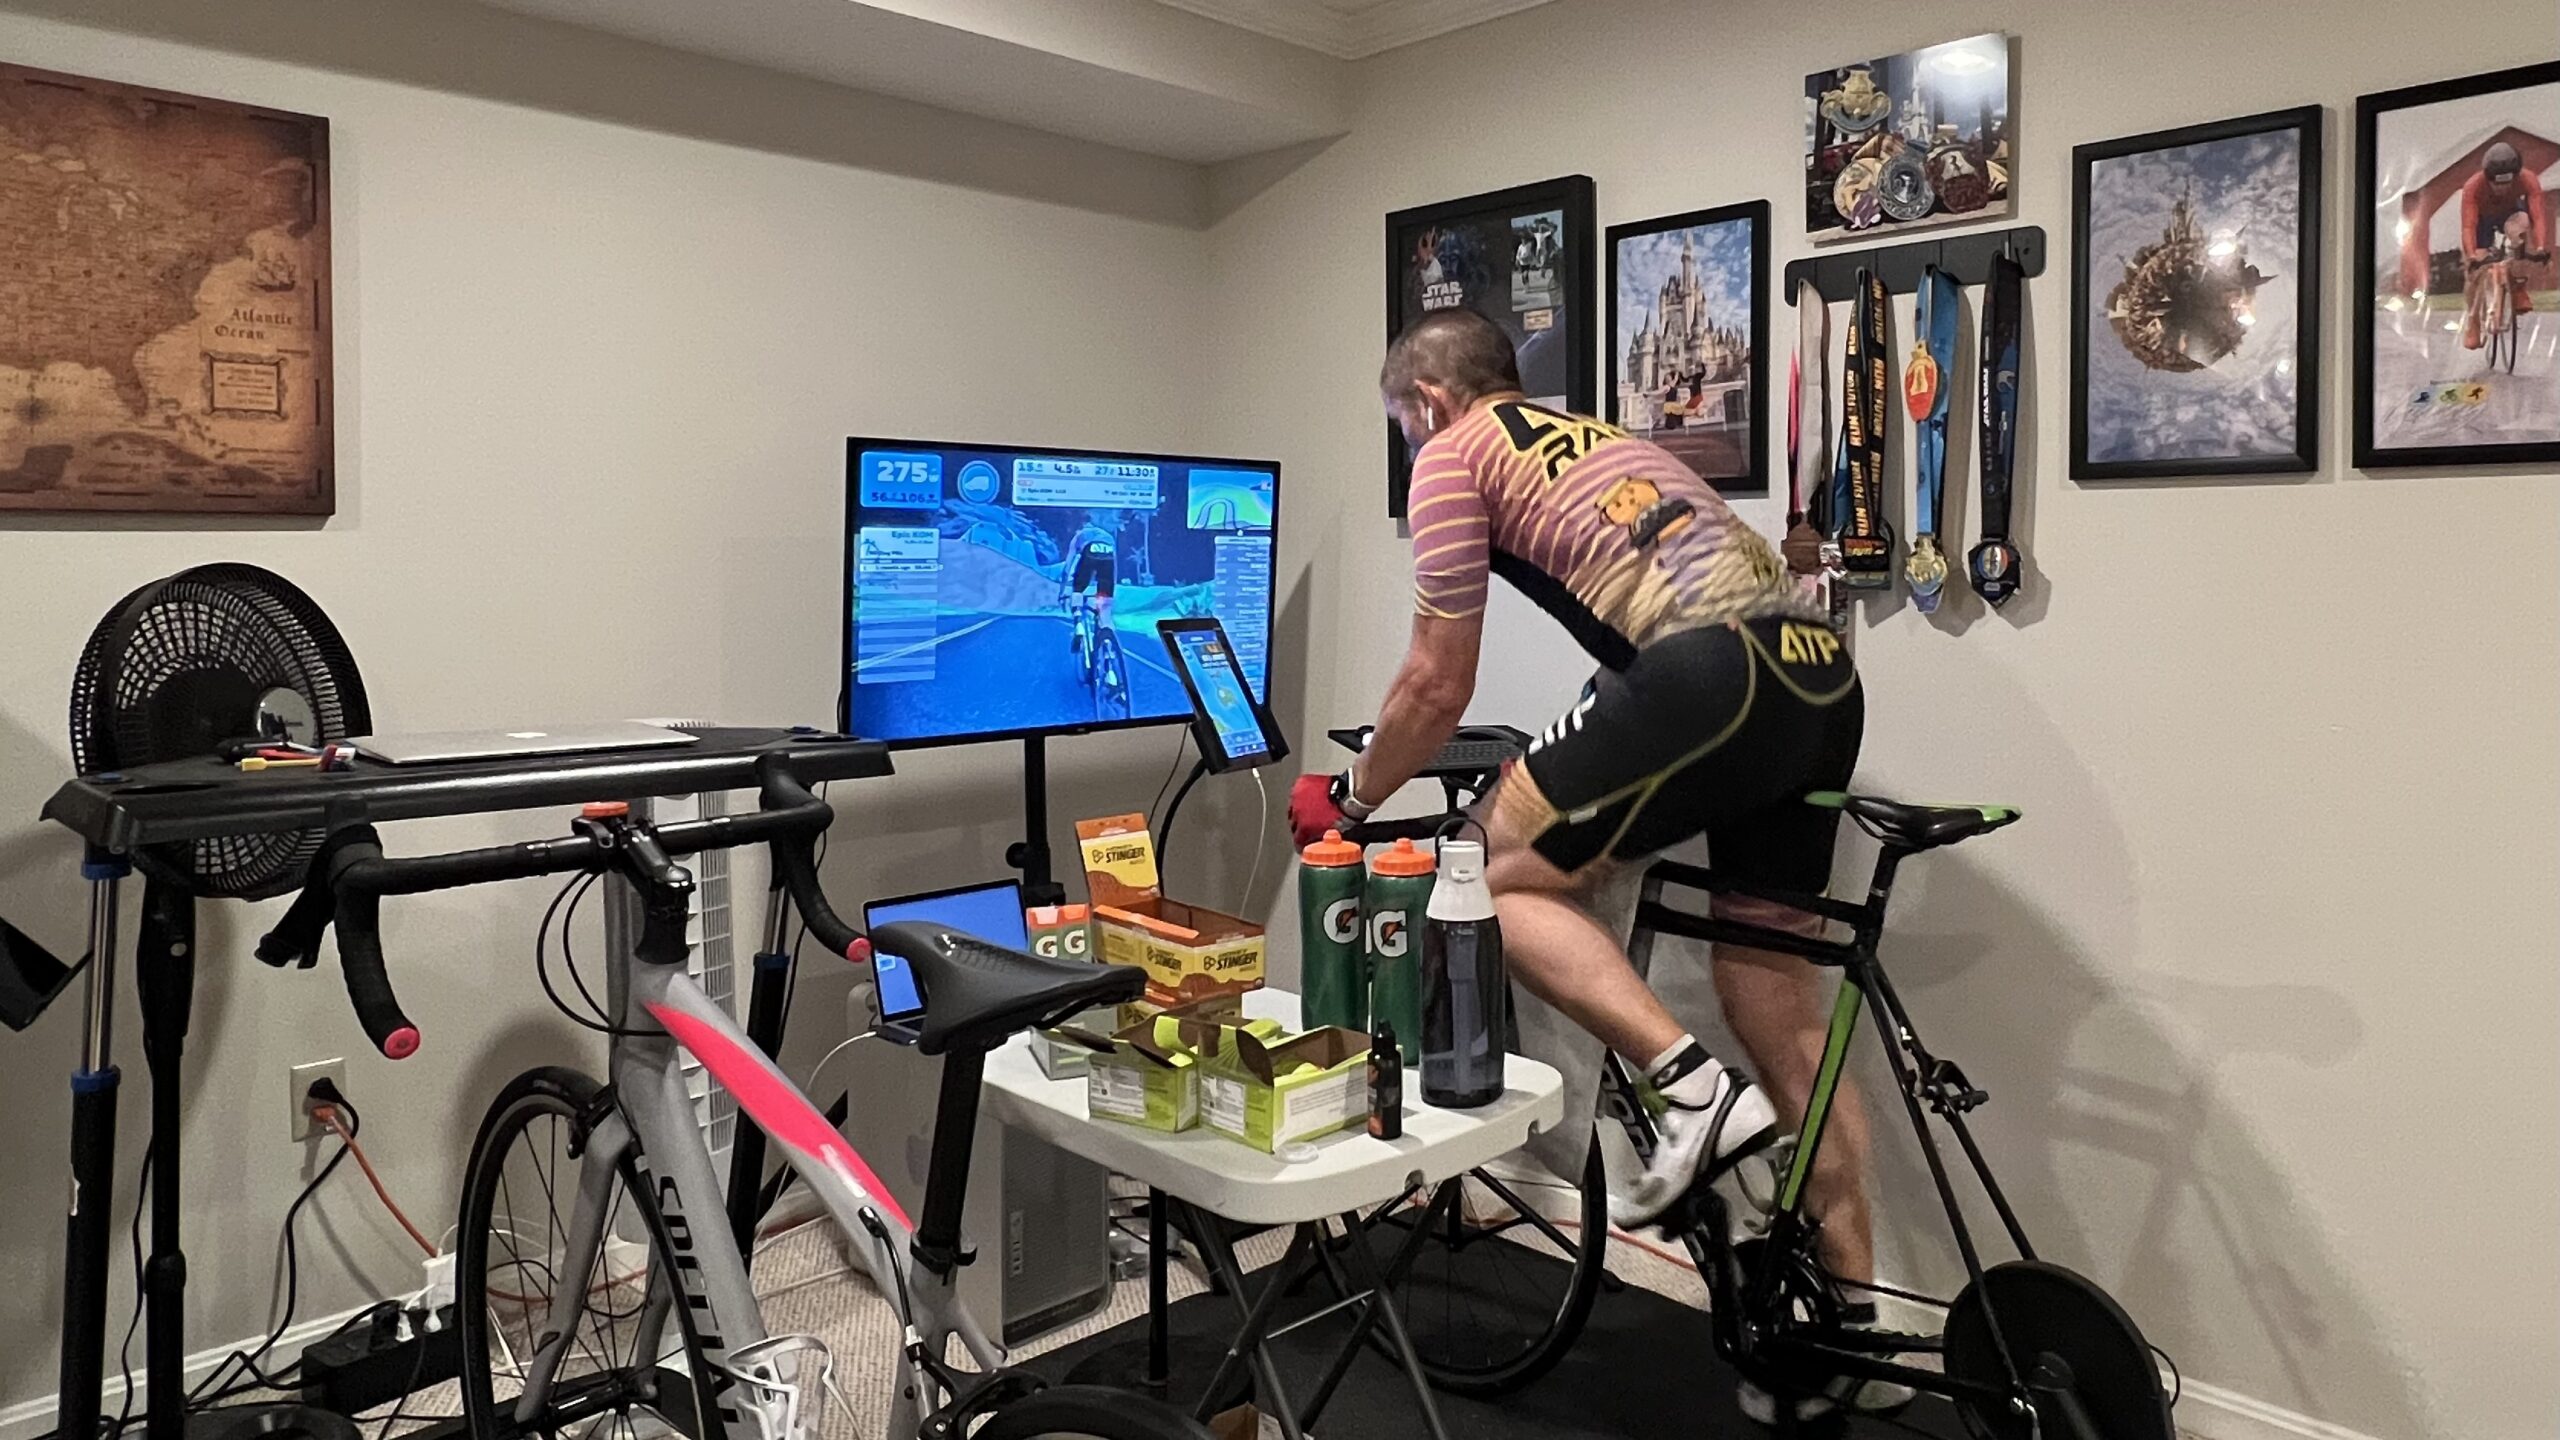
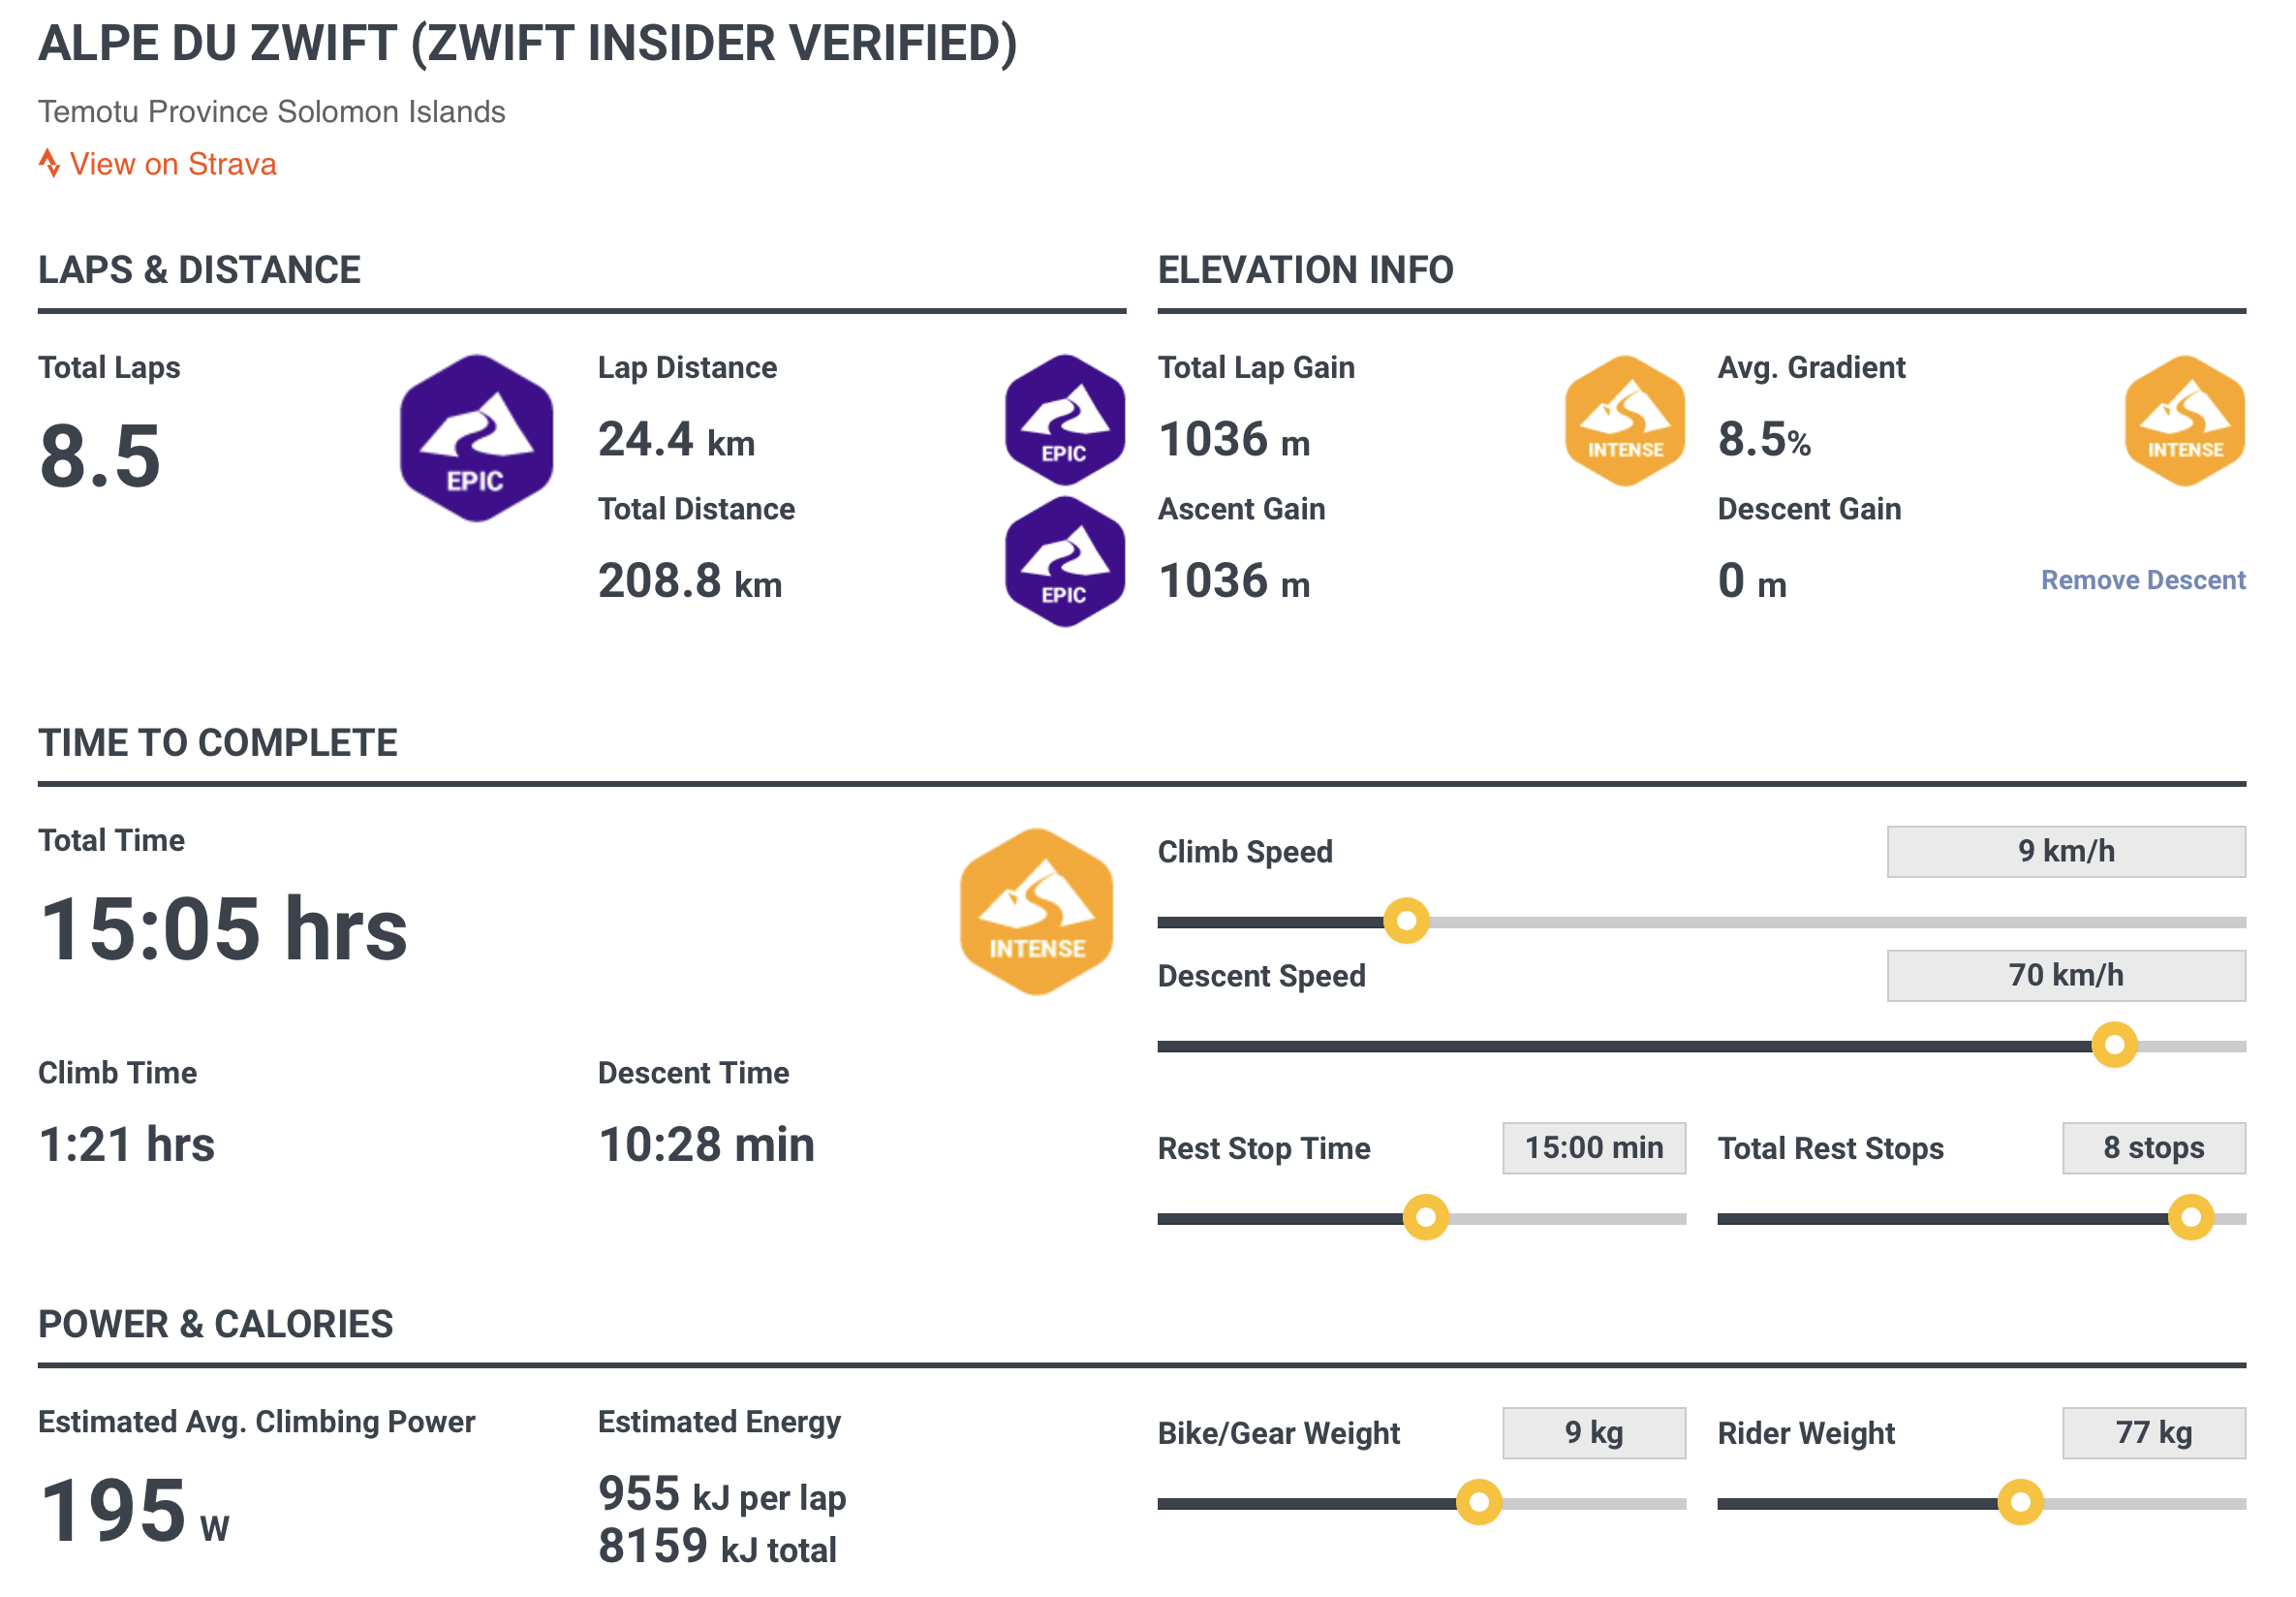
I’ll be vEveresting beginning at 4am on June 21st, riding my bike on my indoor trainer and climbing the equivalent of Mt. Everest in a single activity. 8,848 meters. That’s 5.5 miles of going up. It WILL take me the better part of the longest day to complete. The official Everesting website has me completing it in about 15 hours – only an estimate.
I’m by no means the first to attempt/accomplish this and will not be the last. I’ve known about this challenge for years now, but have never had the interest in completing it. Until now. You see, the Alzheimer’s Association has “adopted” the longest day of the year as their day of fighting for this terrible disease – “The day with the most light is the day we fight®.”
Yes, it’s a fundraiser, but I’m doing this for a couple of reasons. Mainly, my dad. Secondly, I think I need to push through this wall I’ve created and come back. Back to work. Back to the world. Back to myself. You can certainly donate at any time, but more importantly, at least for me, join me. Join me in the fight. Join me on the ride itself. If you’re on Zwift, find me, follow me, ride with me.
When ordering a Zwift Hub, Zwifters select the cassette they want: 8, 9, 10, 11, or 12-speed. In theory, this means the Hub arrives compatible with the Zwifter’s bike. Remove your back wheel, mount your bike on the Hub, and you’re ready!
But some SRAM users have requested the ability to swap out the Hub’s freehub body (which is a Shimano Hyperglide-compatible body) with an SRAM XDR-compatible one in order to mount a SRAM 12-speed cassette. Why would someone want an XDR-compatible freehub body?
Using a SRAM-manufactured 12-speed cassette provides optimal shifting smoother performance for SRAM drivetrains.
Selecting a Zwift Hub cassette with the same gear range as your bike’s cassette keeps your gearing “feel” consistent indoors and outdoors. (The 12-speed cassette shipped with Zwift Hubs is an 11-30, but standard SRAM Eagle 12-speed MTB cassettes are 10-50 or 10-52. That’s a difference you will feel!)
Selecting a Zwift Hub cassette with the same gear range as your bike’s cassette minimizes the need to readjust your shifting when swapping on and off the trainer.
Note: Purchasing a SRAM cassette? Be aware that SRAM manufactures 12-speed cassettes compatible with Shimano HG drivers. Verify SRAM’s specifications to see which cassettes are for XD/XDR/HG drivers.
Step 2: Follow these instructions to remove the Hyperglide freehub body and install the XDR freehub body in its place.
Step 3. Determine if your SRAM 12-speed cassette is for use with road/gravel (XDR) or mountain bike (XD) drivers. XDR drivers are 1.85 mm longer than XD cassettes, and require a 1.85mm shim behind the largest cog to take up that extra space. More information about the difference on SRAM’s website.
Step 4: Only if needed – install one 1.85 mm spacer. Then slide the cassette onto the driver. The splines are shaped in a way that will allow the cassette to slide on in one position. Follow the instructions on the Support Hub.
Welcome to my week 9 “Build Me Up” (BMU) training log.
About this Series: I’m journaling my way weekly through Zwift’s “Build Me Up” training plan and calling out tough workouts, minor bugs, and Zwift feature suggestions along the way. For your reference, my FTP is set to 321W, as detected by Zwift’s ramp test at the start of the plan. Past weeks: Week 1 // Week 2 // Week 3 // Week 4 // Week 5 // Week 6 // Week 7// Week 8
Until this week, I had completed every BMU workout I’d attempted… on the first try! But this week saw the workout that broke me. Was it the workout, or was it my own form on the day? I think mostly the latter. Read on for more…
Heading into my 9th week of BMU, I was pretty proud of myself for having completed all the workouts thus far… and without cheating*!
* Yes, I’ve skipped two pedaling drills workouts, which some readers think are rather important. I wouldn’t say they’re worthless, but I would say when doing a big plan like this, for me it was better to get outside and get off the trainer instead of doing those workouts. Gotta stay sane. Also – I’ll admit I haven’t always hit the cadence or position targets in some workouts… so there’s been a bit of cheating that way. But I’ve always completed the intervals at the required power, without pausing the workout or lowering the FTP bias. Those are my “rules”.
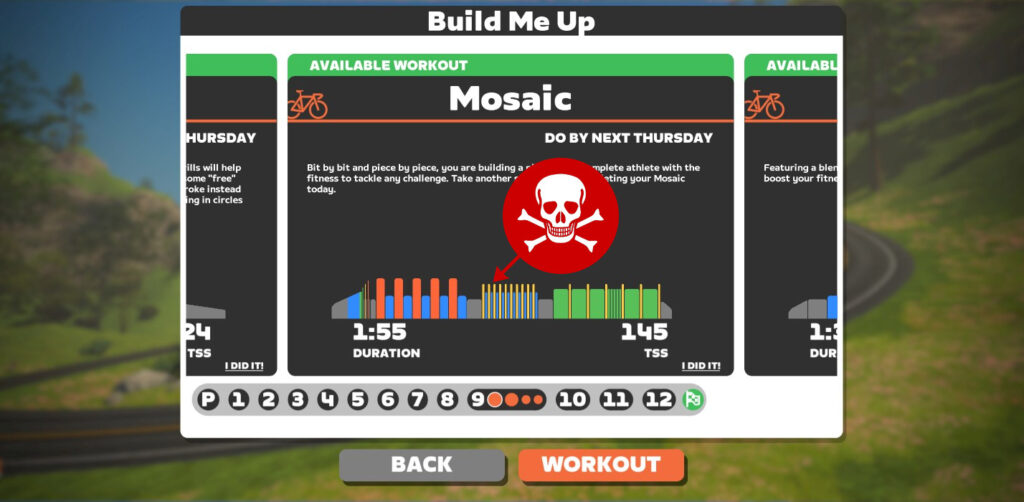
I’d completed every work attempted thus far. But all that ended with this Mosaic workout.
First, the workout had a VO2 block which was harder than anything I’d done before, because the “recovery” intervals were at 210W (zone 2) so my legs weren’t just spinning easy and letting me get more complete recovery between intervals. I paused the workout after the 4th set so I could spin easy and get my legs under me for the final VO2 interval.
This was followed by a set of intervals alternating between 1 minute at FTP (320W) and 1 minute at high zone 2 (240W). Heading into the workout I didn’t anticipate this part being very hard, but the VO2 intervals clearly wiped me out, and I pulled the plug after just 2 of the 10 1-minute FTP intervals. There was no way I could complete this workout today.
This is where I blew up
Was I tired from riding the day before? Was I getting sick? Is my FTP set too high and this workout finally pushed me to the limit? I’m not sure. But I decided to take it easy the next day, in hopes of tackling this workout later in the week.
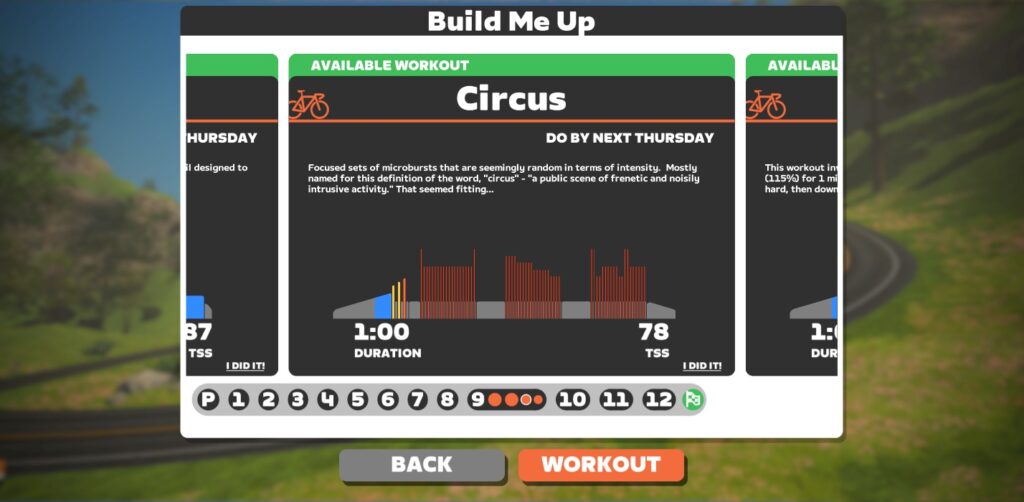
Getting back into the saddle after Saturday’s fail, I just hoped my legs would feel good enough that I could complete this workout. I had a lot of questions, though. Had the workout difficulty ratcheted up quickly in week 9, and I couldn’t hack it? Was I getting sick, as evidenced by Saturday’s failure? And even if I wasn’t sick, how would my body handle this crazy workout, which consisted of 3 sets of 20 “microbursts”: 15 seconds of hard effort followed by 15 seconds of recovery?
This wasn’t going to be the fun sort of Circus. More the Circus of nightmares!
I’d done 30/30s before, usually two sets of 10. But 60 15/15s, and at some very high wattages (some were 200% of my FTP, or 640W)?! 15 seconds may not seem like much, but if you tally it up over 60 repeats that’s 15 minutes spent at an average of 488W.
That’s a lot of work.
The first set of 20 was tough but doable. The second set started out hard, but got easier as we went along, basically following my fatigue so it was steady suffering. The final set was terrible, especially the 2x sprints at 640W near the end. I gutted it out, but I was on the rivet for sure.
15 seconds never felt so long.
I put this one at the top of the list with the hardest workouts so far. It didn’t help that I felt a bit asthmatic during it, wheezing during hard efforts and feeling like I didn’t have full lung capacity. Not sure if that was seasonal allergies or what, but I’m hoping it clears up soon.
It wasn’t just hard because of my breathing, though. I tied my 2023 power curve PRs for 9:45 and 39:00 with this workout, so the effort was high… and spikey!
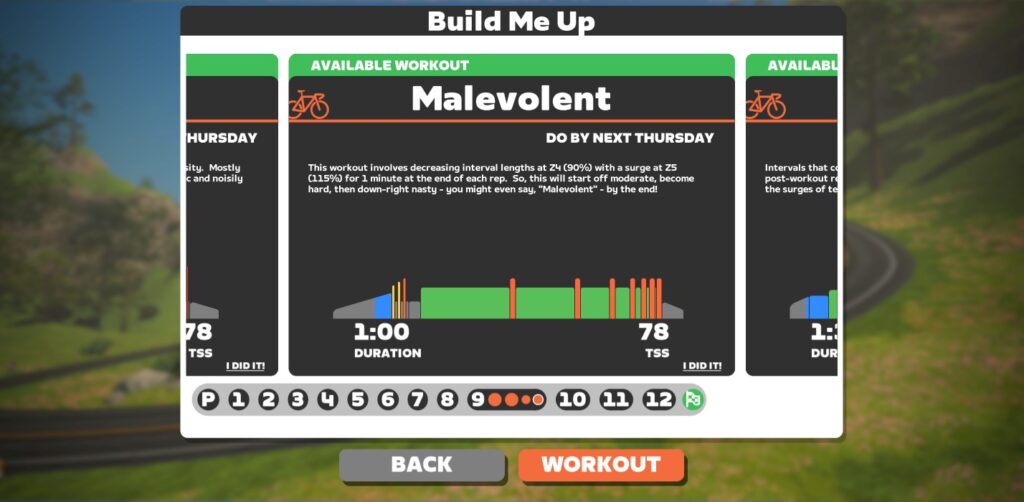
With a name like “Malevolent”, I knew this wouldn’t be easy. This workout could be summarized as “sweetspot + surges”, except the evil twist is that the surges get closer and closer together as the workout goes on, making the final few minutes much harder than the first!
This workout was the largest chunk of hard effort without recovery that I’ve encountered so far in BMU, with the main workout being 41:15 of continuous sweet spot (90% FTP or 290W) with 7 1-minute VO2 surges (115% FTP or 370W) mixed in.
This seemed pretty crazy going in, as the longest sweetspot intervals I’d done yet were 2x 20-minute blocks separated by several minutes of recovery. But I was able to do it, even if that last 3-5 minutes was tough. And I got a power curve update for 2023 as thanks for the effort.
This 90-minute workout was the easiest workout of the week, even though it was a longer one. The intervals just weren’t very taxing – I think my max heartrate for this workout was in the low 160s, and I probably averaged somewhere in the mid-140s.
This workout has two blocks that feel like actual work (eg, legs burning, hard breathing):
After failing to complete this workout on Saturday, I’d be lying if I said I wasn’t intimidated to tackle this the following Thursday… especially after having completed BMU workouts on Monday, Tuesday, and Wednesday!
But I’d felt strong all week, and couldn’t see any way to put this workout off for another day without messing up the whole plan schedule. So I decided to tackle it, even though I doubted my chances of success.
I tried to set myself up for success. I turned the air conditioning on, lowering the room temperature and keeping it from getting too humid. I also brought snacks so I could keep taking in carbs during the long workout. Lastly, I fought with my mind to keep a positive “Can do” mindset. It was a battle!
When I began the VO2 block, I could tell my body was performing better than it had on Saturday. My heart rate felt more controlled and seemed to be recovering better. On Saturday I had to pause the workout before completing the 5th interval, but today I knocked out all 5, no pausing! Here’s what my heart rate looked like for the VO2 block on Saturday vs Thursday:
Saturday’s Failed Mosaic vs Thursday’s Success: VO2 Interval Heartrate
Note: S1=start of VO2 interval #2, F2=finish of VO2 interval #2, etc
Next came the 1-minute over-unders… 1 minute at FTP, 1 minute at 75% FTP (240W). Repeat 10x. This is where I gave up after 2 reps on Saturday… but I was able to push through and complete the whole set today!
Then it was time for the final set – “flavor #3” as Coach Shayne described it. This was 6 sets of 5 minutes at 85% (275W) and 1 minute at FTP (320W), repeated back to back with no rests. That’s 36 minutes of hard work after 80 minutes of hard work!
After finishing the first 6-minute set I thought, “There’s no way I can do 30 more minutes of this.” But then I finished the second block. And on the third block I realized that, while my legs felt achy and tired, they were able to hold the needed power. I just had to be willing mentally to keep pushing, even though I so badly wanted to hit pause, spin out the legs, then knock out those final intervals.
So I kept pedaling. And miracle of miracles… I made it to the end! Mosaic completed, with no FTP bias adjustments or pauses. And a bump in my 2023 power curve:
I was super stoked to have finished this workout after failing a few days earlier. This was the most mentally challenging workout of the program so far for me, especially after it blew me up the first time. I was flying high and energized the rest of the day!
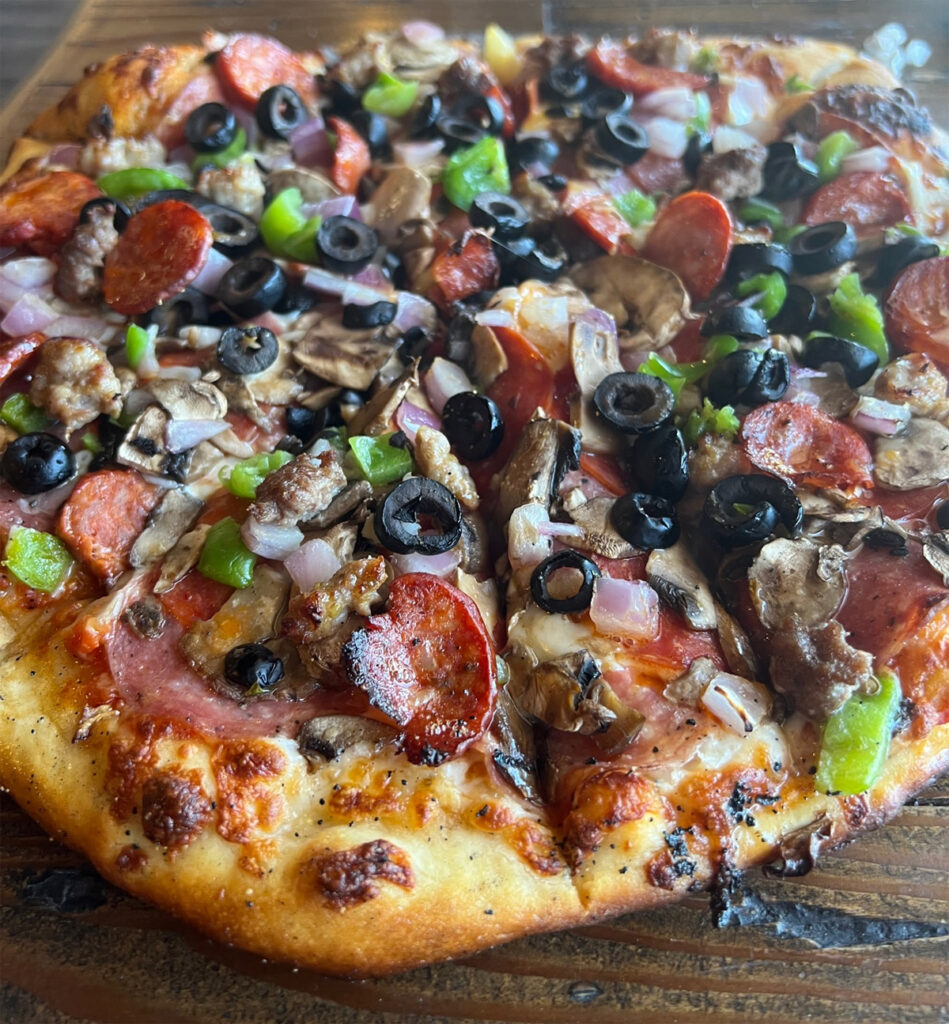
Despite my left foot wanting to cramp as I walked around afterward, I drove down to the local pizza joint and treated myself to several slices of combo for lunch. And a Pepsi! The conqueror’s reward.
My reward pizza. I only ate half!
Whine of the Week: Questionable Captions
Looking forward to week 10, there are two workouts with captions I question:
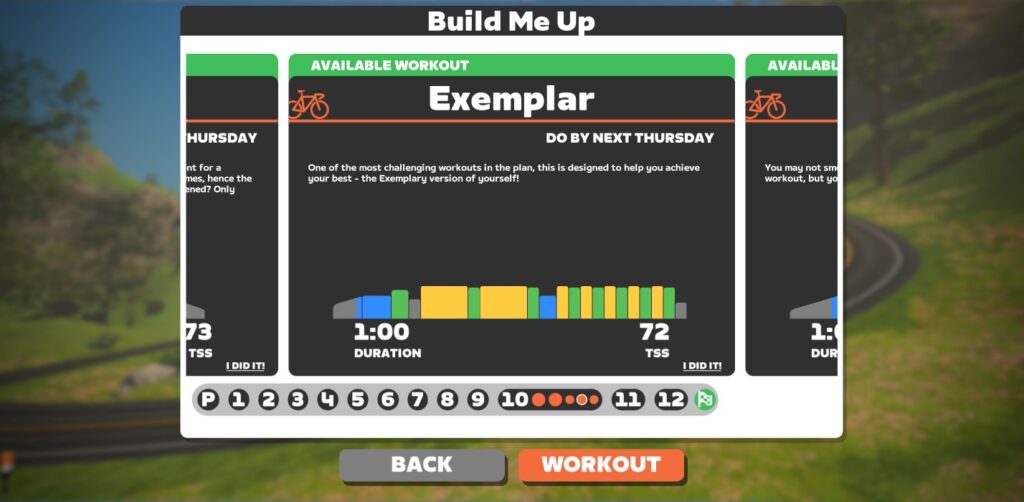
Exemplar: says it’s “One of the most challenging workouts in this plan.”
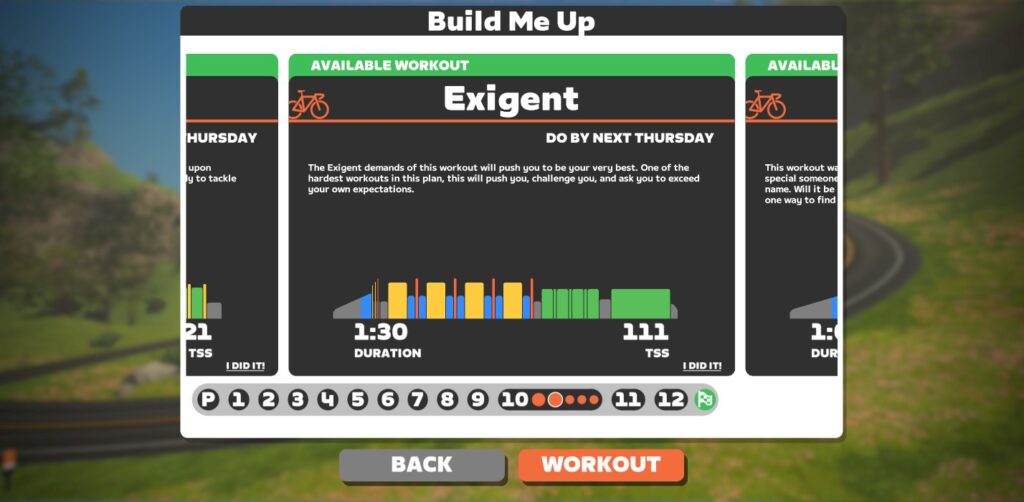
Exigent: says it’s “One of the hardest workouts in this plan.”
Neither appears to be close to the hardest workouts in the plan – particularly Exemplar, which is just a 60-minute sweetspot workout. Perhaps these workouts will tell me to ride big blocks in the drops at 60rpm or something silly like that… but in terms of power requirements, the captions for these just seem off, which makes it hard to trust the captions for other workouts.
Summing Up Week 9
This may have been my toughest week yet, but only because I started on an off day and had to repeat the big Mosaic workout.
Week 1: 274 TSS
Week 2: 343 TSS
Week 3: 363 TSS
Week 4: 212 TSS
Week 5: 312 TSS
Week 6: 358 TSS
Week 7: 430 TSS
Week 8: 217 TSS (not counting my outdoor rides)
Week 9: 388 TSS (not counting the failed Mosaic workout)
One to Keep, One to Throw Away
I think each week of BMU features a key “cornerstone workout” and another which doesn’t really need to be done, so I thought it might be useful to call those out each week, in case your schedule is tight. For week 9, here are my picks:
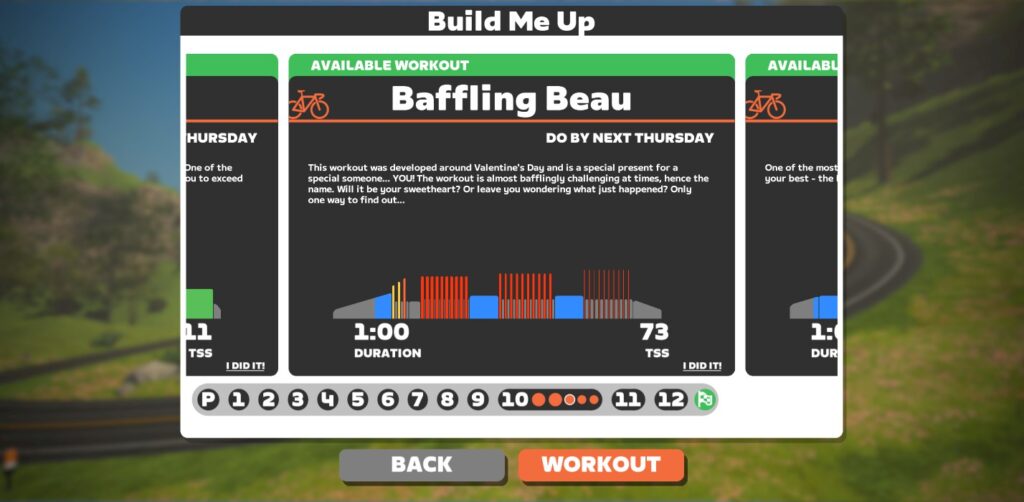
Key Workout – Circus: Hard to choose just one key workout this week, but I settled on Circus since it focuses on the microbursts that will be featured in upcoming weeks, too. If you don’t do this workout, you’ll probably fail on Week 10’s “Baffling Beau”.
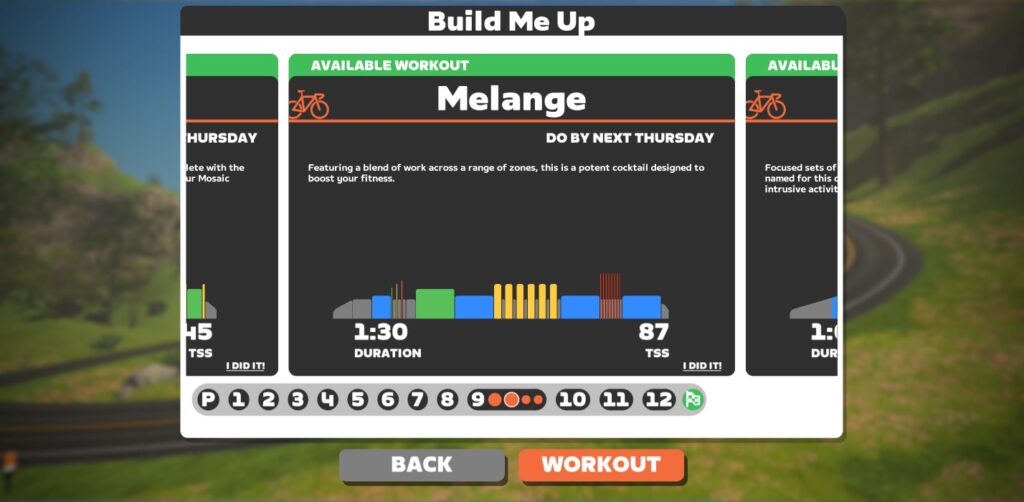
Throw Away – Melange: This one felt like a few different workouts combined in order to keep me busy on an easier day. Which isn’t a bad thing, I suppose! But if I had to pick one workout that didn’t feel super targeted or effective for the week, it would be Melange.
Coming Up Next Week
Week 10 is next, and its 5 workouts add up to 441 TSS, making it the biggest week so far!
✅ Feel Good Factor ✅ Popular Event ✅ Sweet Unlocks
Giant’s Ride Like King is easily the most popular event this weekend. This is an iconic event that takes place annually and has quite a few perks to it! Most importantly, for every 500km that the community rides, a buffalo bike will be donated to World Bike Relief. Throughout the ride, riders will be kitted up in Giant bikes and the virtual RLK kit.
Leaders from the various supporters of this event will be leading these group rides. The events take place on different courses every day. Read more about RLK15 >
Looking for a longer ride? The PACK SUB2 Weekend Adventure offers a longer ride while maintaining a more mellow, social pace. Rides by PACK are always great and the leaders never fail to entertain the riders. Throughout the ride leaders will be holding 1.8 w/kg on the flats and 1.9 w/kg on the climbs.
This weekend’s adventure takes place over three laps of the Greatest London Flat course. The course is relatively flat but does feature a small climb towards the end.
This event would be the jersey highlight of the weekend, but the Ride Like King event is taking the spotlight! The ride has an advertised pace range of 1-2.5 w/kg. Included with the completion of this event is Foudre’s unique in-game cycling jersey, featuring a lighting bolt printed on the back. Pretty cool!
This week’s coffee ride takes place on The Magnificent 8 course in Watopia. The ride lasts for 90 minutes, so riders will likely complete nearly two laps of the course.
DBR’s weekly Saturday Race is very popular amongst some of the top riders on Zwift. This is partially due to its stricter rules and partially because of the daunting distance of this race. Much like the KISS 100, DBR’s Saturday Race is well-known for being a popular endurance race.
In addition to the length of the race, this week’s event features a boatload of climbing as it takes place over one lap of The Mega Pretzel (107 km). Yikes!
To round off this weekend’s list of notable events, we’ve got the Snap Crackle Pop King/Queen event by On The Rivet Racing. This is a points-based race, solely dependent upon the times that riders clock on the primes. Some of the segments will be sprints, others will be KOMs. Contrasting to most events, riders are encouraged to group up and take it easy in between segments so everyone can achieve the best times they are capable of.
This event completes nearly a full lap of The Muckle Yin, which covers almost all of the roads in Zwift’s Scotland.
We choose each weekend’s Notable Events based on a variety of factors including:
Is the event unique/innovative in some way?
Are celebrities (pro riders, etc) attending/leading?
Are signup counts already high, meaning the event is extra-popular?
Does the ride include desirable unlocks or prizes?
Does the event appeal to ladies on Zwift? (We like to support this under-represented group!)
Is it for a good cause?
Is it just plain crazy (extra long races, world record attempts, etc)?
Is it a long-running, popular weekly event with a dedicated leader who deserves a shout out?
In the end, we want to call attention to events that are extra-special and therefore extra-appealing to Zwifters. If you think your event qualifies, comment below with a link/details and we may just include it in an upcoming post!
Your Thoughts
Got other events that stand out this weekend? Share below in the comments!
Wahoo Recapitalized by Founder + Additional Investors
Wahoo Fitness has been a worldwide leader in the smart trainer industry since the introduction of their first KICKR in 2012. And even though their latest KICKR leads the pack in terms of features, the post-Covid years have been challenging for the cycling industry overall, and for Wahoo in particular.
The situation became downright dire a few months ago, when (according to a brilliant article by DC Rainmaker) “15 different banks had called the debt, and took over the business.” Since then, Wahoo has been in a sort of holding pattern. They ceased marketing, most sponsorships, and limited non-critical business functions, including product development, all in an attempt to save money.
But there’s good news!
Wahoo announced this week that founder Chip Hawkins, along with “new and current investors”, has “fully recapitalized its business.” Or to put it more simply: Chip and additional investors have bought back Wahoo from the banks and put it on solid financial footing.
According to DC Rainmaker, the additional investment partners are:
Wahoo’s press release says these are “new and current investors with substantial experience in supporting diverse connected fitness and endurance athlete platform businesses.”
Here’s more from the press release:
Confidential terms of the arrangements eliminate all debt and provide significant cash liquidity designed to extend the company’s prominence in advancing innovation in the global smart fitness and training category.
Wahoo Founder, Chip Hawkins commented, “The successful recapitalization of the business provides the flexibility we were seeking as a management team to allow for investment in innovation and growth from the company’s substantial base and category leadership position, by diversifying the breadth of its offerings to better support athletes and fitness enthusiasts. Wahoo’s management team is energized by a renewed focus on delighting its customers and continuing Wahoo’s mission of building a better athlete in all of us.”
Mike Saturnia, Wahoo CEO stated, “The investment from both new and existing investors is a clear sign of confidence in the strength of Wahoo- specifically our team, brand, strategy, and powerful ecosystem of innovative products, software, and services. This could not have happened without months of hard work and support from our channel partners. We want to thank our supply chain and retail and distribution partners for their trust and confidence as we navigated to a successful conclusion to this process.”