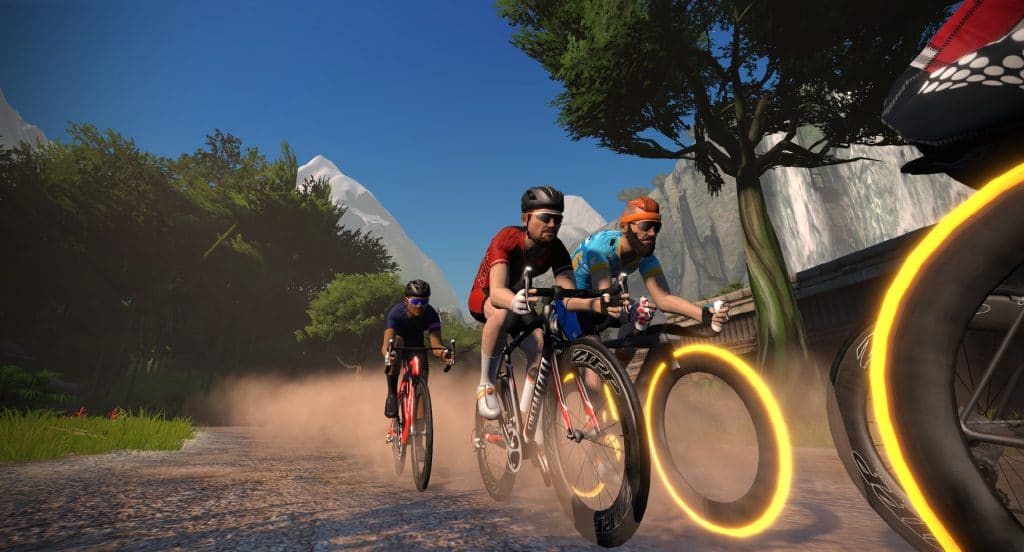
Team DIRT has announced a new community race series designed to let Zwifters experience the challenges and teamwork of stage racing, with pro peloton-style scoring and two individual time trial stages.
Taking a cue from pro tours, 9 Stages of DIRT includes 3 competitions which run alongside each individual race for the duration of the series:
Team-Based General Classification: for each stage, the time of the best-placed rider counts as the time of the team. Team with the lowest accumulated time for the 9 races wins. You can compete as a 1-racer-team if you wish, but working together as a real team makes you more competitive on every terrain and every situation.
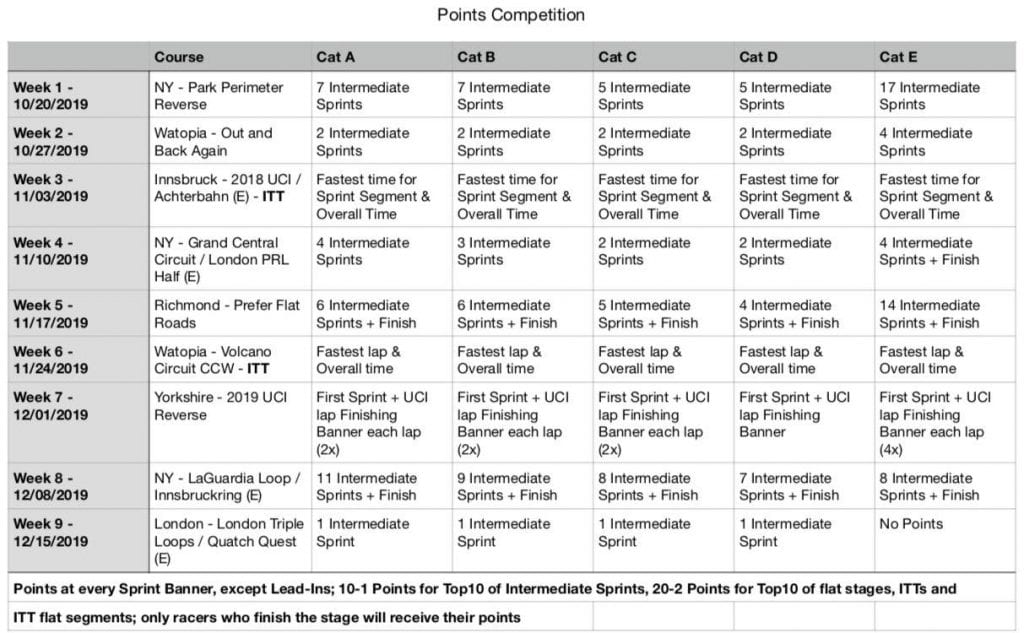
Individual Points Competition: each intermediate sprint banner (except lead-ins) gives points for the top 10 riders. Each flat stage finish gives points for the top 10 riders.
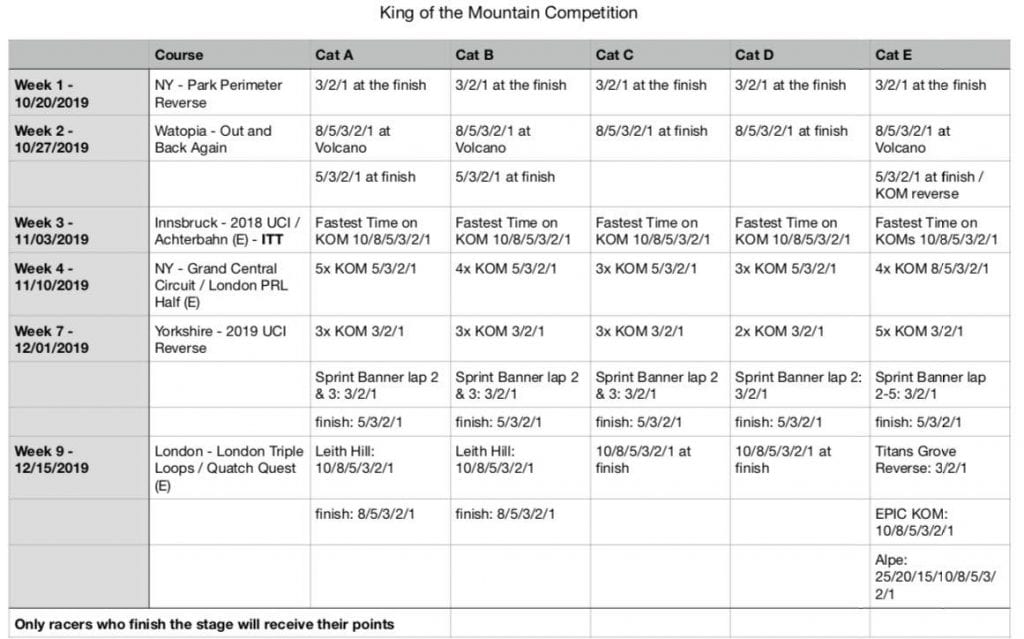
Individual King of Mountain Competition: Each KOM banner and uphill stage finish gives points for the top riders similar to pro cycling KOM competitions.
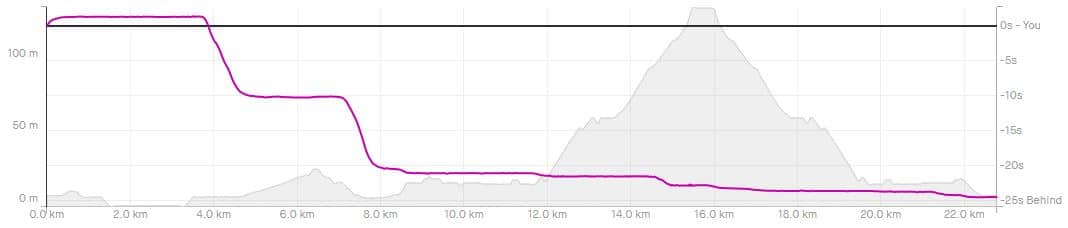
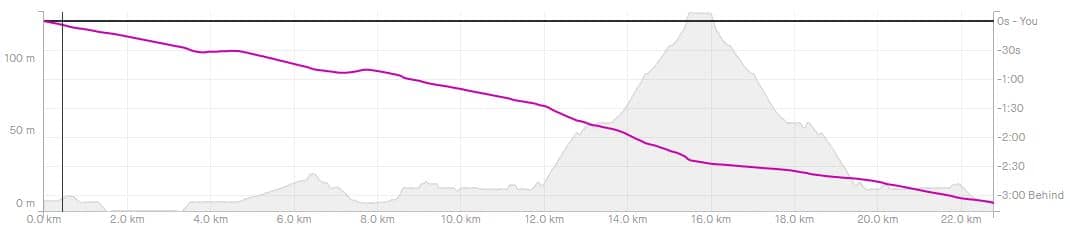
Here are detailed charts outlining the Points and KOM classifications:
Racers must select a category, and each category group gets its own start time. Standard Zwift race categories are used, except this stage race includes an “E” category for elite and long-distance racers!
A: 4-4.59 w/kg
B: 3.2-3.9 w/kg
C: 2.5-3.1 w/kg
D: 1-2.4 w/kg
E: any w/kg
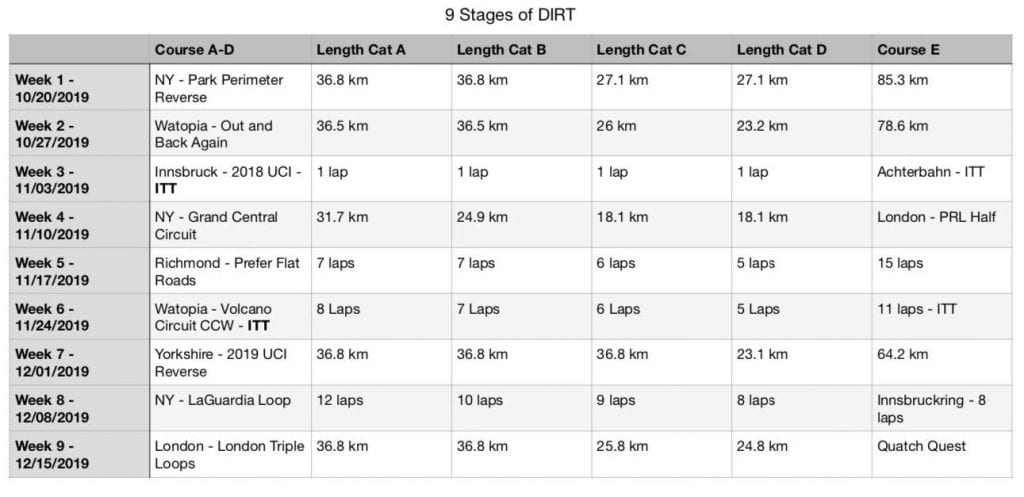
While everyone will race the same routes (listed above), race length is based on category. See table below for details:
Race routes and lengths
More about DIRT
To learn more about DIRT (Dads Inside Riding Trainers), check the following links:
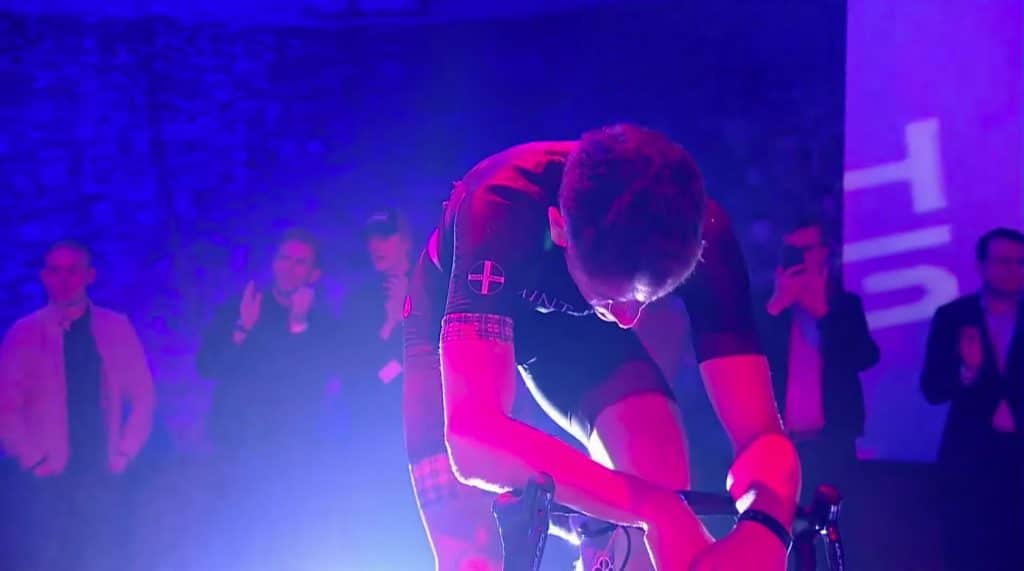
The story of Cam Jeffers being disqualified and sanctioned has garnered a lot of attention in Zwift and the cycling community at large. And that’s not surprising: it’s the first time a governing body has sanctioned a rider for actions in Zwift, and it’s a hefty penalty which includes restriction from outdoor racing as well.
The controversy centers around the Tron bike which was obtained “illegally” by Jeffers using an ANT+ emulator. Jeffers then used that virtual bike in the British Cycling eRacing Championships, going on to win first place.
While no one disagrees that Jeffers’ use of an emulator is cheating, many are asking: what kind of advantage did the Tron bike give Jeffers? Or more to the point: did Jeffers win because of his unfairly-obtained Tron bike, or did he win because he was the most capable rider on the day?
A Short History of Fast Zwift Bikes
Before Zwift’s release of the Drop Shop in early 2019, the Tron bike was the undisputed king of Zwift racing. It wasn’t quite the fastest climber, but it was near the top, and significantly faster than other available road bike setups on flat roads and descents.
So the Tron bike developed a deserved reputation for being the best race bike.
But when the Drop Shop arrived, Zwift modified weight and aero values for frames and wheelsets and released several new frames and wheelsets. The Tron got heavier, making it a poor choice for long climbs. And today, at least three frames are as fast or faster than the Tron bike on flat or mixed courses when coupled with one of the disc wheelsets. Those fast frames are:
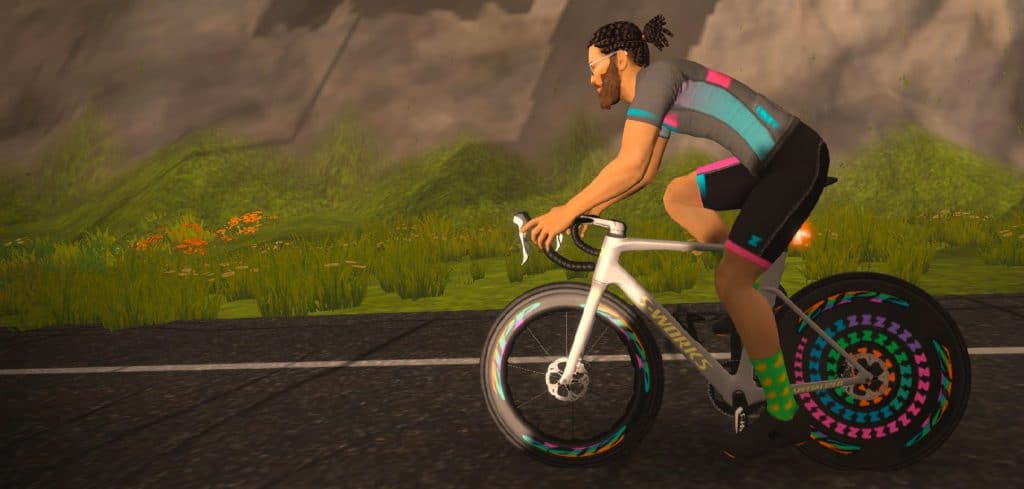
Specialized Venge S-Works
Cervelo S5
Felt AR
Tested Time Gaps
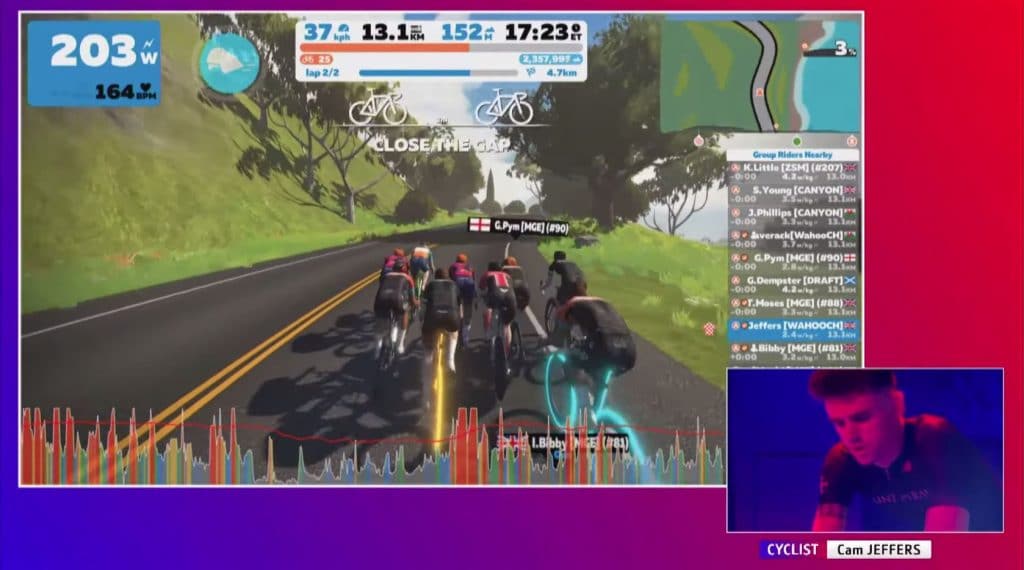
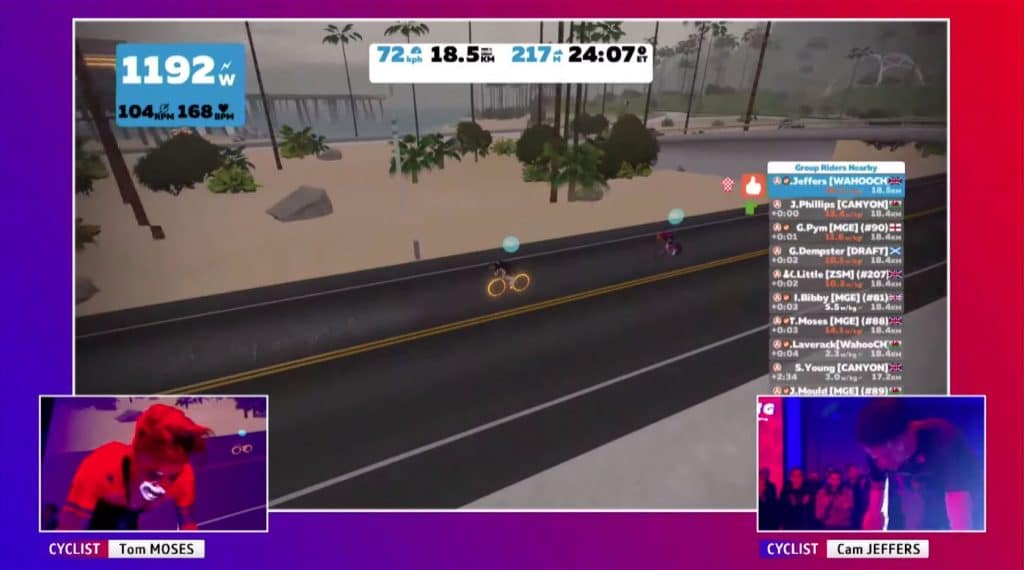
The final race of the BC eRacing Championship was over two laps of Watopia Hilly Reverse. Here are our test lap times for actual bike setups used in the BC races, run at 300 watts steady (4 w/kg) for two laps:
Tron (ridden by Ian Bibby and Cam Jeffers): 28:30
Canyon Aeroad with 808/Disc (ridden by James Phillips, now the winner of the race): 28:32
Cervelo S5 808s (ridden by Zwift veteran Kim Little, 3rd place in the final race): 28:36
Zwift Aero with 808s (ridden by other members of Madison Genesis): 28:36
Oddly enough, no riders used the Zipp 858/Super9 wheelset, which is the fastest wheelset in game for flat/mixed courses. We did a test run with the speedy S-Works Venge running the 858/Super9 wheelset, and its 2-lap time was 28:24!
TT vs Peloton Times
It’s worth discussing the difference between lap times turned in by our solo rider test results, and the times you’ll see in an actual Zwift road race. Because they are very different beasts.
While our test times give you a pure look at which setups are fastest, there are much, much bigger factors determining who wins a Zwift race. Factors like:
Here’s one example of how course knowledge and powerup assignments factor into races: in a recent race on the new Yorkshire course, I was in a chasing group which had been consistently 10-15 seconds behind the lead group for miles. But in one well-timed 45-second push, I was able to pull my group back to the lead bunch.
How did I do it? A well-timed aero powerup as we hit the twisty Pot Bank descent, then keeping the power up when we hit the slight incline afterward.
I could have put out that same power anywhere else on course with little effect. But I knew the course, had a useful powerup, and went hard at the right time. And I wasn’t even riding the Tron bike!
Conclusion: riding a virtual bike that tests a few seconds slower or faster than the competition makes no noticeable difference in a typical draft-enabled Zwift race.
Why Jeffers Won
It’s clear from the times above that, while the Tron bike didn’t hurt Jeffers at all, it’s also not the reason he won. He knew the race courses, had good legs, and rode smart.
Opinion: Race Equipment Standardization
As a result of “Jeffersgate” I’ve seen many calls for standardized equipment in these big races: that is, make every rider use the same virtual bike and wheels so there is no advantage based on equipment.
While I understand where those calls are coming from, I can’t help but think that, if eRacing is going to be its own discipline, it needs to reward those who embrace it.
If a rider doesn’t want to put in the effort to unlock a faster bike, or even understand which bikes are faster, they need to realize they’ll have a slight disadvantage compared to those who have worked to unlock faster bikes and understand the game.
This is analogous to what happens in outdoor racing: riders who invest more time and money into their equipment rightly expect to gain some advantage over those who invest less. It’s how cycling (and sports, and life) work!
And it’s just one more way Zwift is trying to ensure that race results aren’t all about power. If racing on Zwift is going to be interesting to viewers it must include elements of strategy, even randomness (Lightweight Meilenstein wheels, anyone?), as well as pure athleticism.
Share Your Thoughts
I’ve shared the test results and given my opinion. Now it’s your turn!
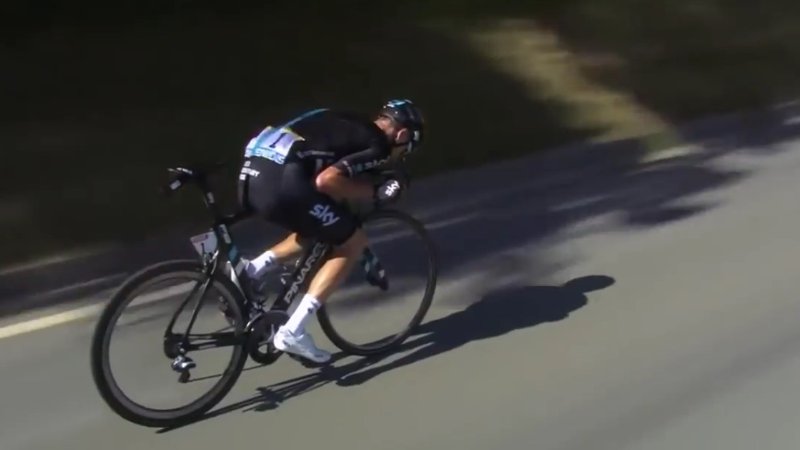
Ah, the supertuck. You’ve seen the pros do it (before it was outlawed by the UCI), and you’ve probably been advised against doing it yourself.
For those unfamiliar, this very aero tuck involves sitting on the top tube and lowering your shoulders/chest onto the bars (or close to it) by bending your arms as far as they will go while holding onto the drops. It’s a fast position, but also difficult to pedal in (although Chris Froome pulled it off in glorious fashion at the 2016 TdF). It’s also a dangerous position because of how it affects your bike handling.
The good news is, you can supertuck in Zwift, risk-free! Here’s how it works.
Getting Into a Zwift Supertuck
To supertuck in Zwift four conditions must be met:
You must be traveling at least ~36MPH (~58km/hr)
The gradient’s decline must be at least -3%
Your power output must be below 11 watts
You must be out of the draft and not riding in a pack (safety first!)
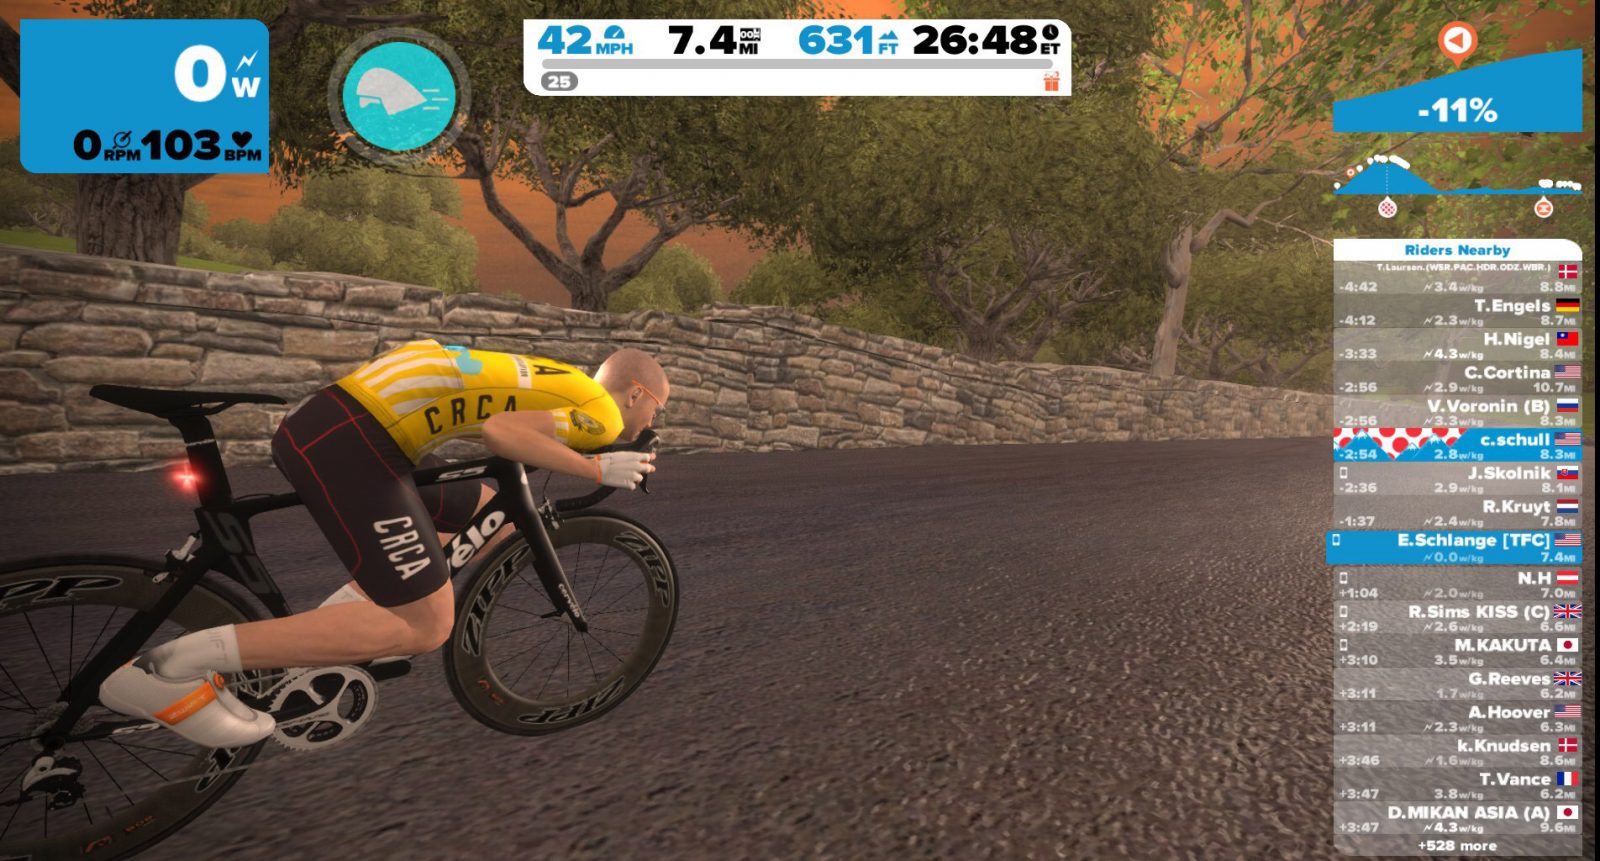
Zwift will automatically place you in the supertuck if all these conditions are true. You come back out of the supertuck once any of these conditions is not met – for example, if the road flattens out to a 2% decline.
How Fast Is It?
Specific numbers are hard to come by since the supertuck behaves differently in races than free rides. But in our experience, coasting in the supertuck will let you hang with a pack that is putting out 2.5-3.5 w/kg. Of course, this varies based on rider weight, how many in the group are putting out power, steepness of decline, and other variables.
While it is possible for riders to attack on a descent and drop supertuckers, you don’t see that very often in Zwift races.
Supertuck whenever you can! Thanks to Zwift’s Pack Dynamics 4.0, you can only supertuck when riding out in the wind. If that’s you (perhaps attacking in a race, or trying to bridge up to the group) use the supertuck to your advantage.
TT, MTB, and Workout Exception
You cannot supertuck if you are riding a TT or MTB frame. Because that’s just silly!
Also, no supertucking in workouts. Even if you’re in a free ride block descending Alpe du Zwift.
Conclusion
The supertuck does not make you superfast–but it can allow for short periods of rest which are helpful in race situations. So use it wisely, but keep your eyes open and don’t get dropped while you’re resting!
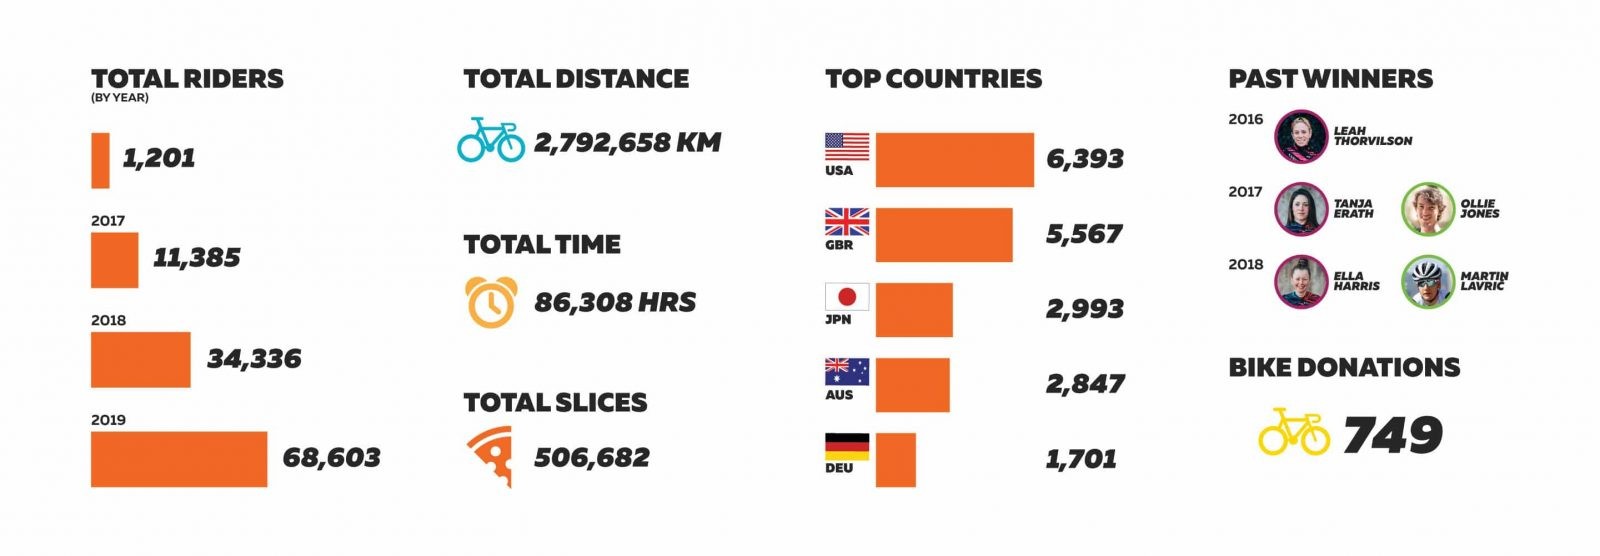
Zwift Academy 2019 has entered its next phase with men’s and women’s semi-finalists being selected. Ten men and ten women will complete a mix of indoor workouts on the Tacx Neo 2 and outdoor workouts–an important step in the validation process.
Three finalists will then be chosen from each group to travel to the Zwift Academy Finals in Spain for a week-long camp to ride and complete structured drills to win a professional contract. One man and one woman will be chosen for a pro contract for the 2020 cycling season.
Here’s a little more about our semi-finalists…
Men’s Semi-Finalists
Drew Christensen (New Zealand): an experienced cyclist, Drew’s 5-minute power of 6.55 w/kg is impressive and shows he’s able to take on punchy climbs. ZwiftPower Profile
Drake Deuel (USA): an elite-level rower who recently moved to bike racing, Drake’s 5.72 w/kg 20-minute power impressive. ZwiftPower Profile
Kees Duyvesteyn (New Zealand): 2nd at New Zealand U23 National Road Race 2019 and took 3rd in the Time Trial, Kees has the real-world results to back up his Zwift performance. ProCyclingStats Profile
Luuk van Gestel (Netherlands): rode for the U19 national team last year, and has 10 years of racing experience on cross, gravel, and road. ProCyclingStats Profile
Brad Gouveris (South Africa): the most experienced Zwift racer of the group, Brad was a ZA semi-finalist last year as well. His 1-minute power of 9.96 w/kg makes him a powerful puncheur. He’s won multiple titles in track cycling, as well as this year’s KISS Super League Grand Finale race. ZwiftPower Profile
Filip Kvasina (Croatia): 2nd place in this year’s national U23 ITT, Filip is definitely a powerful rider. ProCyclingStats Profile
Mathijs Loman (Netherlands): one of the less-experienced of the bunch, Mathijs is going to have to prove himself in the coming weeks. ProCyclingStats Profile
Campbell Pithie (New Zealand): with outdoor titles on the road and track and a strong power profile, Campbell is an aggressive rider with big aspirations. ZwiftPower Profile
Rhys Robotham (Australia): an outdoor racer who finishes in the front pack consistently. ProCyclingStats Profile
Ryan Rudderham (Canada): solid 20-minute power and a strong mind to back up his legs. ZwiftPower Profile
Olivia Baril (Canada): a former competitive swimmer, Olivia took this year’s U23 National titles in both the time trial and road race. ProCyclingStats Profile
Catherine Colyn (South Africa): 2018 U23 National road race winner, Catherine is a strong climber with solid race intuition. ZwiftPower Profile
Imogen Cotter (Ireland): a former runner with national titles, Imogen has competed in track cycling and won 2nd at Irish Road Nationals. ZwiftPower Profile
Nathalie Eklund (Sweden): a ZA semi-finalist in 2018, Nathalie has stood on two Swedish National Podiums, is an Ironman Champion, and certainly is out to prove she’s worthy of a spot in the finals. ZwiftPower Profile
Veronica Ewers (USA): though not a very experienced cyclist, Veronica has the power numbers to be successful in the game. Road-Results.com Profile
Emily Gass (USA): a former competitive rower, Emily has the cardio engine to put down big efforts on long climbs. Road-Results.com Profile
Ione Johnson (New Zealand): a finalist in last year’s Zwift Academy, Ione is obviously a strong rider who knows how to compete at the top. ZwiftPower Profile
Mary Kate McCarthy (New Zealand): with more ZwiftPower races under her belt than almost any other semi-finalist, Mary Kate has the experience to perform well indoors. ZwiftPower Profile
Jessica Pratt (Australia): U19 National road race winner, Jessica has done a fair amount of outdoor racing including a 2017 European tour with an Australian development team. ProCyclingStats Profile
Samara Sheppard (New Zealand): a multi-time National and Oceania MTB champion with more plenty of Zwift races under her belt, Samara’s power profile show she’s a force to be reckoned with. ZwiftPower Profile ProCyclingStats Profile
Zwiftcast Episode 70 – the Jeffers controversy, MTB hits Zwift and art for Zwift’s sake
The 2019/20 indoor seasons has started with a bang, or should that be a ban? The Zwift community has been convulsed by Jeffers-gate: the fining, banning and stripping of the first officially-sanctioned national e-championship from Zwifter Cameron Jeffers by British Cycling.
Jeffers’ account was shown to have gained a Tron bike with the use of an ANT+ emulator… and the news of the ban has polarised opinion. As the dust settles on a huge row for Zwift and eSports, a row which has garnered international attention, Simon, Shane, and Nathan give their positions and debate what it means for regulation and enforcement in the new world of eSports on the platform.
Elsewhere, the arrival of Mountain Biking and steering on Zwift has seen a plethora of DIY hacks for smooth movement of the front wheel… which has caught the Zwiftcasters’ eyes and what do they make of steering?
Plus a change to the code in the game has made the Jungle Circuit heavier going… if we dare mention it, the choice of bike and wheels has become even more important.
And finally news of a very ambitious artistic project which captures the visual richness of Watopia in a whole new way.
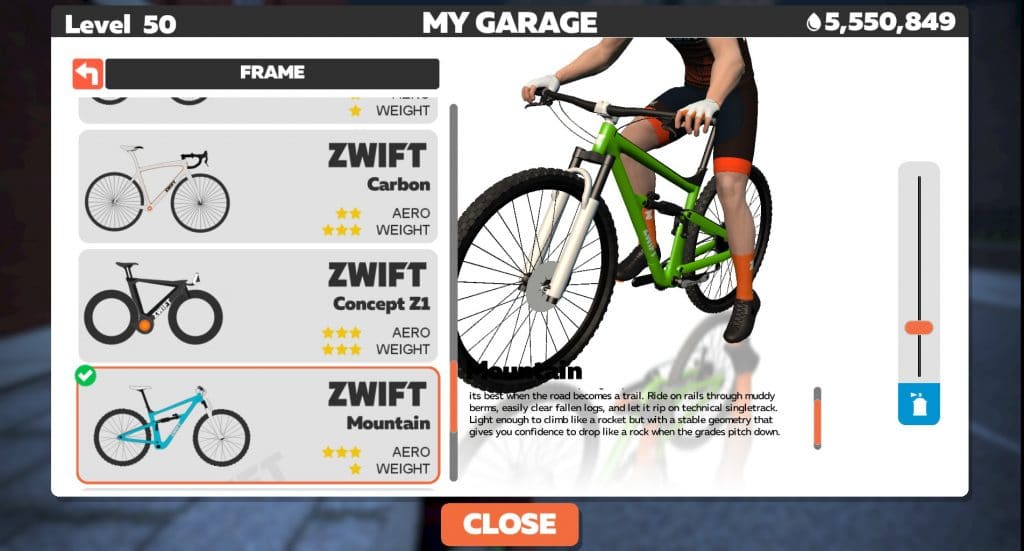
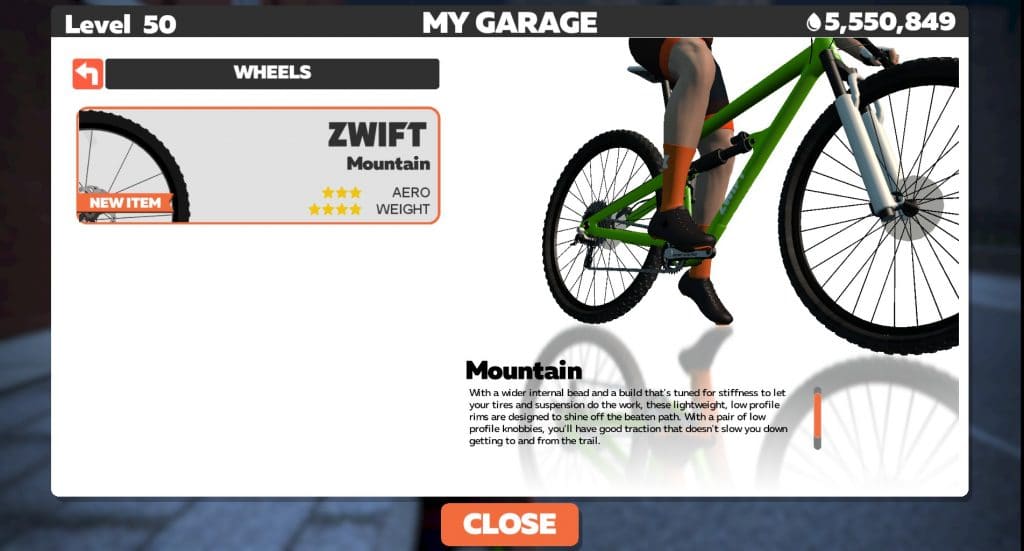
Meet the New King of the Jungle: the Zwift Mountain Bike
We’ve already discussed how Zwift has increased the rolling resistance of dirt portions of Watopia for certain tires/wheels. But we haven’t yet talked about the one bike in game which is set up to roll faster in the dirt: the new Zwift Mountain bike!
According to my sources inside Zwift, every wheelset except the new mountain bike wheels is using the same rolling resistance right now, meaning all the road bike wheels are going to roll pretty slow on dirt.
This isn’t immediately obvious unless you ride a long stretch of dirt, like the all-dirt Jungle Circuit. Here, riders are finding their speeds with road wheels to be 6-8km/hr slower than tarmac speeds.
So we did some test laps with various road setups, as well as the Zwift Mountain bike, to find out if the mountain bike was really faster in the dirt, and if so, by how much.
The Results
At 300 watts steady (4w/kg) the Zwift Mountain bike turned in a Jungle Circuit time of 13:47.
The Tron bike (and other fast bikes) come in right around 15 minutes flat at the same power levels.
No bike/wheelset combination comes close to the Zwift Mountain setup when riding the Jungle Circuit… at least not right now. Of course, Zwift will be releasing more wheels that roll better in virtual dirt. Then things will get interesting!
But for now, if you’re heading to a race on the Jungle Circuit, you’re going to want to try the Zwift Mountain bike! Here’s how to unlock it.
How Does It Perform on Tarmac?
The mountain bike doesn’t perform well on tarmac–it’s by far the slowest bike on pavement, turning in a lap time of 38:34 on a single lap of our Volcano Climb test route (at 300 watts, 4w/kg steady).
For comparison, the fastest road setups finish this route in 35 minutes flat, while the slowest finish it in just under 36 minutes.
Thoughts On Dirt Strategy
This sets up an interesting race situation in which riders may choose a fast road bike setup for racing the Jungle Circuit in hopes of dropping the mountain bike riders before hitting the dirt circuit.
Will that strategy work? Possibly, depending on how many Jungle Circuit laps the race includes. Most races involve 1.5-2.5 laps around the Jungle Circuit. With only ~5 miles of tarmac leading into the Jungle dirt, road riders will have to push hard from the start to drop mountain bikers and create a big gap before hitting the dirt circuit. Then it will be up to the mountain bike riders to reel in the roadies on the dirt. It’ll be a battle!
UPDATE: with Zwift’s December 6th 2019 update, all Zwifters were given the Zwift Mountain Bike in their garage (you don’t have to perform well on Repack Ridge to unlock it.) If you don’t have the bike, you can purchase it once you reach level 2. But there are better mountain bikes!
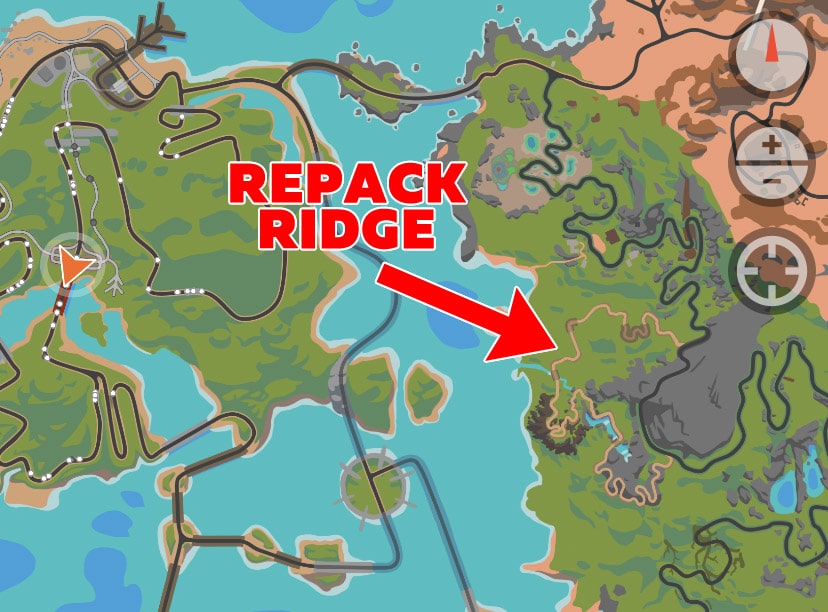
Zwift launched its new mountain bike course two weeks ago (here’s how to find it) and with it the opportunity to unlock the first-ever Zwift mountain bike frame and wheelset.
While this is surely only the first in-game mountain bike of many to come, and serious Zwifter should want it in their garage. So how do you unlock it?
First: Find Repack Ridge
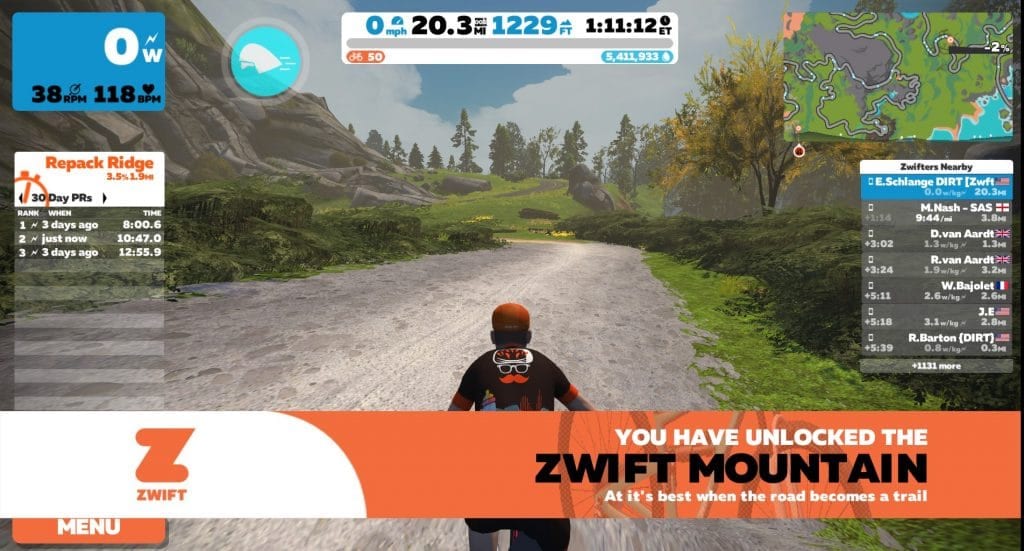
You must ride the new Repack Ridge steering trail in order to unlock the mountain bike.
As you pedal (and steer!) your way over Repack Ridge, the game is tracking your performance in two ways:
Your overall time on the trail (shown at the top of the screen)
The number of stars you get by steering the right line (also at the top of the screen)
Aim for the blue!
There are 10 sections of the trail which include either blue arrows and red X’s, or a single blue line. Steer your way onto the blue, keep of the X’s, and you’ll get a full star for each section.
To unlock the Zwift mountain bike, you must complete the trail in under 12 minutes, 30 seconds AND get at least 9 out of 10 stars.
What Do You Unlock?
Hit your targets and you’ll unlock both the Zwift Mountain frame and wheels.
While they aren’t particularly fast on tarmac, they’re faster than any other bike available when it comes to riding the Jungle Circuit‘s dirt, thanks to Zwift’s new rolling resistance changes.
And the frame has a color slider, so you can customize the look a bit!
Various wheels and tires now have different rolling resistance based on the surface they are rolling on. IE, a mountain bike or gravel tire may be the best on the Jungle circuit, while a road/TT bike is fastest on the tarmac. More to come here in a future update.
This weekend’s update to version 1.041097 seems to have rolling resistance working the way Zwift intends, so we’ve started running tests to see how different wheels perform on the course with updated rolling resistance values.
First: About Crr
The change in Zwift’s latest update means the game is now setting a value for the Coefficient of Rolling Resistance (Crr) based on the wheels you are using in game and the type of surface you are currently riding.
Crr is simply a number which quantifies how much friction your tires are creating against the road surface. A fast-rolling tire has a lower Crr, while a slower tire has a higher Crr.
Our educated guess is that, before this update, Crr was a constant on Zwift, not changing based on road surface or wheel type. But now, every time the road surface changes, Zwift checks the Crr for your particular wheel for that particular surface, and uses that value to help determine your in-game speed. Zwift also sends that value to your smart trainer, where it affects the resistance you are feeling in standard Sim mode.
Here’s a snippet from the ANT+ spec showing how rolling resistance is calculated, then used to determine the resistance your smart trainer gives you:
(section 8.10.2)… the standard calculation for rolling resistance. Rolling Resistance [N] = (Bicycle Mass + Cyclist Mass) x Coefficient of Rolling Resistance x 9.8
Calculating Total Resistance (Simulation) The total resistance applied by the fitness equipment is a sum of the wind resistance, rolling resistance and the gravitational resistance as shown in Equation 8-15: Total resistance [N] = Gravitational Resistance + Rolling Resistance + Wind Resistance
Speed Comparison: Road Bike
We used Strava’s Effort Comparison tool to compare the speeds of an identical bike setup before and after Zwift’s Crr updates.
The frame used is the Specialized S-Works Venge, with Zipp 858/Super 9 Wheelset. One of the fastest setups in-game. Click here to access the Strava Effort Comparison, or simply watch the quick video below:
As you can see, our test bike definitely slows down in the dirt sections compared to past performances.
Speed Comparison: Road Bike vs Mountain Bike
Here’s a comparison of the same road bike above and Zwift’s new mountain bike, which is supposed to perform better than the road bikes on dirt.
While the mountain bike steadily loses ground to the road bike on most of the course, it keeps up with the road bike (and even gains a little time) on the dirt sections. (More on MTB performance in dirt coming soon!)
What Does It All Mean?
There are a few key takeaways here:
All dirt sections are slower with road tires, not just the Jungle Circuit (where it’s most noticeable because it’s a long stretch of dirt). The lava dirt around the volcano appears to roll at the same speed as before.
Soon, dirt performance will be a factor in wheel choice. Currently, all road tires perform the same in dirt, and only the mountain bike (with its MTB tires) performs differently. This will change when Zwift begins releasing more wheelsets, and they may even change the Crr values of some existing wheelsets.
Expect more dirt attacks. Racers already like to attack in the dirt, where dust clouds mean poor visibility. But the increased resistance on road tires in the dirt means power numbers will bump up even more in these sections.
Your Thoughts
What do you think of Zwift’s Crr changes? Chime in below!
It’s Kona week! Matt catches up with Levi Hauwert, Yvonne Timewell, and team mentor Tim Don of the Specialized Zwift Academy Triathlon team. We learn about their experience on the team and expectations going into race day. Tim and Matt make their rapid-fire picks for Saturday, followed up with Jordan’s analysis of these picks.
About the Podcast:
The Zwift PowerUp Tri Podcast is hosted by former pro triathletes Matt Lieto and Jordan Rapp, lending their in-depth knowledge of the multisport to the Zwift Tri audience.
Zwift released a minor update last night, worth mentioning only because there’s been a lot of confusion recently due to changes made to the rolling resistance of some dirt portions of Watopia.
Various wheels and tires now have different rolling resistance based on the surface they are rolling on. IE, a mountain bike or gravel tire may be the best on the Jungle circuit, while a road/TT bike is fastest on the tarmac. More to come here in a future update.
I love the concept here. That Zwift is adding another strategic element to their “game” so those who pick the right equipment for the course get a performance edge over those who do not.
Just like the real world. If I’m racing on gravel, I need to have the right bike for it. And that bike won’t be the same one I use for a crit, or a mountain bike downhill.
Not Quite There
So far, though, this new feature of Zwift’s hasn’t rolled out well. It began with complaints that group rides on the Jungle Circuit were splintering apart, with riders flying off the front holding less power than those struggling to catch on.
Group leaders were going crazy trying to figure out the issue until they began comparing game version numbers. Guess what? Zwifters who hadn’t updated to the latest version were rolling fast through the Jungle, while Zwifters on the latest version moved much slower. At 300 watts (4 w/kg) it was a difference of about 5km/hr. No small difference!
On top of that, the Zwift Mountain bike which was rolled out in last week’s update was supposed to perform pretty well in the dirt. Details are scarce, but the big idea was that the mountain bike would be a poor choice for a race on tarmac, while being a useful option in the jungle.
But that hasn’t materialized either. Thus far some bugs have made it so the mountain bike doesn’t perform well… anywhere, really! (It’s probably a bit faster than it should be on tarmac, but significantly slower than, say, the Tron bike on the Jungle Circuit.)
Today’s Jungle Update: Faster Dirt
With today’s update, the Jungle is rolling much faster. Since we hadn’t done a lot of testing on the Jungle Circuit prior to last week’s update, we can’t really tell if the speeds are different now than they were, say, 1 month ago. But they’re pretty close, and much faster than they were after last week’s update.
As for the mountain bike: it still isn’t performing particularly well on any surface. But that should change soon (and it seems plenty fast on Repack Ridge!)
Squishing Bugs/Riding Gravel
Zwift will get these bugs fixed soon enough. Then we’ll test various setups and help you get a virtual gravel/dirt setup just in time for the winter season.


")