The fifth race of Zwift Racing League 2023/24 Round 1 happens Tuesday, October 10, and it’s our second points race of this round. With three KOM segments and zero sprint intermediates, this week is all about watts per kilo, smart racing, and… bike swaps? Maybe.
Let’s dig into crucial segments along with bike choice, powerups, and strategic options!
Looking at the Route: Temples and Towers
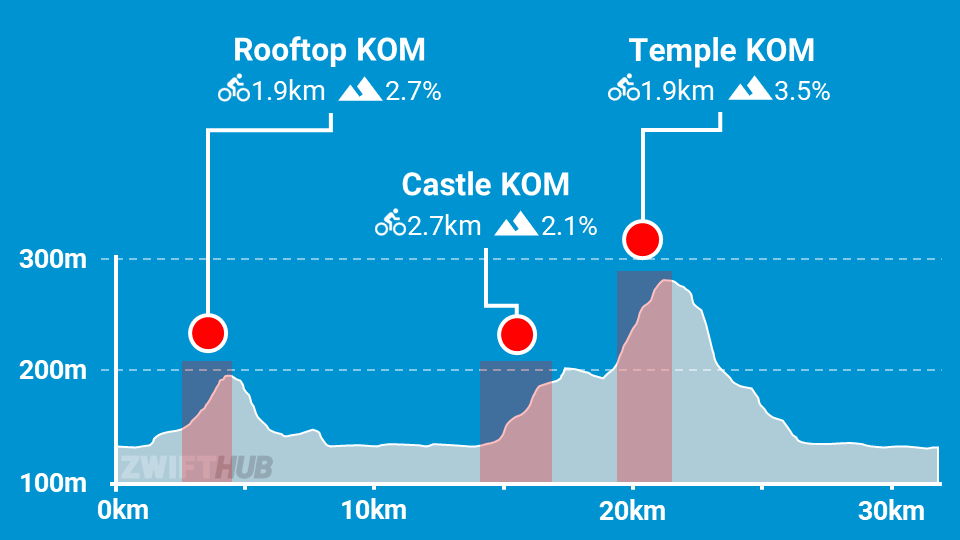
Makuri Islands’ Temples and Towers hits all three KOMs on the map, covering a total distance of 33.4km with 280m of elevation. This our second time racing this route in ZRL (we raced it in 2021/22 round 2) but this time around, D category will be racing a shortened version that ends atop the Temple KOM (around 22km):
Rather than taking you through a turn-by-turn, let’s just discuss the three KOMs, since that’s where the action will happen. We’ll also talk about the finish.
First, the Rooftop KOM. At 1.87km and 2.7%, this is the “easiest” of the three KOMs. It’s a very draftable climb, especially on the first half, which is a series of steps.
The first selection of the race will happen here, but it won’t be a huge selection. There will still be a sizeable front pack hitting the flat roads at the bottom.
Second, the Castle KOM. At 2.67km and 2.1%, this climb comes in two parts. The first, flatter half is draftable, and the pack typically stays together. The second half, especially after the hairpin left into the Castle area, is where things string out.
Expect a second selection here.
Third, the Temple KOM. This is the big one! 2.5km at 3.6%, this climb is all dirt and thus will take around twice as long to complete as the Castle KOM. Strong climbers will put in their biggest attacks here to shrink the front pack’s size substantially and grab some segment points.
The finish is set in a custom location for these ZRL events, so it comes before the typical finish if you were to ride the route for one full lap. You’ll hit a bit of dirt, go through the tunnel, and when you exit the roundabout you’ll have less than 600m left to go. Watch your distance to go, watch the pack, and sprint smart.
The finish banner only comes into sight with around 200m to go!
Read more about the Temples and Towers route >
PowerUps
Riders will be awarded powerups through each banner, and WTRL has assigned specific powerups to specific banners. Here are the powerups you’ll receive as you progress through the race course (note that D riders will only receive the first 3 powerups):

Aero Boost (helmet) @ Rooftop KOM Arch (~5.2km): makes you more aerodynamic (reduces your CdA by 25%) for 15 seconds.
Use at higher speeds (flats and descents), especially when no draft is available (although it is still useful when drafting.)

Lightweight (feather) @ Railway Sprint Arch (~7.8km): reduces your weight by 10% for 30 seconds.
Use on climbs, when weight matters the most. The steeper the road, the more this helps.

Steamroller @ Castle KOM Arch (~17.8km): reduces Crr for 30 seconds so you roll as fast as a road tire on pavement regardless of wheels or road surface. Event-only.
If you’re on a road bike, use this when you hit a dirt patch. (It also provides an advantage on cobbles, bricks, ice/snow, etc.) If you’re on a mountain bike in the jungle, use this when you hit the wooden bridges or the hard-packed dirt at the bottom of the Jungle Circuit.

Draft Boost (van) @ Temple KOM Arch (~22.6km): increases the draft effect you are experiencing for 40 seconds.
Use at higher speeds (flats and descents) when you are already drafting off another rider (since this powerup only helps when you are drafting.)
Steamroller @ Castle KOM Arch (~25.7km): reduces Crr for 30 seconds so you roll as fast as a road tire on pavement regardless of wheels or road surface. Event-only.
If you’re on a road bike, use this when you hit a dirt patch. (It also provides an advantage on cobbles, bricks, ice/snow, etc.) If you’re on a mountain bike in the jungle, use this when you hit the wooden bridges or the hard-packed dirt at the bottom of the Jungle Circuit.
Bike Frame + Wheel Choice
An all-arounder setup is your best bet here, since you want something decently fast for the flats and descents, but light enough that it won’t hurt you much on the key climbs.
The Tron bike is a good all-arounder. We also like the Scott Addict RC + ENVE 7.8 wheels – a combo which climbs slightly faster than the Tron on this route’s KOMs (less than 1s difference, but that matters). See our Tron vs Top Performers chart for details on the performance of various top frames and wheels.
The most aero setup in game (Specialized Venge S-Works plus DT Swiss disc combo) loses 2.5s to the Scott+Enve combo on the Temple KOM, so we wouldn’t recommend going pure aero.
To Swap, Or Not To Swap?
This is the question many are asking. If it’s not worth riding a gravel bike from the start (and it’s not), is it worth swapping to a gravel bike before the Temple KOM, to take advantage of its speed on the dirt? And if so, should you swap back to a road bike… and when?
The answer is… it depends. Let’s run through three likely scenarios for A/B/C riders:
Scenario 1: Starting the Temple KOM in a large pack (10+ riders), and you are a strong enough climber to possibly get FTS points. Swapping may work, but it’s a big maybe. It would only make sense to swap if you were to stop before the KOM start line, swap, then chase back onto your pack and finish at least 10s ahead of them at the top, so you can swap back to a road bike after the KOM banner and get back into the group. If you can do all this from the front group (and that’s a big if!), you’ll earn FTS and FAL points, still be in the pack you started with, and on a road bike that lets you contest the finishing sprint.
Scenario 2: Starting the KOM in a large pack (10+ riders), and you are not a strong enough climber to get FTS points. If you’re just praying to that Zwift gods that you’ll be able to remain with your group over the top, don’t swap. Because even if you match the power of others in your pack, you’ll probably still be dropped due to the time cost of swapping off the gravel bike. Put another way: the best that can happen if you swap is to “break even” and finish the climb in the same pack you started with. Better to keep it simple and work to hold your position in the pack.
Scenario 3: Starting the KOM alone or in a very small group (less than 10 riders), and you are not in the front group. If you’re in this position, your drafting on the climb will be minimal, and you probably aren’t strong enough to get FTS points on this KOM anyway. Don’t worry about swapping. Just work to maximize your finish position.
If you’re a D rider, there are just two scenarios to consider:
Scenario 1: You are a D rider and can swap bikes fairly quickly (15 seconds or less). Stop before the Temple KOM start line and swap to a gravel bike. It will save you 20 seconds or more over your road bike, so it’s worth it.
Scenario 2: You are a D rider who cannot swap bikes quickly. Just stay on your road bike and give it all you’ve got to the top!
Related: Which Bike Should I Use on Zwift’s Makuri Islands Routes?
More Route Recons
Many recon rides are planned each week on the upcoming ZRL route. If you’re unfamiliar with this course, jump into an event and do some recon! Here’s a list of upcoming Temples and Towers events.
Si Bradeley
Strategic Options
Points Distribution, Week 5 (A/B/C)
Points Distribution, Week 5 (D)
The maximum points a team of 6 could earn in this race. D category is unique since FAL points on the final climb are effectively Finish points, so we recategorized them in the chart.
As you can see from the chart above, KOM points make up a large majority of the overall points. Winning teams will have riders with high W/kg in the 2.5-7.5 minute range.
So what strategies will riders employ in race 5? Here’s what we predict:
- Smash-n-Ease First Two KOMs: riders strong enough to chase KOM FAL and FTS points will attack the second half of the first two KOMs, but not work to stay away from the pack afterward. It’s not worth the effort to stay away when they know they’ll drop weaker climbers on the final KOM anyway.
- Hanging ’til the Finish: riders who aren’t strong climbers will be doing all they can to hang with the front pack over the KOMs in order to find themselves in the front group on the flat lead-in to the finish. If sprinters can make it over the top with the front group, they should be able to grab high finishing points.
- A Strategic Final 11km: once we finish the final KOM, we expect to see a small group of climbers off the front, with a group of “flatlanders” chasing. Whether those groups come together or not in the final 11km will be a question of teamwork and strategy. Is it smart for a sprinter in the chase group to work to bridge up to the front if he has teammates in that group? What if you aren’t a sprinter? What if you don’t have teammates in front? Lots to consider.
- Destroy Any Gravel Starters: if a strong competitor begins the race on a gravel bike, it would be smart to push the pace on the pavement, particularly on the climbs, in order to drop that rider before the Temple KOM. (This gets extra-interesting when you consider that Zwift caches other riders’ bike selections, so what you see on screen may not be entirely accurate…)
- Bike Swapping: some riders (especially in D category) will swap to a gravel bike for the Temple KOM. See “To Swap, Or Not To Swap?” above for more discussion on this.
- Smart PowerUp Usage: having particular powerups assigned to particular arches means riders can plan powerup usage before the race. Knowing powerups, arches, and the race course can be a real strategic advantage this week.
Your Thoughts
Any insights or further thoughts on this race? Share below!
