

I vEverested on Friday, May 23rd. While preparing, I consulted various resources, including the Zwift Insider posts from Ron Chatfield and Tim Perkin. These testimonials helped me understand what I was facing, and now that I’ve completed the challenge, I want to share my experience with the community to help others prepare for their epic vEverestings.
But First, the Numbers
- Time: 12:03:05
- Elevation: 8888 m
- Distance: 213.18 km
- Route: Road to Sky
- Segment: Alpe du Zwift
- Laps: 8.5
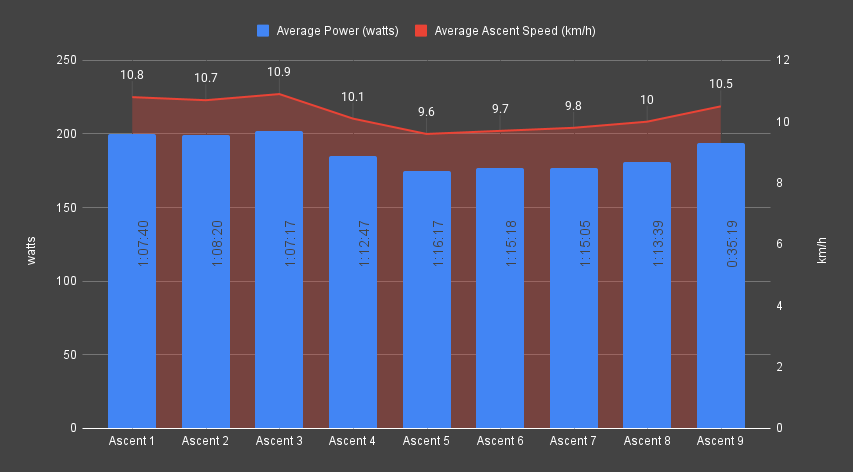
- Average Ascent Speed: 10.5 km/h
- Average Descent Speed: 66.1 km/h
- Average Ascent Power: 188 w
- Normalize Ascent Power: 189 w
- Average Ascent Heart Rate: 121 bpm
- Average Ascent Cadence: 84 rpm
- TSS: 489
- Work: 7047 kJ
- Weight: 71.4 kg
- FTP: 4 w/kg
- Height: 180 cm
- Carbohydrates In: 873 g
- Sodium In: 9199 mg
- Calories In: 4563 kcal
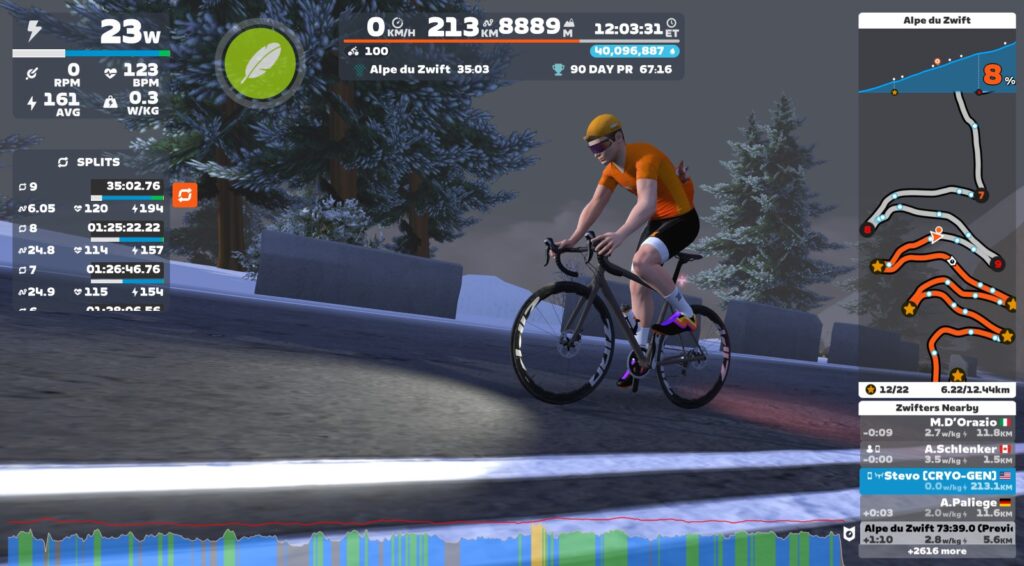
Getting Started
After a few weeks of consideration, I scheduled the ride for Friday, May 23rd. Leading up to the day, I secured my nutrition and configured my pain cave/battle station for the event, trying not to overthink the challenge ahead.
I didn’t adjust my training schedule in advance of the attempt and still raced with my TTT team the day before the event (go CRYO-GEN Kestrels). Early Friday morning, I set out. Here are my observations.
Initial Preparation
I’m a data nerd. As such, I was at home researching and planning my vEverest attempt. I consulted first-hand reports, compared segment data, and quickly decided to use Road to Sky and Alpe du Zwift for the ride. After running the numbers through Everesting’s lap calculator, I settled on a 12-hour target time. I prefer to train early in the morning, but your chronotype will ultimately determine your optimal ride schedule. I scheduled my attempt for 4 am, intending to have an early dinner.
The Day Before
I assembled my nutrition and set up an extra table next to my trainer to house the goods. I completed a full video weigh-in, updated my weight in Zwift, set the trainer difficulty to 100% according to Everesting rules, and took screenshots and photos of each step in Zwift’s settings.
This is a good time to optimize your virtual gears, as trainer difficulty will change the feel of the ascents. Also, hit the garage and equip your fastest climbing bike and wheels! I used the S-Works Aethos and Zipp 353 NSW wheels.
The Day Of
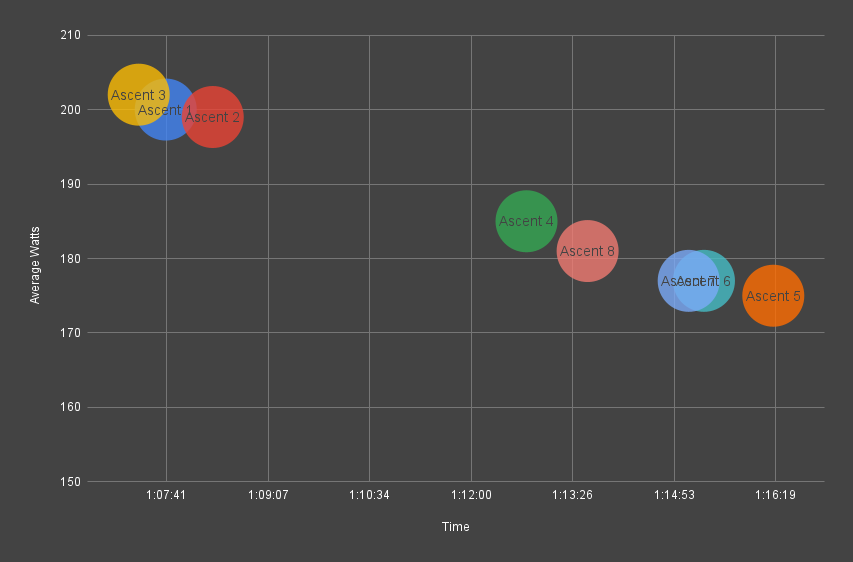
I woke up an hour early, but otherwise maintained my routine. Wake, dress, eat, stretch, and train. After logging on and taking a few more pictures, I started out, quickly realizing I needed to adjust my gearing further. After that hiccup, I started my watch and was off at 4:17 am. My pace for ascents one through three was hot and likely unsustainable. This was entirely avoidable, but I settled into a sustainable pace by lap four, which I maintained until lap nine.
I utilized each descent to get off the bike, eat real food, refill hydration, change kit, and bio break. Use these rests wisely, but do not let your guard down. I avoided sitting down and used the time strictly to prepare for the next ascent. Time your first descent so you can return to the bike before your avatar passes the segment start line. Be aware of the limitations of your watch and heart rate monitor as you leave your training area. Consider leaving them behind to prevent disconnects from your trainer and Zwift device.
After completing the vEveresting, I straightened up my pain cave and headed for the shower. I consistently fueled during the ride and wasn’t hungry, but I happily ate a massive burrito, then retired to the couch with my laptop to pore over my data.
The Next Day
I returned to my usual routine: wake, dress, eat, stretch, and train. The legs felt okay, all things considered, and 90 minutes of zone 1 got things loosened up. My only other activity for the day was resting, eating, and walking after meals. While not fully recovered, by the end of the day, I was ready to lead my Sunday morning 2-hour Cat C group ride (go Team CRYO-GEN).
Environment
Optimizing your environment will help you be more efficient and comfortable for such a long session on a trainer. Familiarize yourself with your training area so you know what time to close the shades and block the afternoon sun. Make a reminder to adjust the HVAC to prevent the space from becoming too hot or humid. Adjust the lighting to prevent glare, darkness, or other distracting conditions. Check the condition of your fans and add more if needed. Stock your training area with clean towels and sweatbands.
Nutrition
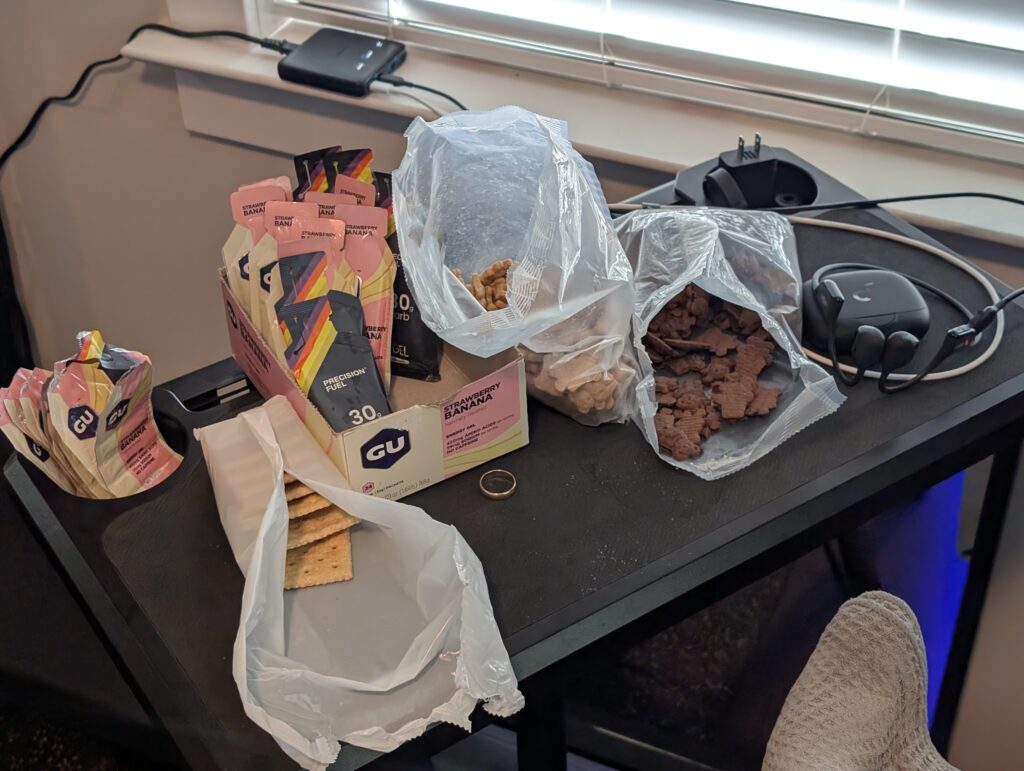
This will make or break your ride. Stick with familiar foods that you’re comfortable with and do not cause you digestive or GI issues. Fuel early and often. Set up a dedicated table for on-bike nutrition where everything is easily accessible. The goal is to reduce friction and encourage fueling, as you may not feel like eating. Supplement your water with electrolytes and hydrate consistently throughout the session. As with food, stick with known brands that do not cause you issues. Consider pre-hydrating with electrolytes before you begin your attempt.
Hardware
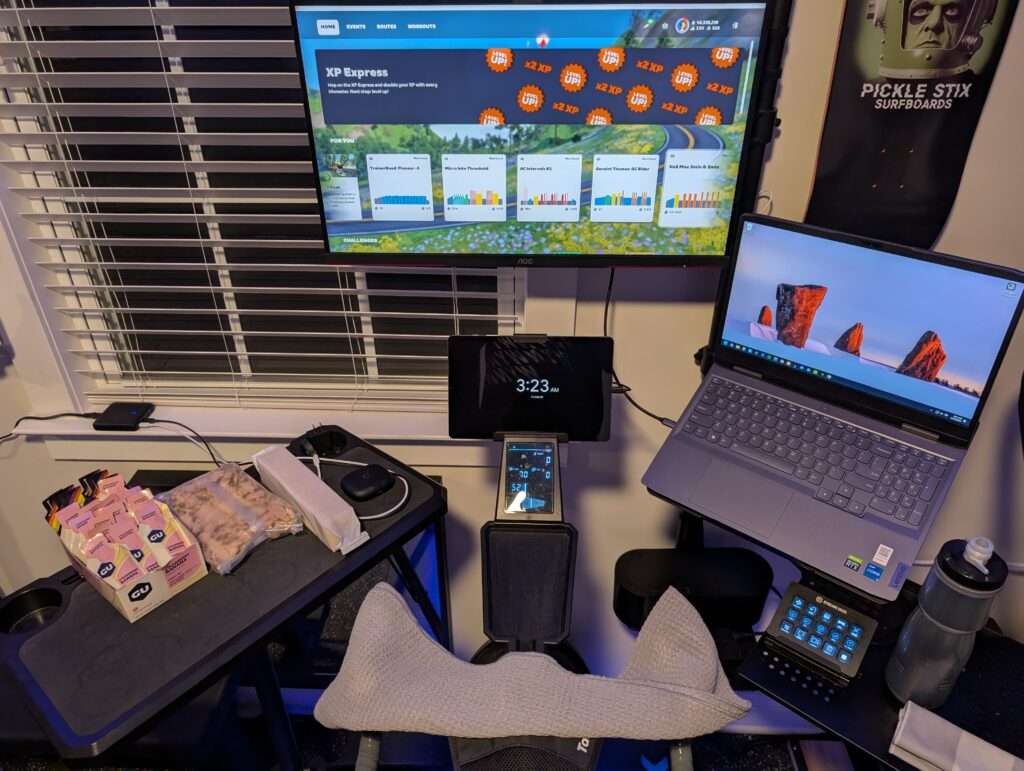
Some tips to ensure your hardware functions smoothly throughout your vEverest attempt:
- Update your Zwift devices, head units, watches, and tech well in advance of your vEverest attempt.
- Allow plenty of time to establish a secure connection between your trainer, Zwift device, head unit, watch, and heart rate monitor. Make a test ride or two prior to starting your attempt to ensure that all devices are communicating with reliable connections.
- Address any bike, trainer, rocker plate, or shoe maintenance well ahead of your ride.
- Dial in your physical or virtual gears before your attempt. The 100% trainer difficulty setting will impact the feel of the ascent. Get comfortable with your updated gearing before you set out.
- Set up a charger for your phone and wireless headphones.
- If running Zwift on a tablet or phone, ensure your charger is powerful enough to charge the device while it is running Zwift.
Zwift Features
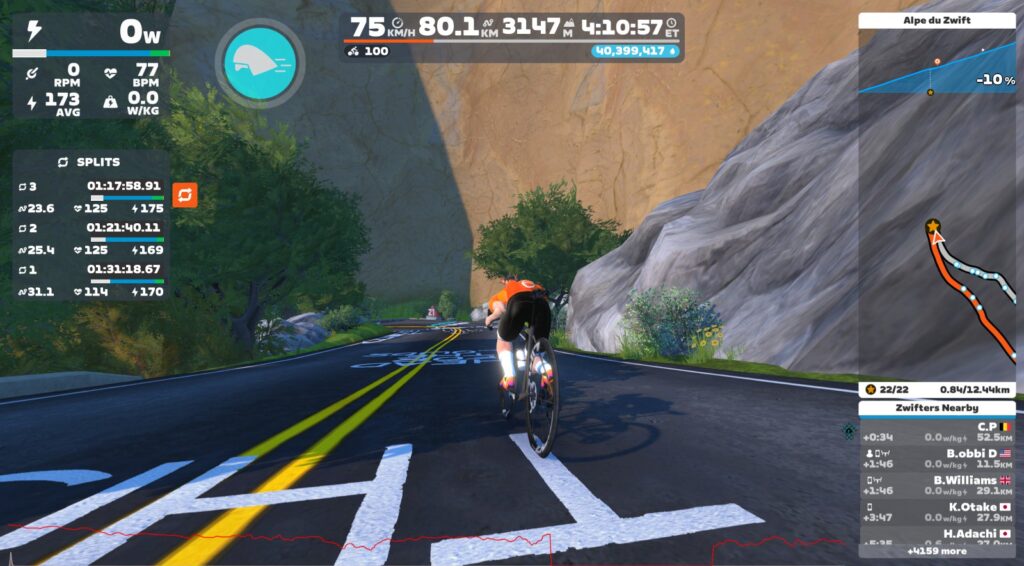
Zwift launched the new lap feature the week of my vEveresting. The lap counter was an outstanding tool, and I was able to launch a new lap at the start of each ascent. Initially, I planned to reset the lap counter at the beginning and end of each ascent, but I quickly forgot to reset it at the top of the mountain and decided to log each complete lap instead. Combined with the segment timer HUD elements, the lap counter made it easy to compare average power, heart rate, and time.
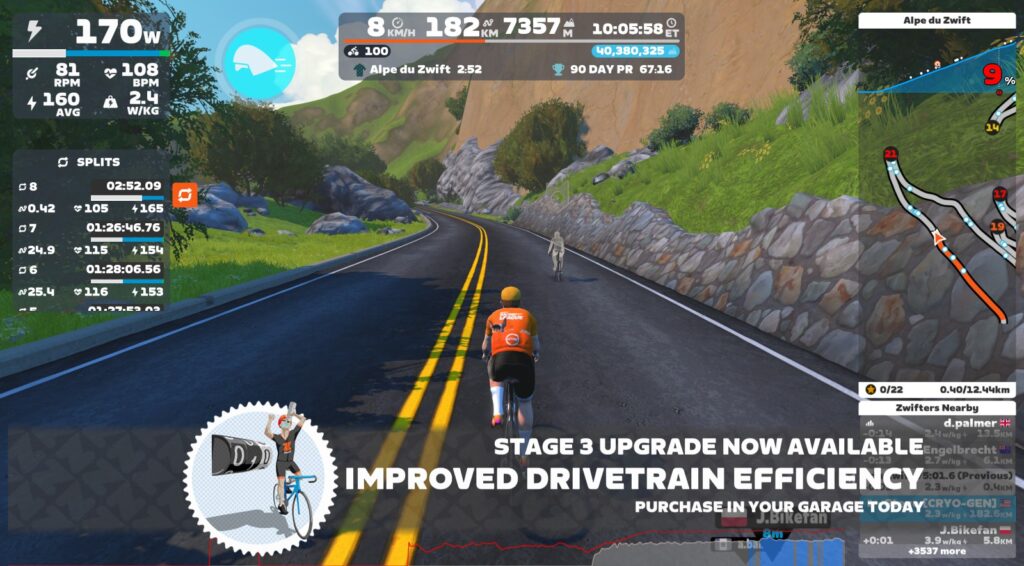
vEveresting also provided an outstanding opportunity to upgrade my S-Works Aethos climbing bike. Ahead of the ride, I noted the elevation thresholds for each upgrade level and used them as milestones during the session. When I hit an upgrade, I quickly stopped, hit the drop shop, and purchased the upgrade. This routine was motivational, and I was able to upgrade from level 0 to level 3 by lap 8!
Related: What is required to fully upgrade a particular bike in Zwift?
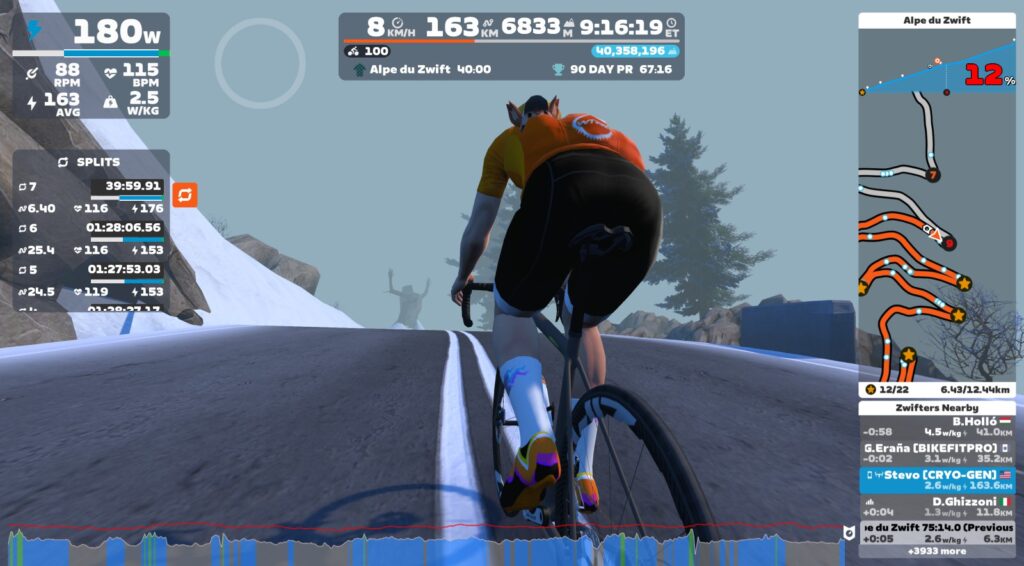
The HoloReplay ghost is the MVP of a ride with repeating segments. Once you’ve established a sustainable pace, your ghost will escort you up the mountain on the next lap. If you pace yourself to the ghost, you can hit consistent lap times with little effort. Be aware of chasing a fast ghost and know when to fold and let the ghost ride ahead. The sunk cost fallacy is real, and it’s easy to attempt to maintain the unsustainable pace from your previous lap.
Kit
Bib selection is paramount for a ride this long. Use your best-fitting, most comfortable bibs, and plan to swap them at least once during the ride. I changed my bibs, shirt, and socks after lap four and felt like a new person. Consider swapping to a different model or style of bibs when you change. A slightly different fit may help prevent hot spots caused by impedance mismatches between your bibs and anatomy.
Training
A strong level of base fitness is necessary for vEveresting. Consider long Erg mode training sessions in zones 2 and 3. There is no coasting up the mountain, and if you stop or slow pedaling, you will stop moving. Erg mode helps train you to maintain steady and consistent power, which is crucial for this attempt.
Pets
Ensure you have a feeding, walking, and care plan in place for your pets. Make sure that they are comfortable while you suffer on your ride.
Support
While it’s more challenging to take on this attempt unsupported, it’s entirely possible. If possible, schedule your ride for a day when family or friends are available to assist. I rode unsupported until the very end when my beautiful wife brought home burritos. Consider coordinating with your Zwift team, who will provide moral support during your ride. I kept my attempt a secret until one of my teammates noticed me online with 200 km clocked and rallied the team for an all-out ride-on assault. This gesture helped me in the end.
Conclusion
vEveresting was the hardest thing I’ve done on a bike, indoors or out. It put my endurance to the test but resulted in a deep feeling of accomplishment that I’m sure won’t come from anywhere else. A massive thank you to the community for the content that helped me plan the event and Team CRYO-GEN for motivation and props. Hopefully, this article will help others in the future. Be well and ride on!


It’s probably worth mentioning the rules around trainer difficulty. I did my vEveresting years ago so maybe things have changed but anything less than 100% wasn’t considered an official vEveresting. I suspect it might be the same around erg mode. Didn’t bother me in the slightest that I didn’t qualify for the official t-shift but it might be a disappointment for some.
Thanks for reading, Raymond 👊 I rode with trainer difficulty set to 100% as required by the Everesting rules. It noticeably changes the feel of the grades, and adjusting your gears should be part of your preparation 👍 I was sure to document the process, as well as my weight-in so that I would qualify for the Eversting Hall of Fame 👍
Well done Stevo!
Thank you, Ray 👊
Well done on your accomplishment, Stevo and thanks for the great article.
Thank you, Brendan 👊 Looking forward to your full-everest attempt 😎
Well done. Amazing ride. I still think Zwift should make a long steep portal climb you can Everest to the top in one go. Maybe 20 or 30 equal distant arches and much better background music/noise. Group ride or event?
Although 3 days later you might still be seeing those floating orbs/bubbles. Maybe add some floating animals like Wizard of Oz in the tornado just to break things up a bit.🤔
I continuous 8848m climb portal would be wild! The arches could be used as rest stops and lap markers 👍
Surely it would be Everest itself?
Well done sir..👍
Thank you, Neil 👊
Amazing feat and a great article. Wow, just wow!
Thanks for reading, Tim 👊
Great article Steve, another Team CRYO-GEN leader who give so generously of his time to serve those who ride and race with Team CRYO-GEN and a true gentleman along with it. 😊
Thank you, Rick 👊 Riding and racing with Team CRYO-GEN is great motivation, and I’m constantly working to get stronger and faster to help the team 💪
The trainer difficulty at 100%, is a real nonsense at the present state of the technology, when people use different trainers.
So someone on 100% trainer difficulty, on a cheap trainer, will enjoy almost flat pedaling, and someone with an advanced trainer will feel all the grades fully.
Total nonsense. Absolutely total nonsense.
To make it smart, they should also define a list of specific trainers that are approved to simulate the same grade as in the virtual world.
Thanks for reading, Alex. An approved trainer list is an interesting idea. I use a Tacx Bike Neo, and trainer difficulty noticeably impacts the feel of the grades. Perhaps the Everesting team could put together a list 🤔
They wont as they would be classed as discriminating against those who havent got a “listed” trainer. 100% on any trainer is 100%, only “smart” trainers adjust gradients and resistance for a more realistic “feel”
I absolutely agree with you. Combined with the fact that folks with Wahoo smart bikes can configure their “road” bikes with MTB-like gearing means that they can cruise up the Alpe at a more comfortable cadence than a standard road bike (even with 50/34 compact gearing)
I seem to remember there was a list of verified trainers, I am pretty sure it had to be a smart trainer with power meter. When I did mine I set it to 100% but ran out of legs with the gear ratio’s I had and definitely went out too hard lol. I mounted my MTB onto the trainer to get lower gears and was fine all approved.
Done 5 Everests now never bothered to join hall of fame didn’t do anything wildly different just got in with it
Planning a double Everest that will be a different kettle of fish I expect
Possibly too gung ho attitude for some but you can always get off if it’s not working for you
a word of caution. Everesting is addictive. =)
Hi Steve, First of all, congrats on your vEveresting, not an easy ride. I did this on May 16, unfortunately, one or two weeks before the bike upgrade update on zwift. I’m writing to ask if you submitted the ride to the “official website”. I set my trainer to 100% like always, but I did use virtual gears since it would cost a bit to get a real derailleur that I could use without grinding my knees to death. Because of that, I did not submit my ride to the official website. Did you use virtual gears, and did you submit your ride? Thank you and congratulations again.
Thanks for reading, Tiago. I appreciate it 👊 The Virtual Everesting rules say “Virtual shifting such as Zwift Hub is acceptable.”
Hi! Thank you for sharing your experience!
Did you consider doing Ven-Top (mt Ventoux) instead of Alpe? Any thoughts on that?
Thanks for reading, Agnieszka 👊 I selected Alpe because the route is always available without requiring a workaround to load. I didn’t want to introduce variables that might impact the event like loading the route as a workout. Second to availability, I was more comfortable with the Alpe’s topography and section tracking. Ven Top now has progress/section markers, so it should be more engaging to use for a vEversting 👍
I had a similar question. Did you consider The Grade? Using the Oh Hill No route, the route automatically cycles you back down to the bottom and then automatically turns you back to the top. No u-turns. And the grade is more consistent, with no 15%+ gradient. Lastly, the 20-25 minute up 5 minute down seems appealing. But 5 might be too short of a break. I’m considering the options…
Oh Hill No is an interesting option. Some back-of-the-envelope math: There is a ~300 m flat spot at 1.3 km that takes 25-30 seconds to cover. This adds up to ~12 to 15 minutes (over 29 ascents) of riding without gaining elevation, which is longer than the jungle portion of Road to Sky. Not a big deal, but something to consider. I tested the descent and it took me ~04:10 to coast down The Grade before stopping just after the start of the KOM. This adds up to ~118-120 minutes for 28 descents compared to ~90-105 minutes for 8 descents of the Alpe. That being said, The Grade is busier, has nice scenery, and a higher “fun factor” which may help with motivation 👍
Whats the distance and elevation of the Grade?
https://zwiftinsider.com/segment/the-grade-kom/
Great article and well done!
Thanks for reading, Rob 👊
Hi Steve,
inspiring article. It answers many questions and is nicely supplemented by some of the comments below the article.
I do think you can now safely remove the word mediocre (cyclist) from your personal description. There is nothing mediocre about a successful vEverst.
As I said, an inspiring achievement.
Thanks.
Thanks, Peter, I appreciate it. Glad you enjoyed the article 👊
Very well done and a very inspiring write-up Steve!
Thanks, Karel, I appreciate it 👊
Wait, did I read this right? You were not powering the bike for the entire effort? You got off and did your thing on the descents then remounted at the U-turn? I am not taking anything from the effort of climbing 9000m, it’s admirable; however, getting off on the descents doesn’t feel like it follows the intent of the challenge. Those on the road don’t have this luxury.
Thanks for reading, Brandon 👊 Virtual Everesting rules permit getting off the trainer during the descents. From section two: “No need to stay on the trainer on descents. Feel free to use this time to top up food, take a change of clothes, have a stretch etc.” That said, you certainly would not have the liberty to coast unattended down your hill in a real life Everesting event. One of many ways the two efforts differ 🙂
I always love reading about vEveresting successes, as I find the idea very tempting. Great article with so many tips. My current limitation (other than fitness) is that my indoor trainer has an 8 speed cassette, so at 100% difficulty I may not have enough gearing! Time to try Alpe du Zwift and the grade at 100% to get the feel.
Awesome job and write up. Are you aware of any limitations/restrictions towards using the Zwift Hub trainer with virtual shifting? I have mine always set to Max (100%), but run virtual shifting which affords me the ability to select “climbing” gearing. Would that in any way invalidate an official eEveresting? I do weigh ins before each ride on Zwift (22k miles over the past 24 months) using the virtual shifting now for most of that time (my Kickr V5 doesn’t support the virtual shifting protocol and I enjoy swapping bikes out to train for positioning i.e. gravel, road and mountain bikes)