Week 19 – Goal Week Number Two
Editor’s note: Ian Murray is using Zwift to train for the International Triathlon Union Long Course World Championships held in Odense/Fyn, Denmark July 2018. His weekly Zwift Insider series discusses the previous week’s training and the plan for the upcoming week.
Wow, what a week! After last week’s sunburn debacle in the pool, I wasn’t sure how the goal workouts would go this week. It was definitely a week of ups and downs with a big ending.
Dead Arms Don’t Speak
Last week’s goal of finishing the week with a 7k swim didn’t happen, but the 5k that I did do did a good job of wrecking shop. I started Monday with a nice 10-mile run before riding the almost 10k into work. That afternoon, I hit the pool with my swim partner. We hammered through some good sets, pretty much finishing the job that I started on Sunday. I was pretty happy with being able to hit 1:33/100m SCM repeatedly. I was actually pretty stoked for Tuesday’s swim. I quickly rode home the 10k to take care of some business that evening for work and returned back home at about 9.
The next day, I got to the pool and set about teaching my body that “it wasn’t tired.” It was a good lesson that I thought would take. It did for a while. I consistently held mid-1:30s per 100m for a while, including for longer sets. Then, it hit me. I was starving. And, my arms no longer wanted to catch and pull. They were ok flailing around like a drowning victim, but they were done. I cut the workout short at 2500 meters and went looking for food. HUNGRY! The next day went fine with a good bike workout and SkillZ and DrillZ keeping my day busy. Thursday’s swim picked up where I left off on Tuesday. My swim muscles were shattered. Done. Cooked. I barely got enough in to hit the 11k mark for the week (including Sunday’s swim) and went back on the prowl for food.
Friday was an interesting beast. I had to get up before 4 AM to take someone to the airport. By the time I got back and finished the Coaches’ Corner podcast, I had to get right into my goal run for the week, a 30k sustained effort. On the treadmill. Yeah, 18.6 miles on the treadmill. Awesome. The reason I chose to do it on the treadmill, you ask? Well, I was able to program the course for the race into the treadmill, so I actually could simulate running the whole thing. Yes, I am a genius. Thank you. Anyway, 2 hours and 15 minutes of sweat later, I finished up. I felt good the whole way. I probably could have gone faster, but the goal was not destroying my legs. It was to practice the distance and the nutrition. Goal met!
Saturday was a fairly light day, or at least it was scheduled that way. I took over as the Director Sportiff/Road Captain for the C group at the TeamODZ Goats & Bears Race. It was a lot of fun, as we had a pretty good group who chose to work together. Andy, Paddy, and I did most of the work, as we are all A and B group riders who were on an “easy” day. In the end, we were able to help one of our ODZ teammates take the C group win, nearly catching the few remaining D group riders and holding off the As and Bs. It was a bit more TSS than I had planned for the day, but it was worth it to see Tim have a great race.
Then came Sunday (dread and doom music playing in the background). I decided to do a race simulation ride this weekend to cap off a week of goal sessions. Starting just outside of Santo Domingo, I would head north across the country for 76 miles to just outside Las Terrenas, on the north coast of the Samaná peninsula, stopping at an overlook point. Following the bike, I planned to run the remaining almost two miles to the beach for lunch. For safety and recording reasons, my wife and friend followed behind me in the car, providing me with a support vehicle.
We left the house at 6:10 AM and headed to the starting point. After a couple of pictures and loading up my aero bottle with my favorite Skratch Labs drink, we got to it. The first 20 miles passed quickly, making our first planned stop in about 55 minutes. We stayed just long enough to fill up my aero bottle and hit the bathroom. I was only rolling with the one bottle, as we planned to stop every 20 to 25 miles to let my support crew out of the car. This turned out to be an interesting tactic that didn’t work out all that well. We got going again and quickly hit the hills south of Los Haitises National Park. None of the hills were all that hard, but they just kept coming, one after the other, and there never seemed to be a downhill following the uphill. It was just a series of steps going up. Finally, 20 miles later, the road began to pitch in a more favorable direction.
Here’s where my tactical plan went sideways. You see, I have done part of this route a number of times. Normally, I stop at one gas station at the end of my ride to transition to the run. Unfortunately, my brain didn’t calculate that I normally turn around 20 miles after the first stop, refilling my water from the car on the side of the road.
So, there I was, hammering away, looking for the gas station that would never appear… ever. At about mile 48 or 50, I was pretty much out of water and getting a bit thirsty. This put me in a bit of a dilemma. Should I stop and refill or keep bombing down the hills, rolling along at 35 MPH. Anyone who knows me quickly knows that there was no discussion about it. I pressed on and hard. It felt so good. I got into a super tuck a few times, even blowing by some guys on their motorcycles. During one section, the support car had a hard time keeping up, as I was able to take the curves much faster than Ruby and Juan José. I made my wife a bit nervous during the white-knuckles descent, but I had so much fun.
Mind you, I was still looking for my gas station, but I realized that I might have missed it. I decided to push until I hit the 100-kilometer mark or my body gave in to the heat. Fortunately, the air flowing over my body from the high speeds staved off any problem from the heat, although I started to get a little thirsty by mile 56. Finally, we hit the end of the toll road and made the turn off toward Las Terrenas. I passed through the 100k mark and found a good spot to pull off. I threw down some calories and water and refilled my Skratch Labs drink then got back to work.
The last 13.5 miles were tough. The first part was fairly flat but into a head wind. Once we hit mile 65, though, the road pitched up. It felt like I climbed for the next 7 miles. I know there was a little bit of downhill there but not much. At one point, a third lane was added to facilitate the passing of slow moving vehicles. I was such a vehicle. Hell, I was barely moving before the third lane! Finally, at about mile 72, we hit the crest of the final climb. The next few miles undulated, but were significantly easier than the previous seven. At long last, I saw the sign for our finishing point, the Mirador Paraiso. After a few happy snaps with the bike of the lovely view, I switched out to my running shoes, and we headed toward the beach for lunch. A quick two miles later, I met up with the support crew at Playa Cozon and jumped in the ocean. The quick dip was closely followed by a tasty lunch at Restaurante Luis on the beach before the two-hour long drive back to the house. During the ride back home, I took the back seat and napped a little bit, trying to get in a little bit of recovery before returning home. Overall, it was a tough day, but it was not overly taxing. I was more tired from the schedule that I had maintained over the past few days than I was from the ride, so I took that as something positive. The week ended up being a great one in terms of training. I had a good bit of fun, and I think I took a good stock of where I am in my training plan. Things are looking good. If you want to see a cool map depiction of the ride, click here.
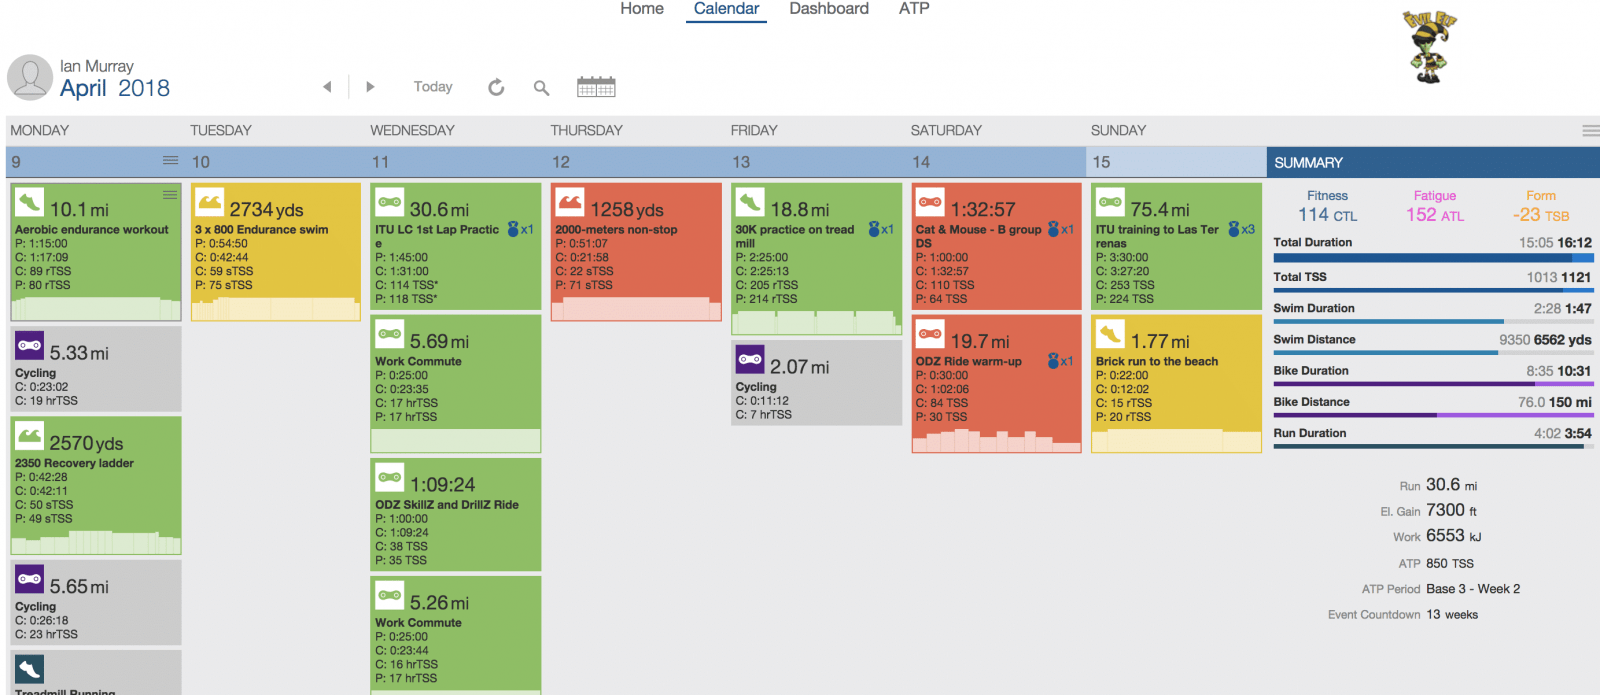
Planned TSS – 1013; Completed TSS – 1121
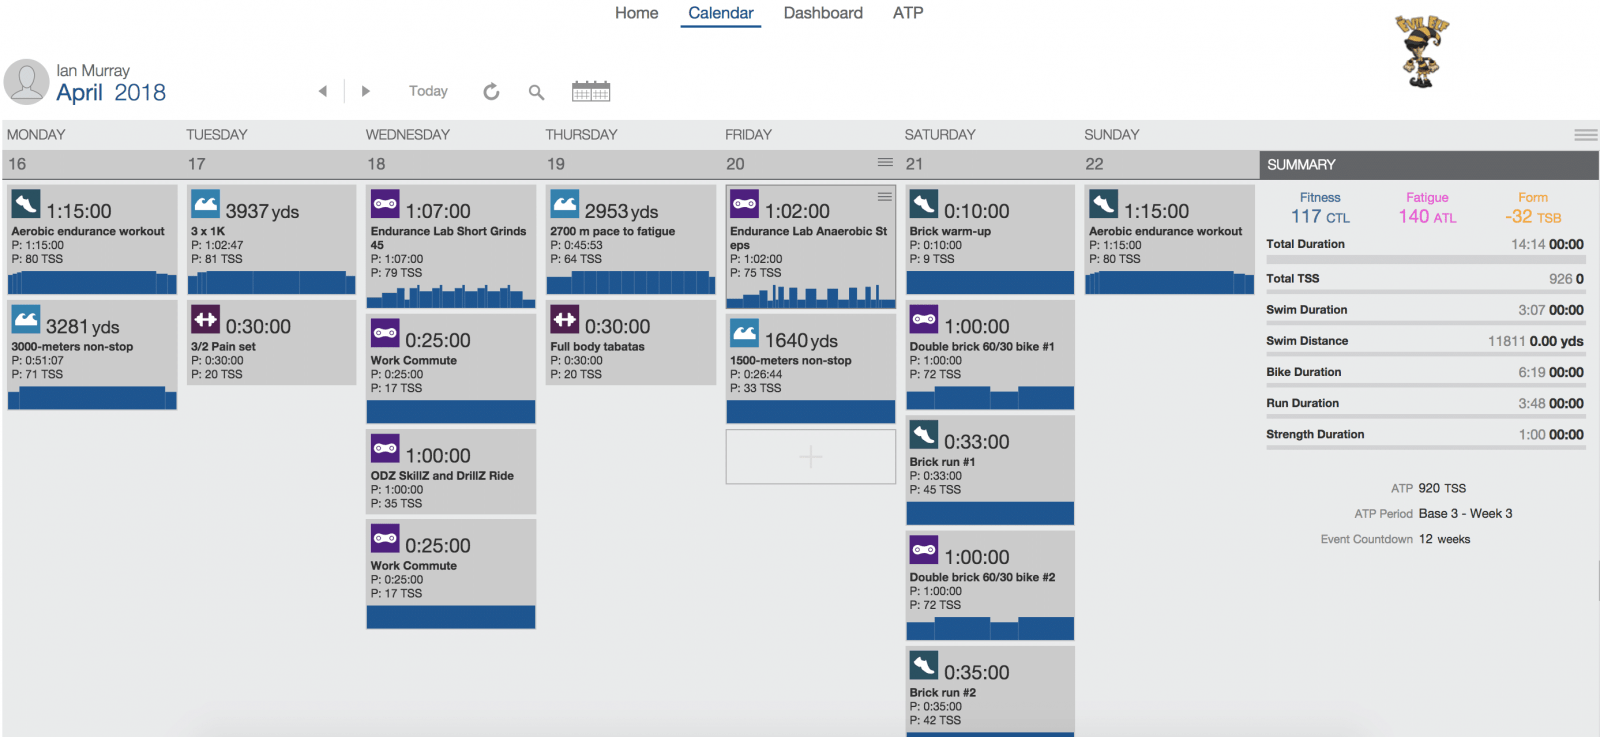
Another Week of “Fun”
After the hard week, I have another hard week. Let’s see how the body recovers. I’ll admit that I’m a bit fatigued, but we’ll see how things go. There is no single workout that stands out as being super hard, but the totality of the week is definitely a bit daunting.
Planned TSS 926
Starting to Wrap it Up
Well, we’re starting to wind down the training. The volume is there, so it’s time to work on getting faster. This is my favorite part. I love hammering out speed work for runs. After the next recovery week, that will start in earnest. I am looking forward to it very much. Once we get things planned out, I’ll try to post up the speed workouts that I will do on the treadmill on Zwift. Join me if you get the chance. Until then, Ride On!

 Bend to Bend Timing