Table of Contents
Zwift’s Fitness Metrics, initially released in April of 2025, help to answer common questions from endurance athletes: “How am I doing? Can I train more? Should I train less? What’s my potential?”
But if you’re new to riding or running, these metrics may be a bit confusing. So we’re here to help!
If you aren’t sure how to use Zwift’s Fitness Metrics, or what they’re even telling you, read on…
Riders: It Starts with FTP
As a cyclist, if you want your Training Score to be accurate in Zwift, you must have your FTP (functional threshold power) value set accurately in your profile.
What is “FTP”? It is the wattage you can stay below and sustain for longer durations, while going above it causes fatigue to set in very quickly. Most riders, if they put in a steady but maximal effort on fresh legs, can hold their FTP for 40-60 minutes.
Your Training Score is directly based on the Stress Points accumulated with each ride, and Stress Points are calculated from your FTP (see below).
So if your FTP isn’t accurate, your Stress Points won’t be, either, which means your Training Score won’t be accurate.
FTP is also used to calculate power targets in ERG workouts – for example, a VO2 interval may have you ride at 110% of FTP for 4-minute intervals. So you’ll want an accurate FTP value if you’re doing structured workouts on Zwift as well.
Zwift will automatically estimate your FTP based on your power bests as you ride or race in the game. But if you want a more accurate FTP value, I recommend taking an FTP test.
Related: How (and Why) to Take an FTP Test on Zwift >
Stress Points, aka “TSS”
For Riders
Once your FTP is set accurately, the Stress Points (SP) calculated for each ride will be accurate. SP is just a Zwifty name for TSS, an industry-standard metric developed by TrainingPeaks that combines both time and intensity into one number indicating how much stress a particular workout puts on your body.
Related: All about TSS (Stress Points) in Zwift >
You don’t need to know how SP are calculated to use them, although this post has the formula if you’re curious. To give you some idea of typical SP ranges, an easy 1-hour recovery ride may be around 40-50 SP, while a 1-hour race will be closer to 90-100 SP, and a 3-hour endurance ride may be more like 150-180 SP.
If you’re syncing outdoor rides to Zwift, but don’t have a power meter on your outdoor bike, Zwift will do its best to estimate your SP for the ride, much like Strava estimates your power even on rides without power data. If you want your training metrics to be truly dialed in, though, maybe it’s time to get a power meter on your outdoor bike?
I recommend the Favero Assioma pedals. They’re the most respected in the industry, more affordable than most, and easy to install (unlike crank or spider-based power meters).
Buy them on Amazon >
Read my Favero Assioma Duo review >
For Runners
Zwift uses industry-standard algorithms to compute SP for runs:
- If your run includes heart rate data, this is used to calculate the SP for that activity based on the hrTSS formula.
- If an outdoor run lacks heart rate data, Zwift uses the RPE (Rate of Perceived Exertion) from that activity as synced from Garmin or Wahoo to estimate SP using the method shown here.
- For Zwift activities without heart rate data, SP is calculated with a default RPE of 5 using the method shown here.
Seeing SP in Zwift
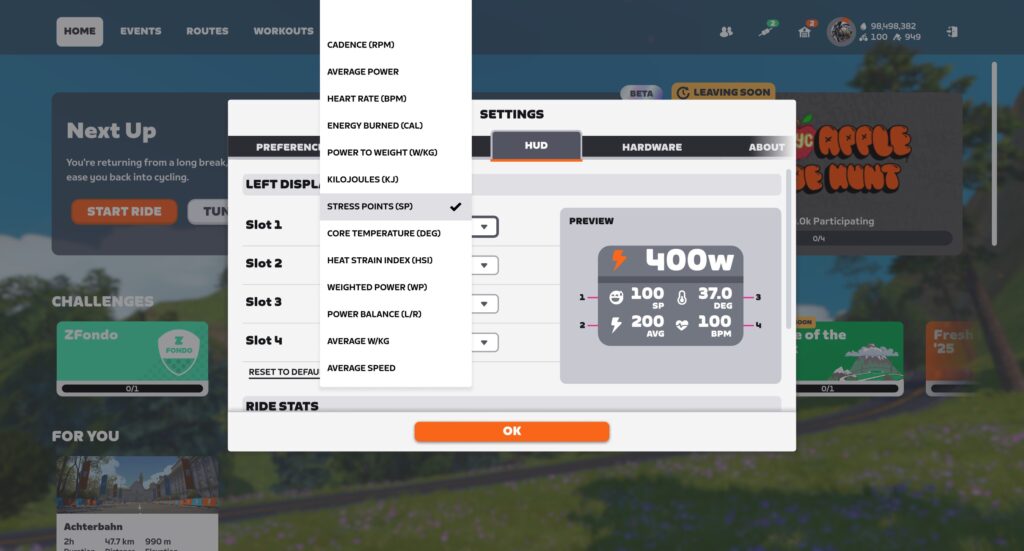
You can show SP in real-time in Zwift’s HUD by selecting it for one of the display metrics via Menu>Settings>HUD:
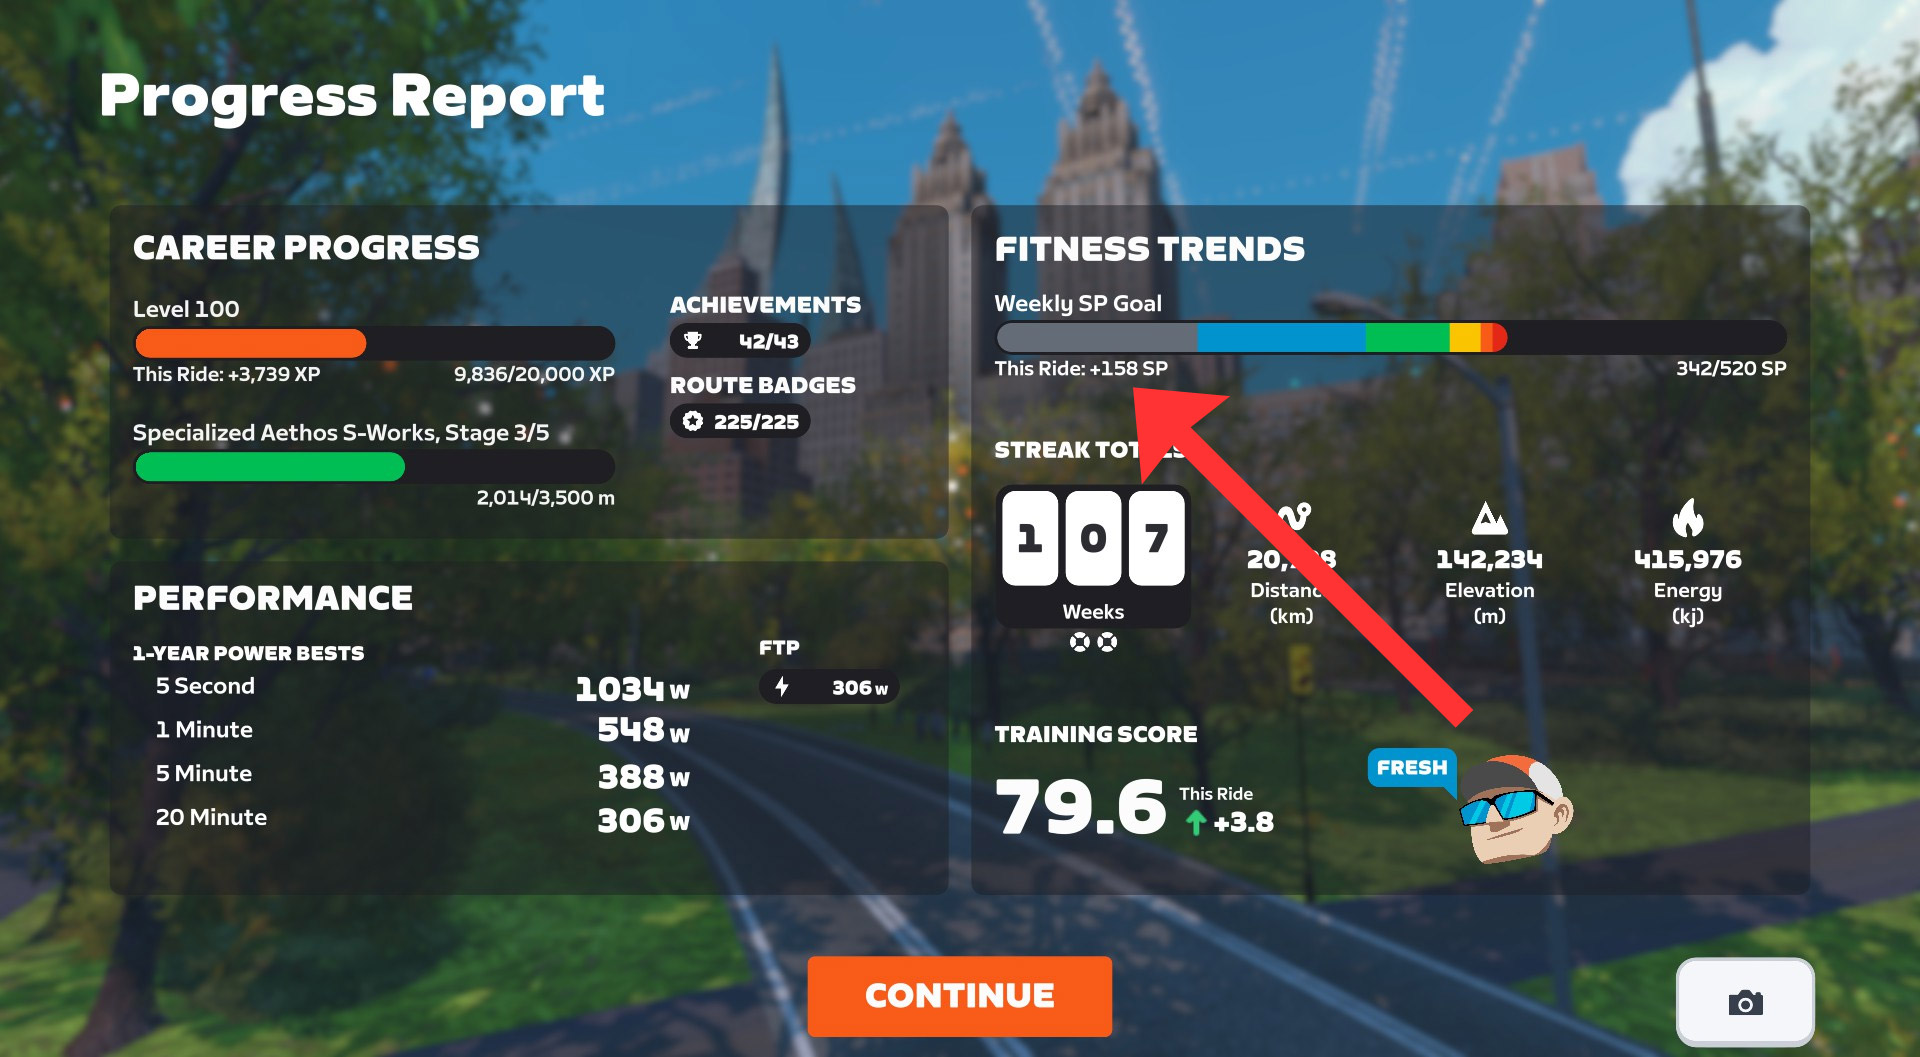
SP are also shown on the Ride/Run Report when completing an activity, and on the Progress Report screen if you’ve set a fitness goal based on SP:

Outdoor Activities
If you do any outdoor riding or running (and most of us do), you’ll want to get that data into Zwift’s system. Otherwise, your Fitness Metrics won’t be accurate, since they won’t include your outdoor efforts!
You’ll need to record your outdoor session on a device such as a bike computer (aka “head unit”), smart watch, or even your phone. I’m partial to Wahoo’s bike computers, but Zwift supports importing outdoor rides from Garmin, Wahoo, and Hammerhead accounts.
Learn how to connect Garmin or Wahoo to Zwift >
Learn how to connect Hammerhead to Zwift >
Training Score
Your Training Score in Zwift is the 42-day exponentially weighted moving average of your training load. What does that mean in simple terms? It means your Training Score is an average of your daily SP, weighted so recent sessions affect the score more than older ones. Note that “Training Score” is more often called “Fitness” in other apps, or “Chronic Training Load/CTL” in TrainingPeaks.
This comment from ZI reader R. Chung (yes, that Chung) unpacks how Training Score is calculated: “The ‘42-day exponentially weighted moving average’ (and the 7-day version) don’t mean they’re an average over the previous 42 days. That’s a common misconception. It means the exponential decay rate is 1/42 days = 2.38% per day (and the 7-day decay rate is 1/7 = 14.28% per day). The 2.38% decay rate means about three-eighths of the TSS from a ride is still around after 42 days, not zero.”
You can see your current Training Score in the Companion app at the top-left of the Fitness Trends box:

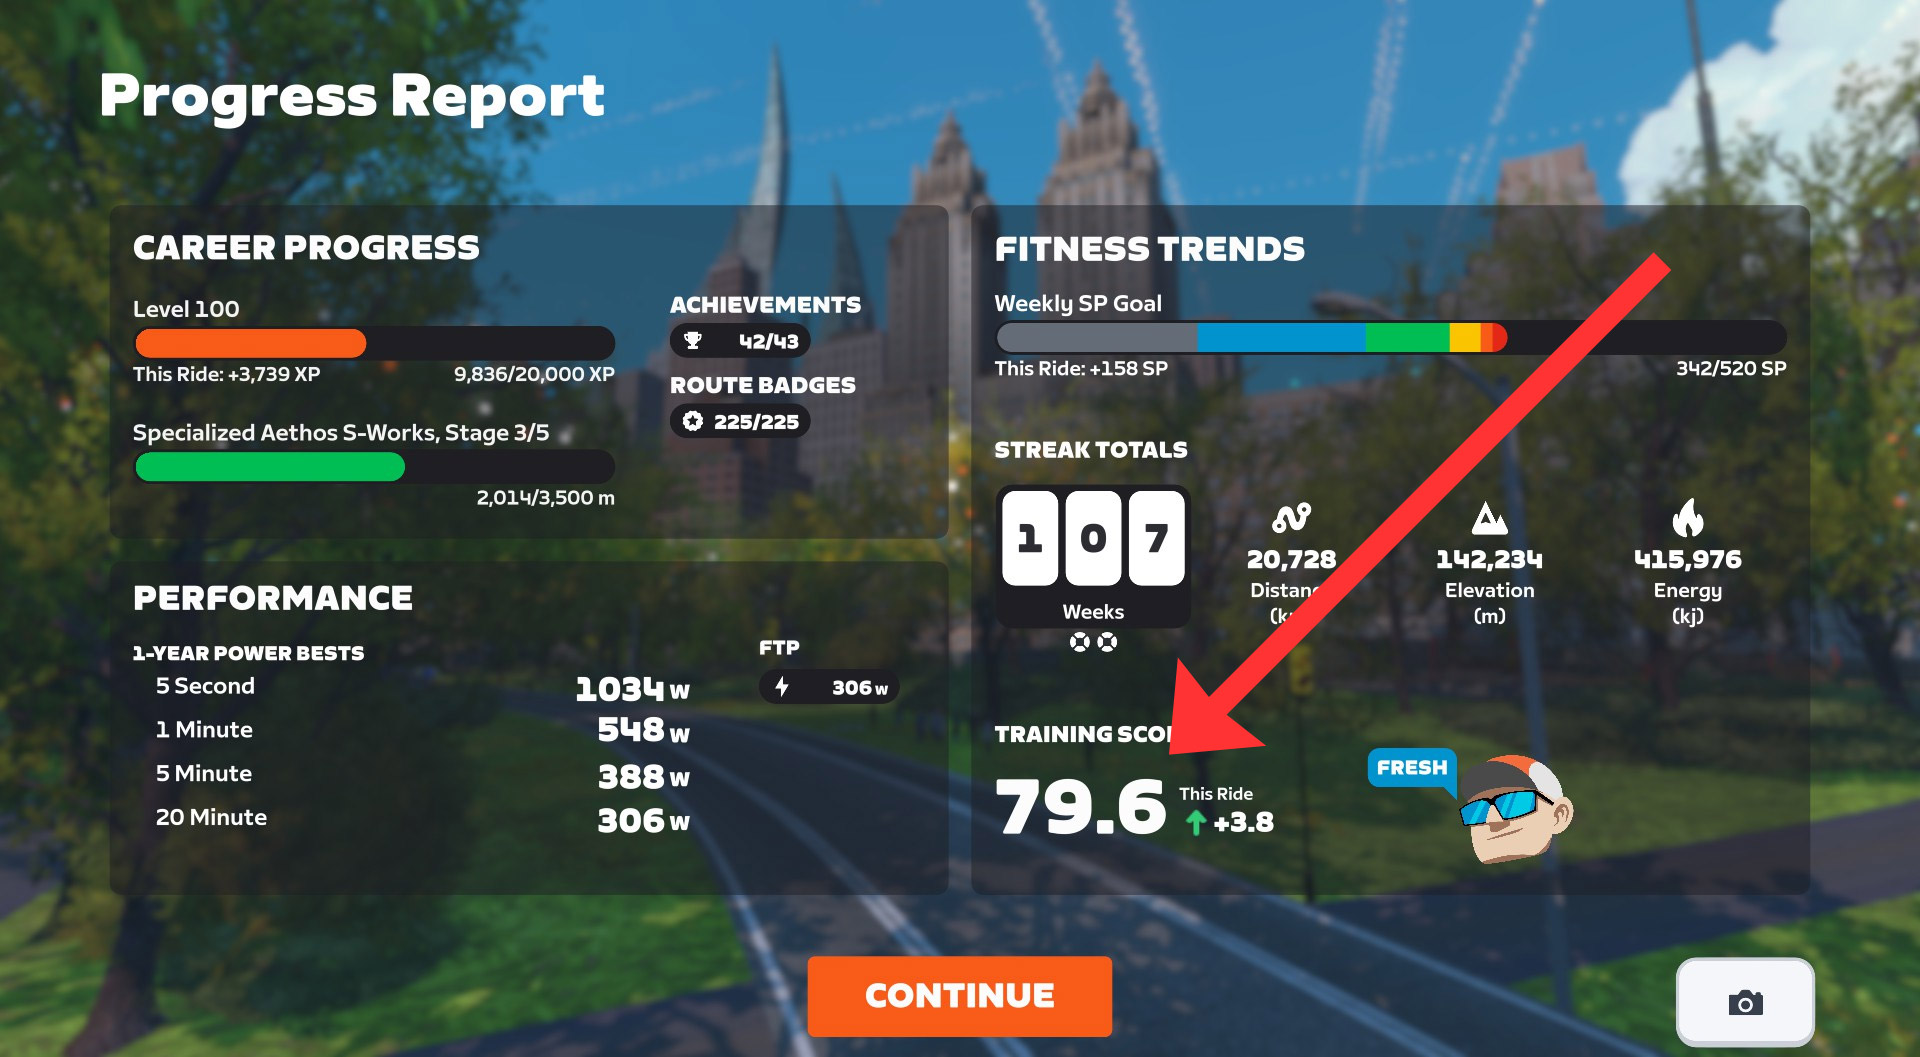
It is also shown on the Progress Report screen, along with a value showing how much your session changed the score:
Training Status
Your Training Status is also displayed in the Companion app and Progress Report. It will place you in one of the following categories:
- Overreaching: avoid staying here long, or you may become over-trained
- Productive: gaining fitness
- Fresh: fit and ready to race
- Detraining: losing fitness
- Ready: new to training, not enough data to categorize you
Zwift Training Status is based on a metric that other apps call “Form” or “Freshness”. This is calculated as your current Training Score minus your current Fatigue. (Fatigue is calculated similarly to Training Score, except it’s only a 7-day exponentially weighted moving average of your training load instead of 42-day.)
Since Zwift likes to keep metrics simple, they don’t display this Form/Freshness value. Instead, they simply chart it in the Companion app under “Fitness Trends”, so you can see where you’re trending:

How To Use It
So that’s how all of Zwift’s Fitness Metrics work. But how do you actually use them?
In some ways, that’s a very individual question, and thus impossible for me to answer. A qualified coach could look at your data and give you some really helpful insights, though!
But there are some general principles, and some obvious use cases, which apply to just about everyone.
First: it’s worth mentioning that your Zwift Training Status is not an indicator of how well you may feel on a given day. If you’re anything like me, Zwift may often say you’re “fresh,” but your legs disagree! That’s OK. Training Status summarizes overall Training Stress Balance (TSB), giving a sort of zoomed-out view of your current freshness, which may not match how you feel on the day.
If your Training Status is “Overreaching”, you’ll want to ease up soon. The great Joe Friel says, “…if you spend much time here you will create great fatigue and are flirting with extreme overreaching that would likely become overtraining if continued for too long.” Typically, you’ll automatically ease up training at this phase, because the body simply can’t keep overreaching. But be careful if you find yourself here.
Zwift’s Fitness Metrics are just a Zwifty (that is, simpler and more colorful) version of the commonly-used Performance Management Chart seen in coaching plans on TrainingPeaks and other platforms. These charts show the detailed results of periodized training plans, where athletes typically go through sections of training in the “productive” zone, take a recovery week to enter the “fresh zone,” then start another block of training. Often, these training plans are structured with a target event in mind, and athletes will taper their training in the week or two leading up to it.
You may not have a coach or the expertise to structure a full training plan, but you can use Zwift’s Fitness Metrics to help determine an effective training load for your situation. The metrics won’t tell you which workout to do each day, but they’ll help you manage your overall training load. And that’s half of the battle! While it’s good to know which specific workouts will help you most, so much of endurance training is about building up a training load. Getting on the bike. Running the planned distance. Putting in the work. Consistency.
So put in the effort to get into the productive zone, then take a week off after 3-4 productive weeks. And if you get into overreaching, don’t panic. But also, don’t keep digging that hole deeper!
Those are just a few tips and thoughts, but training management is a huge topic with plenty of rabbit holes. So I’ll leave it here for now.
What’s Next?
More Activities from More Devices
Zwift’s Fitness Metrics do a great job of delivering a simple, easy-to-understand view of your fitness trends… if most or all of your training syncs into Zwift’s ecosystem. That means most or all of your training needs to be cycling and/or running, and it all has to be recorded on Garmin/Wahoo/Hammerhead so it syncs into Zwift.
If you are a Zwifter who does substantial training outside of cycling and running (triathletes, for example), or you record your runs on, say, an Apple or Coros watch, Fitness Trends won’t reflect your training accurately. Not yet.
So what many Zwifters want is for Zwift to expand its ecosystem so a broader list of activities (swimming, cross-country skiing, etc) can be pulled in, from a broader set of devices.
Something Bigger
Lastly, it’s worth mentioning that these metrics are just one part of the more robust training platform Zwift is building. You can see the pieces coming together: first, third-party workout syncing brought all the big training plan providers to the table. Then revamped automatic FTP detection made it easier to set your power zones. Next, Zwift added outdoor rides and began computing training metrics. Then run activities were added to the mix!
To what end? We don’t know for sure, but Zwift recently released Personalized Recommendations, and there’s much, much more that could be done in this space…
Questions or Comments?
Did this post help you better understand and utilize Zwift’s Fitness Metrics? Still got questions? Comments? Share below!
