The third race of Zwift Racing League 2025/26 Round 1 happens Tuesday, September 30, and we’re back in Makuri Islands for a scratch race.
If you’re on an A or B team, you’ll be racing one lap of the Country to Coastal route. C and D teams will be racing one lap of Turf N Surf.
There’s much to discuss, including crucial course segments, powerup usage, bike decisions, and strategic options. So choose your category below, and let’s go!
Looking at the Route
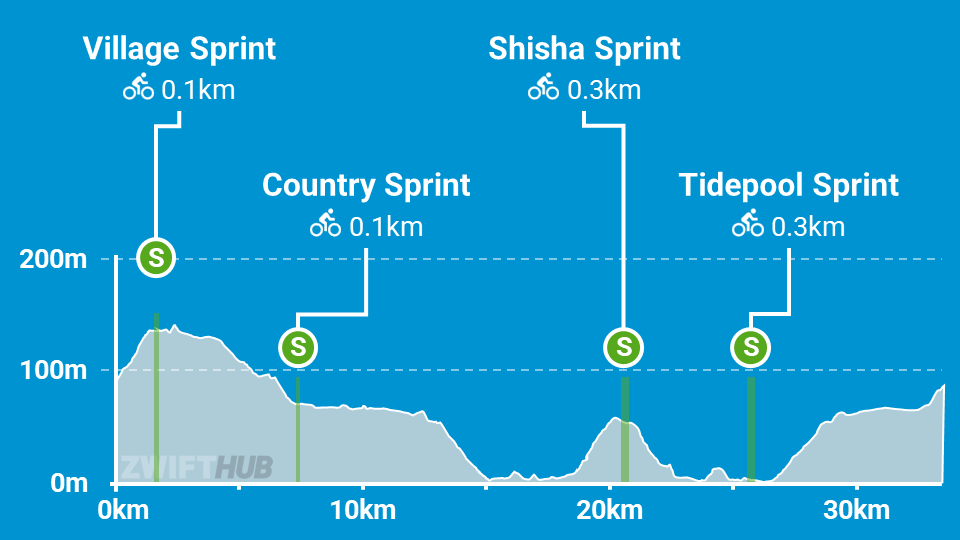
Makuri Islands’ Country to Coastal route is 33.5km long with 284m of elevation gain. This is the second time we’ve raced it for ZRL, as it featured in race 3 almost exactly 1 year ago.
Let’s discuss the key parts of this route, beginning just after we blast out of the start pen.
Note: riders will receive particular powerups at particular arches in this race. We’ve included those details below, along with notes about where to best use the powerup.
Uphill Start (0-1.4km): we begin with a quick climb from the start pens up to the Village Sprint. While the slope only averages 3.5%, it’ll make the first few minutes especially tough. Make sure you come into the pens warmed up! Once the race begins, mind your pack position, watch for gaps, hold onto those wheels, and know that recovery is just up the road as the next 13.5km are mostly downhill!

Draft Boost powerup at Village Sprint arch @1.7km: increases the draft effect you are experiencing for 40 seconds. Use at higher speeds (flats and descents) when you are already drafting off another rider (since this powerup only helps when you are drafting.) Best used before the next powerup at 7.4, while you’re in the pack, to grab additional recovery.

Anvil at Country Sprint arch @7.4km: makes you heavier for up to 15 seconds, so you can descend faster. It won’t hurt you, as it only adds weight when the road is at a -1.5% decline or greater. Event-only. Use this on downhills. Pair it with a supertuck to go extra fast with zero effort! Best used on the steeper portions of the slot canyon descent ~13-15km into the race.
Climb to Shisa Sprint (18.6-20.1km): the next pinch point begins at 18.6km when you cross a bridge onto the sandy, uphill corkscrew road taking you to the Shisa Sprint. Again, this isn’t a steep climb – it averages 3.3%. But climbers and puncheurs will push the w/kg here in an effort to thin the herd. If you aren’t attacking, you’ll want to hold onto a wheel to save energy in the draft.

Steamroller at Shisa Sprint arch @20.7km: reduces Crr for 30 seconds so you roll as fast as a road tire on pavement regardless of wheels or road surface. This is most effective when used on dirt, but it also provides an advantage on cobbles, bricks, gravel, wood, and ice/snow, etc. Best used on the dirt portion of the Mangrove Maze road at ~24.1km.

Lightweight (feather) at Tidepool Sprint arch @25.8km: reduces your weight by 10% for 30 seconds. Use on climbs, when weight matters the most. Best use? Either on the steeper portion of the Slot Canyon Climb (~26.2-28.5km) if you’re struggling to hold on, or save it for the base of the finishing climb, triggering it just before the lap arch so you get the next powerup!
Slot Canyon climb (26.7-29.2km): our last real climb (apart from the uphill finish) takes us up through the Slot Canyon we descended earlier. At just 2.4%, this is the slackest of our three climbs. But since it comes near the end of the race, you know it’s going to hurt! Pro tips: watch for riders attacking when the road turns right off the pavement and onto sand around 28.2km. This always seems to be a key inflection point.

Burrito at lap arch @33km: turns off the draft effect for riders in a cone-shaped window behind you for 20 seconds. Use when attacking off the front so opponents have to work harder to follow you, or in the peloton to make others work harder. Best used in the final seconds of the race, but watch out – your burrito may hurt nearby teammates!
Finish at Virtual Arch (@33.5km): after a flat lead-in from the Slot Canyon climb, you’ll get to slug it out in an uphill finish that is around 700 meters long, averaging 3.5%. Any powerup will help you here, and you’ll get another one as you pass under the lap arch with 400 meters to go. Time them wisely!
Read more about the Country to Coastal route >
Bike Recommendations
This route’s three key climbs plus an uphill finish may entice you toward a climbing-friendly bike. But it’s important to look at the pitch of the climbs, and not just their length.
As noted above, the climbs only average 2.4-3.5%, which means they are quite draftable, and your bike’s aero performance will be more important than its weight, especially at the speeds A and B riders travel.
So we’re recommending pairing the DT Swiss ARC 1100 DICUT 85/Disc wheels – the most aero wheels in game – with any of the following frames:
- S-Works Tarmac SL8
- Pinarello Dogma F 2024
- Canyon Aeroad 2024
- Cannondale SuperSix EVO LAB71
The Tron bike (Zwift Concept Z1) is also a good choice.
See Speed Tests: Tron Bike vs Top Performers for more nerd-level detail on frame and wheel performance, and check out Fastest Bike Frames and Wheels at Each Zwift Level to determine the fastest setup available to you.
More Route Recons
Lots of recon events are scheduled on upcoming ZRL routes, led by various teams. See upcoming ZRL recons for this race at zwift.com/events/tag/zrlrecon.
Recon Videos:
Strategic Options
This route as a scratch race has all the makings of a classic attritional Zwift battle. Make no mistake: riders will fall off the back on each of the three key climbs as strong climbers and puncheurs push hard to drop whoever they can!
But does it always make sense to push on the climbs in a team event? Smart teams will look at the makeup of their squad beforehand to determine whether it makes more sense to attack or sit in at key pinch points. Riders will want to communicate well mid-race, too, so teams can make smart, on-the-fly decisions that maximize the team’s overall result.
Looking at the Route
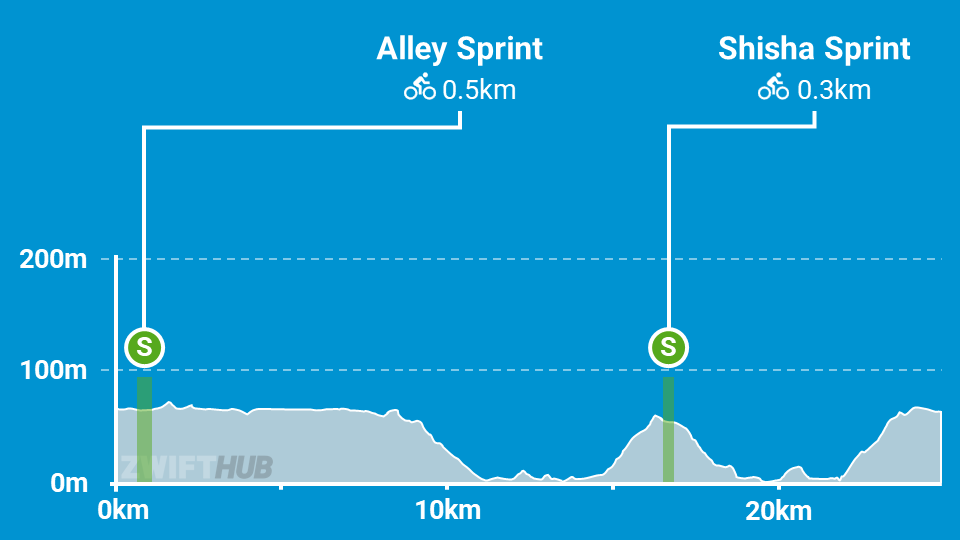
The Makuri Islands Turf N Surf route is essentially one big loop with two key climbs. It was first raced in ZRL in November of 2024, but as a points race.
All C and D teams will be racing a single lap of the route for a total of 24.7km with 198m of climbing.
Let’s discuss the key parts of this route…
Note: riders will receive particular powerups at particular arches in this race. We’ve included those details below, along with notes about where to best use the powerup.
Flat Start (0-14.6km): Don’t expect any major action for the first half of the race, since it’s just a stretch of flat Neokyo roads, the Slot Canyon descent, and more flats. Until the Festival Harbor Climb arrives, any attempted attacks have a very slim chance of sticking.
Draft Boost at Alley Sprint arch @0.7km: increases the draft effect you are experiencing for 40 seconds. Use at higher speeds (flats and descents) when you are already drafting off another rider (since this powerup only helps when you are drafting.) Best used during or just after the Festival Harbor Climb to save you some effort on this key tough section. Just make sure you use it before the Shisa Sprint arch!
Festival Harbor Climb @ 14.6km (2.6% for 2km): This isn’t an official KOM segment, but make no mistake: the first major selection of the race happens here! This is a draggy, draftable climb (remember, it looks like you’re on dirt, but that’s just sand that rolls like tarmac).
Lightweight (feather) at Shisa Sprint arch @16.3km: reduces your weight by 10% for 30 seconds. Use on climbs, when weight matters the most. Best used in the Pain Cavern, when the effort gets highest near the end of the climb.
Recovery (16.6-21.6km): Again, don’t expect any action from the top of the Festival Harbor Climb to the start of the Pain Cavern (21.6km). This section is a twisty descent followed by flat or slightly rolling roads.
Pain Cavern @ 21.6km (3% for 2.1km): This isn’t an official KOM segment either, but it’s the longest climb of the route, and it’s where the second major selection of the race will happen! This is a draggy, draftable climb, and the big moves tend to happen as you enter the figure 8 section. Do everything you can to hold the wheels here, as doing so will give you a shot at the podium. If you lose ’em, you’ve lost.
Finish at Virtual arch: once you’re out of Pain Cavern, you’ve got 1km to go, and it’s quite flat. Time your all-in sprint just right, and you may find yourself on the podium.
Read more about the Turf N Surf route >
Bike Recommendations
This route’s two climbs may entice you toward a climbing-friendly bike. But it’s important to look at the pitch of the climbs, and not just their length.
As noted above, the climbs only average 2.6-3%, which means they are quite draftable, and strong aero performance will save more power than having a lightweight frame.
So we’re recommending pairing the DT Swiss ARC 1100 DICUT 85/Disc wheels – the most aero wheels in game – with any of the following frames:
- S-Works Tarmac SL8
- Pinarello Dogma F 2024
- Canyon Aeroad 2024
- Cannondale SuperSix EVO LAB71
The Tron bike (Zwift Concept Z1) is also a good choice.
See Speed Tests: Tron Bike vs Top Performers for more nerd-level detail on frame and wheel performance, and check out Fastest Bike Frames and Wheels at Each Zwift Level to determine the fastest setup available to you. for more nerd-level detail on frame and wheel performance.
More Route Recons
Lots of recon events are scheduled on upcoming ZRL routes, led by various teams. See upcoming ZRL recons for this race at zwift.com/events/tag/zrlrecon.
Recon Videos:
Strategic Options
This route as a scratch race has all the makings of a classic attritional Zwift battle. Make no mistake: riders will fall off the back on each of the two key climbs as strong climbers and puncheurs push hard to drop whoever they can!
But does it always make sense to push on the climbs in a team event? Smart teams will look at the makeup of their squad beforehand to determine whether it makes more sense to attack or sit in at key pinch points. Riders will want to communicate well mid-race, too, so teams can make smart, on-the-fly decisions that maximize the team’s overall result.
Your Thoughts
Any insights or further thoughts on this race? Share below!
