Zwift Camp: Baseline is now underway, with over 210,000 Zwifters taking part so far in this new style of assessment-oriented training program.
I’m one of those Zwifters, and have been sharing my experience in this three-part series (one for each section of the program):
As you may or may not know, each of these sections consists of two activities: first a workout, then a test. I cover the endurance workout and test below.
Endurance Elevator Workout
The Endurance Elevator workout has you tackle multiple longer intervals at or near your FTP. The full workout is 59 minutes long with 3 hard intervals, while the lite version is 33 minutes long with 2 intervals. Here’s what the workouts look like with my FTP set at 310W:
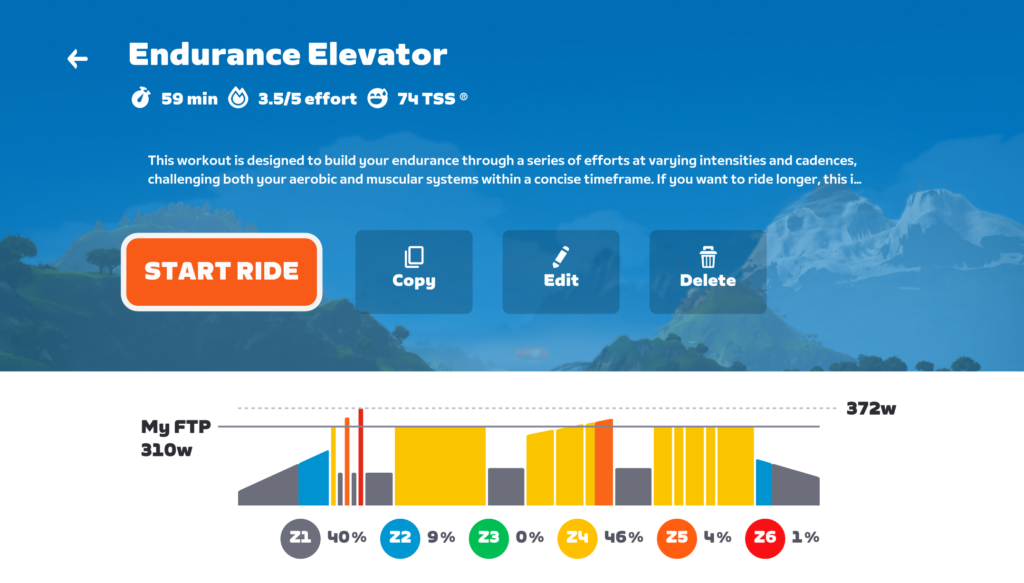
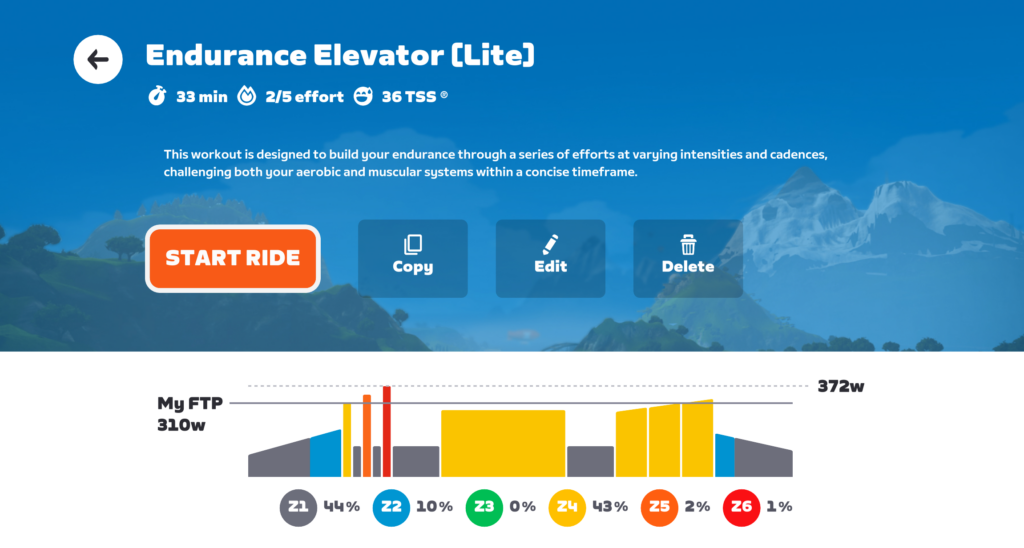
I went with the full 59-minute workout and did it as an on-demand workout because that was the only way to get it done early. I chose to ride the workout on Watopia’s Road to Sky route because I prefer the visuals of a steady climb when doing longer, steady work at sweet spot or threshold.
Watch me ride this workout:
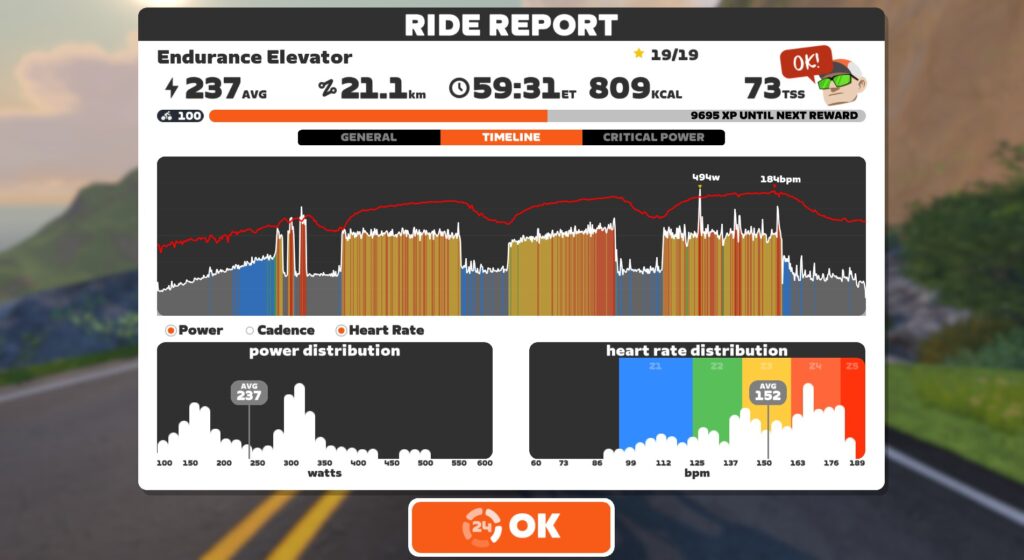
I went into this workout figuring it would involve some steady suffering. But it turned out to be significantly harder than anticipated. The toughest workout so far in this program, in fact!
After a warmup with three 30-second efforts to get your blood pumping, riders are tasked with completing 3 intervals at or near FTP. Here are my intervals:
- 10 minutes at 310W (100% FTP) and 90rpm
- 9-minute ramp from 280-340W (90-110% of FTP) broken into 3 cadence-based blocks
- 3 minutes at 85rpm
- 3 minutes at 80rpm
- 3 minutes at 75rpm
- 10 minutes at 310W (100% FTP) broken into 5 cadence-based blocks
- 2 minutes at 90rpm
- 1 minute standing at 70rpm
- 2 minutes at 90rpm
- 1 minute standing at 70rpm
- 4 minutes at 100rpm
Each of these big blocks was significantly harder than the previous one, and I felt like the cadence targets made them significantly more difficult. Some people say “you can ignore the cadence targets” but that’s not always true… cadence affects a workout, and coaches set particular targets for good reason. So I tried to hit those targets, even though it put me further outside my comfort zone.
For the first 10-minute interval, I spun up to a comfortable cadence around 100rpm, then realized the workout was calling for 90rpm. So I dropped it, and finished the interval right on target. I was pedaling slower than I would naturally, but it didn’t feel like I was mashing the pedals.
The second interval, a 9-minute ramp, dropped the cadence even further. Gah! As the power ramped from 90% of FTP to 110%, it told me to drop my cadence from 85rpm to 80rpm to 75rpm. That hurt. Holding power over threshold at 75rpm feels like it really sapped the strength in my legs.
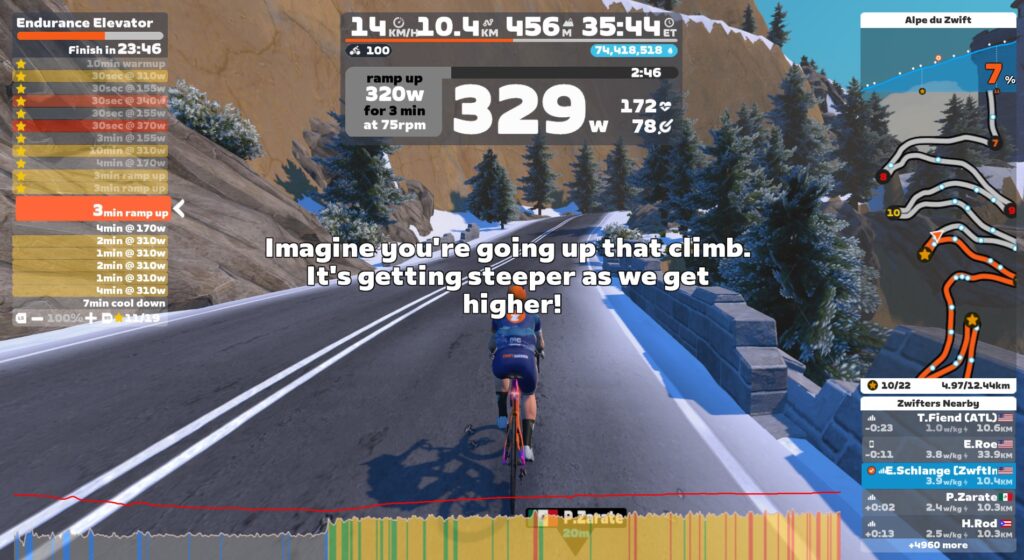
Then I had one more 10-minute section at FTP left. This one surprised me with its difficulty. The first two minutes at 90rpm weren’t terrible, but I could already feel that the previous 9-minute ramp at low cadence had noticeably drained my strength.
Then I stood up for the 1-minute interval as instructed, and tried to hold the 70rpm target… and I couldn’t! It was a weird feeling, like I didn’t have the body weight to stomp on the pedals at a high enough cadence. It would have taken me really engaging my core and arms so I could force my pedal strokes down in order to hit the cadence target – but I just didn’t have the strength.
So I mashed through that interval at 55-60rpm, then sat down and tried to get my cadence up to the 90rpm target. At this point, my heart rate was at its highest point thus far in the workout (175bpm).
Soon enough, it was time to stand for another minute. This block was even worse, with me only able to hold around 50rpm. I was on the edge of the ERG spiral of death, and it was all I could do to keep those pedals turning over.
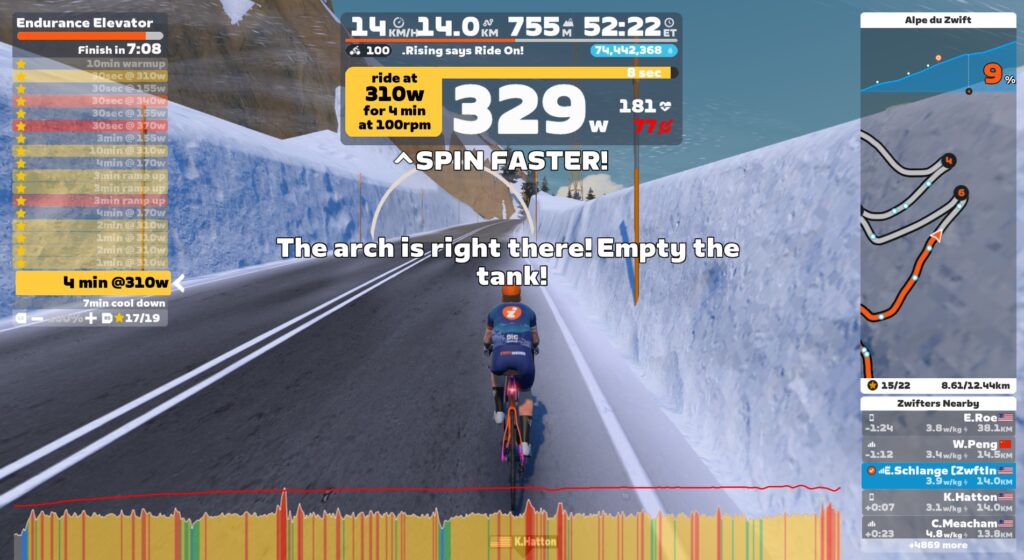
When I finished slogging through that block, it was time for the final 4 minutes at FTP. And the workout called for 100rpm cadence! Grrr… I would have happily down 100rpm early in the workout, but now my legs were so dead I couldn’t get my legs over 75rpm. So I just gutted out the final 4 minutes, even though everything in me wanted to hit that left button to drop the FTP bias by a few percent. My heart rate was pegged at 180, a few beats over threshold, and there it sat until I finished my last FTP interval.
Takeaways from the Endurance Elevator Workout
This was the first Zwift Camp: Baseline stage I had completed where I didn’t get an email from Zwift immediately after finishing. It makes sense – I hadn’t unlocked any new virtual goodies, and there weren’t any test results to display. But I’m not ashamed to admit that after all that hard work, I wish Zwift had sent me some sort of attaboy.
My first takeaway from this workout was that low cadence work really saps my legs, but I probably need to do more of it if I want to climb well. On Zwift, a combination of lower trainer difficulty and lots of virtual gears lets me spin at a higher cadence no matter how steep the climbs may be. But that’s not how it works outdoors.
The other takeaway is a reminder that my body can go further than I might think. When we get pushed to the edge, whether or not we continue pushing becomes a question of mental strength. I’ll be honest: knowing I would be writing this post and sharing my video helped motivate me not to throw in the towel!
Endurance Test
The test for the endurance portion of Zwift Camp: Baseline isn’t like the Sprint or Attacking tests, which were structured workouts. Instead, Zwift has you ride the Elevation Evaluation route:
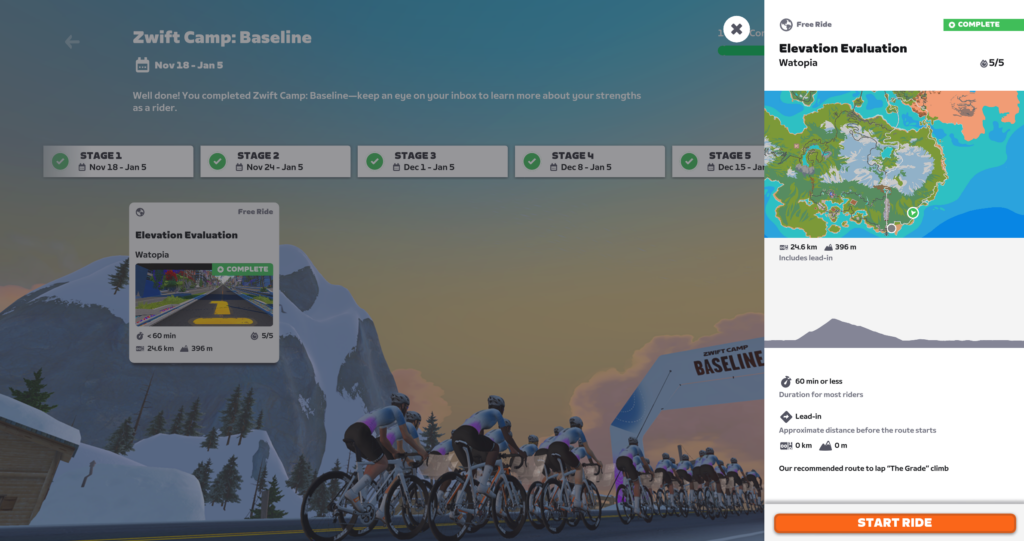
Using this route as an endurance test began as a good idea from Zwift, and it could have been a really cool experience for everyone if done right. Unfortunately, the way it actually unfolds in game for the everyday Zwifter leaves a lot to be desired. I’ll unpack this more below, but first I want to state two things clearly that aren’t spelled out by Zwift:
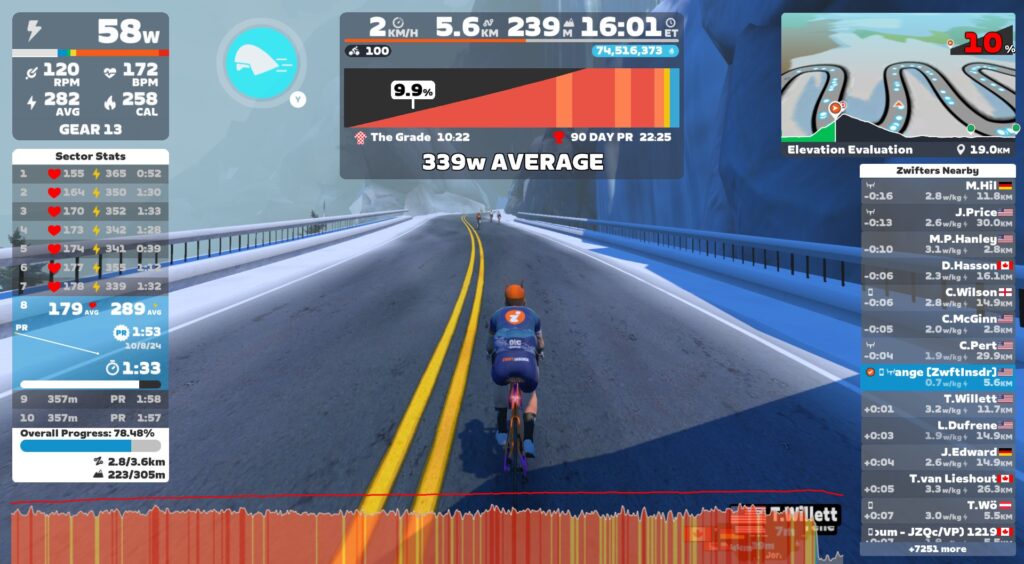
- The whole goal of this final workout is to put in your best 10-minute power effort at some point during the route. I recommend beginning this effort at the bottom of The Grade KOM, because that lets you make use of the timer in game as your 10-minute timer, plus you’ll see an average power readout as well.
- You have to complete the full Elevation Evaluation route for your effort to count as a stage 6 completion. There’s a fair amount of riding to be done even after you climb to the top of The Grade. Just use it to spin your legs out, and make sure you ride through the finish at the Sasquatch Sprint before ending your ride.
Watch me complete the Elevation Evaluation Route/Test:
I started my endurance test with a separate ride, actually. I knew that the Elevation Evaluation route only has a ~3km lead-in when ridden as a free ride, and I wanted a longer warmup. So I jumped in with some robopacers for 30 minutes to break a sweat, spin up the legs, and get the heart rate up.
Hot Tip #1: knowing this is a 10-minute test should help you set your power target quite precisely. There are various ways of doing this. I did two things: I looked at my 2024 power curve in Strava, which showed my best 10-minute power was 344W this year. I also looked at the new way Zwift computes FTP (see chart on this post) and did the math to see I would need to hold 359W (my FTP of 310/0.862) in order for Zwift’s computed FTP to match what I have on my profile.
359W seemed way too high for me to hold for 10 minutes, but 340W seemed doable. So I decided I would target 340W, then increase the power later in the test if I was able.
After my warmup, I saved my activity, then picked the Elevation Evaluation route from stage 6 of the Zwift Camp: Baseline section of my homepage. (I was doing this ride as an on-demand free ride of the route, not an event, because the events won’t be scheduled until next week.)
Recommendation to ZHQ: this page should include text explaining the goal of the ride. Right now it says nothing about what I’m supposed to do. Is this a maximal effort across the entire route? Should I do my best for the full The Grade FTP test? (The fact that it’s a 10-minute test isn’t just well-hidden, it’s not communicated anywhere.)
Hot Tip #2: As I neared the base of the KOM, I reduced my trainer difficulty to 0. This is because I knew there was that flat spot partly up the KOM, and I didn’t want to worry about shifting to keep the resistance (and my power) up during what would be a very suffery portion of the 10-minute effort. Setting trainer difficulty to 0 meant I wouldn’t feel any resistance changes due to gradient at all, so I could control the resistance completely by my shifting.
Hot Tip #3: Even though you can do your maximal 10-minute effort at any time during your Elevation Evaluation ride, plan to begin it right at the start line of The Grade KOM. This is the smart move because it gives you an on-screen timer so you know when you’ve hit 10 minutes, plus it shows your power average on screen, so you’ll know how you’re tracking against your target.
I was feeling good as I started out, and at the 2:30 mark (25% in) I was averaging 355W. But I knew it couldn’t stay that high, so I tried to drop my power closer to 340W so I could sustain the effort.
Just past the 5-minute mark, I hit the flat spot on The Grade. But with trainer difficulty at 0, I didn’t need to shift to keep my power up! #winning My power average was 352W at the halfway mark.
The span from 5-8 minutes was probably the hardest for me, because that was the time when my legs were burning and my mind was asking, “Can I sustain this effort for several more minutes?” At the 7:30 mark (75% done) my power average was 350W, and I was suffering.
Once I hit 2 minutes to go, I knew I could hold close to my 340W target through to the end. (You can do anything for 2 minutes, right?) As I neared 1 minute to go, I tried to up my power and empty the tank. When the clock hit 10 minutes, my on-screen power average was 349W, and as the timer ticked over, my avatar almost came to a stop as I finished my effort with hardly anything left. Whew!
Takeaways from the Endurance Test
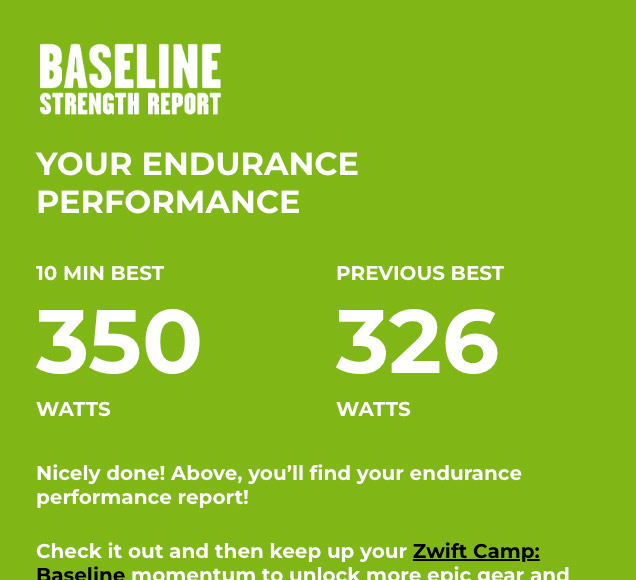
My 350W average for 10 minutes was a personal best for 2024, so I was stoked with that result. Here’s my endurance performance report, showing my new PB plus my previous 90-day best:
I’m not sure if I could have paced it any better than I did, or pushed any harder, so I don’t have any personal takeaways from the test. I do, however, have some takeaways for Zwift based on my experience with this final Zwift Camp: Baseline stage.
Takeaways for Zwift
First, as already mentioned above, Zwift needs to communicate what they’re looking for in this final endurance test. I reached out and it sounds like they’ll be at least talking about the 10-minute power goal in the event description text, but that doesn’t even come close to solving the problem. Because we know lots of people don’t read that text, plus many folks will complete the tests as an on-demand workout outside of an event!
Zwift’s original intent was to use Elevation Evaluation as a “route-based workout”, where riders would ride the route together in an event, with popup text instructing them on how to execute the test. But for some reason, that ended up not happening, which means riders are sort of left to figure it out for themselves.
At this point in Zwift Camp: Baseline, I’m not sure there’s an easy fix for the 200,000+ people who have joined and will soon be completing the final workout.
Recommendation to ZHQ: maybe Zwift could send an email to everyone after they complete stage 5, detailing what to do for stage 6?
I didn’t receive a performance report email after my endurance test like I did with the Attack and Sprint tests, which seems odd. In talking to internal contacts within Zwift, it looks like there was some sort of bug where a trigger didn’t fire after I finished the route. Zwift needs to be really sure that this sort of triggering is working in a rock-solid fashion, because it’s really important for people to see the reports they’re expecting after giving it their all.
Recommendation to ZHQ: riders should get their endurance performance report emailed over as soon as they save their Zwift activity.
Perhaps even more oddly, I didn’t get my “Zwift Camp: Baseline Performance Report” until almost 24 hours after I completed this final test. That’s way too long to wait for the big final report that everyone wants at the conclusion of the Camp. Why not send it right away? Zwift has their tech-based reasons, but again, I think they need to look at user experience and try to maximize it.
Recommendation to ZHQ: riders should get their Zwift Camp: Baseline Performance Report emailed over as soon as they save their Zwift activity.
The performance report said my “Rider Strength” is versatility. That is, I’m not a sprinter, attacker, or endurance-focused rider… I’m sort of equally good at all three. Or equally bad? 😁 Regardless, here’s the full Zwift Camp: Baseline Performance Report email I received:

As you can see, the email contains the following:
- Rider Strength: this section will tell you whether your strength is sprinting, attacking, endurance, or if you’re rather balanced like me. Zwift figures this out by comparing your power numbers to the universe of Zwifters.
- Rider Limiter: basically, your lowest percentile ranking against the universe of active Zwifters.
- Looking to improve? Zwift points me to the upcoming Endurance Challenge (workouts to help me boost my endurance) which will be available December 23rd. The email also points me to the “Fondo” training plan.
- Zwift Baseline wheels blurb: the bottom of the email has a blurb about the wheels you unlock by finishing Zwift Camp: Baseline. It calls them “performance wheels,” but this a more hype than they deserve, since they’re nothing special.
Recommendations to ZHQ: this email could be improved in lots of ways, but at the same time, I get it: Zwift Camp: Baseline was sort of a “proof of concept”, a first go at something Zwift will undoubtedly do again, and in a bigger way. A few improvements I’d love to see:
- Under “Looking to Improve?”, I want to be able to click and see the details for the Endurance Challenge or the recommended Training Plan(s).
- More details: keep the email simple, but let me click and see my numbers again plus my percentile rank for each of the three tests (sprint, attack, endurance) somewhere under my Zwift.com profile.
- Don’t pitch the wheel unlock like it’s something special. Either give me some really unique-looking wheels that I’d want to roll in casual riding just because of their appearance, or give me some wheels that perform really well. The Baseline wheels are just… not super cool looking, and not fast.
Concluding Thoughts
As I’ve already said, I love where Zwift is going with Zwift Camp: Baseline. There’s so much potential for this idea of assessing rider abilities, then recommending next steps.
The Zwift Camp: Baseline program felt a little bit thrown together in places, particularly on stage 6. And you know what? I’m OK with that, as long as Zwift takes feedback on board and iterates to improve the product. Because that’s how development works! I’ve done my best to detail my feedback in my series of walkthrough posts, and I know for a fact Zwift has been reading these articles, and everyone’s comments, to make tweaks to the program on the fly and also improve future versions of it. So that’s all good.
Overall, in going through Zwift Camp: Baseline myself, as well as conversing with folks within ZHQ about it, I really think this is just the start of bigger and better things to come in this space from Zwift. So I’m looking forward to what comes next.
Watch this space for details on the Sprinting, Attacking, and Endurance Challenges releasing on December 23rd as a followup to Zwift Camp: Baseline.
Questions or Comments?
That’s a wrap on Zwift Camp: Baseline for me. How’s it going for you? Share your thoughts or questions below!
