Editor’s Note: this is a guest post from Ben Reeve at CyclingTipsHQ.com
Ben hails from across the pond in the UK where he runs a blog sharing tips, tricks and tales from his world in cycling.
A retailer by trade, he has been cycling for a couple of years now. He believes there is no better teacher than an enthusiastic student, and Ben is very much a student of everything cycling and does his best to share it with the cycling community on his site.
So it’s dark and wet outside. We all know about ‘the rules‘ but for me this means seriously having to consider setting up the turbo trainer again. In previous years this has always proved to be a depressing thing to contemplate, but thanks to Zwift, this year may just be different….
This isn’t a review, more like the ultimate set up and unboxing guide to help you understand what’s involved and how to start.
What Is Zwift?

Zwift’s aim is a simple, but utterly brilliant one. To make the experience of cycling solo on your turbo trainer more exciting. To make it social, interactive, challenging, and above all fun.
A computer game and a fitness tool!? Don’t know about you, but I’m sold.
Zwift lets you enter a new world right from the comfort (!?) of your garage (front room, shed, military bunker or anywhere else you set up your turbo!).
You are transported into a 3D landscape with other riders from around the world, cycling on virtual courses and earning achievements along the way.
What Do I Need To Get Started?
Getting started is more simple than you think. 
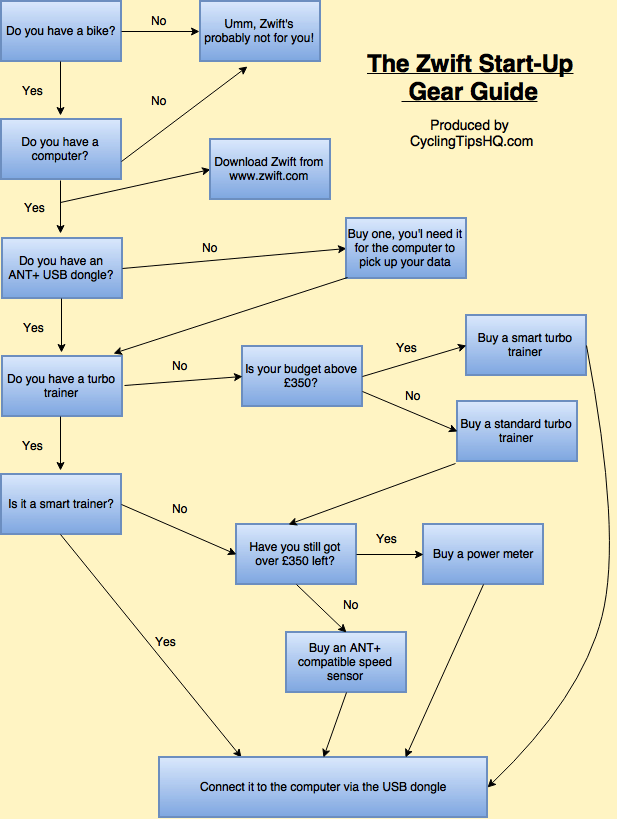
I have produced this simple chart to show you how little you actually need.
Before starting Zwift I already owned a laptop, Garmin sensors, a bicycle and a turbo trainer so the only thing I have actually had to buy is the ANT+ dongle and the software itself.
I would imagine many of you will be in a similar position to this before starting out with Zwift.
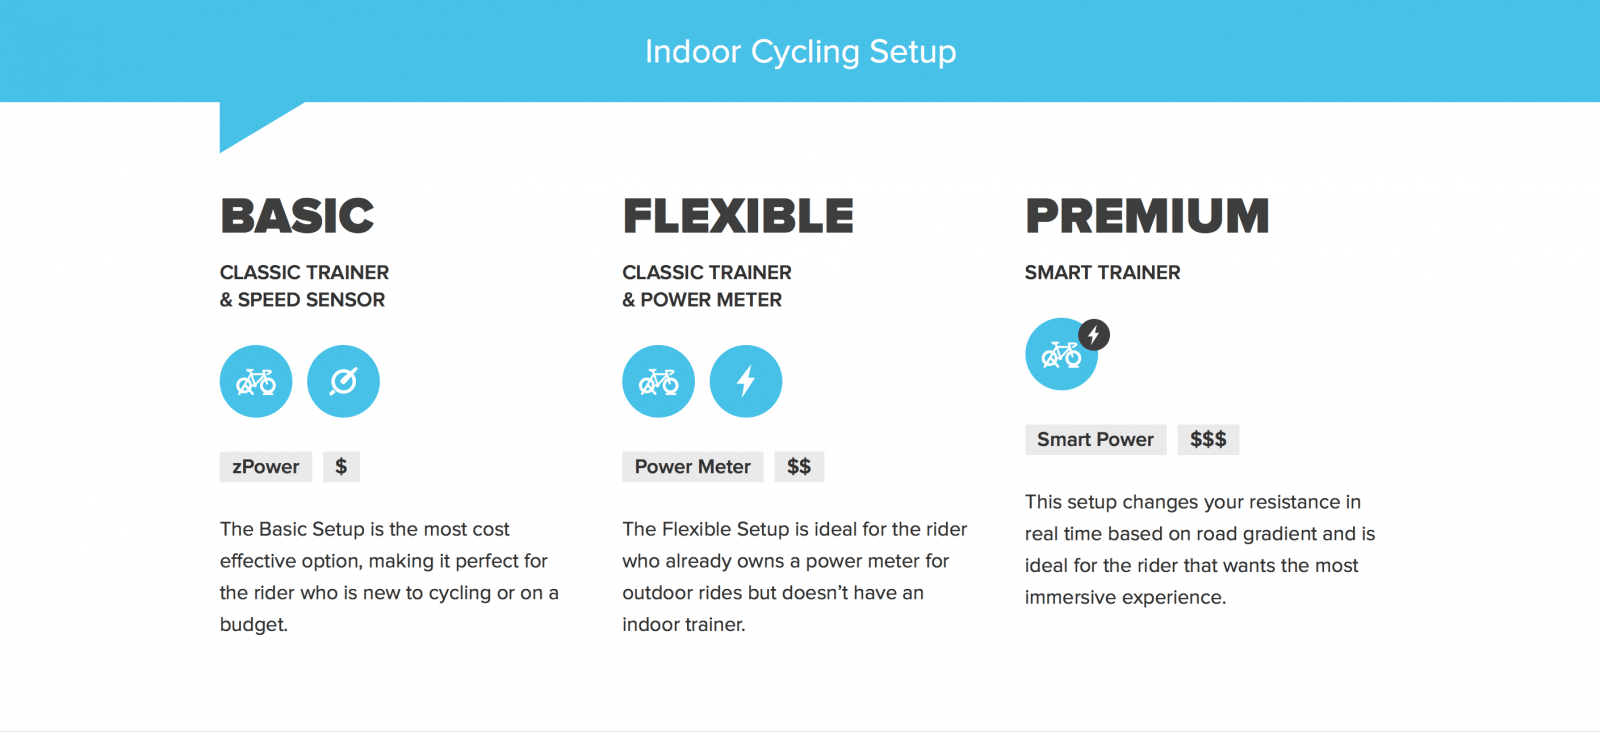
Work your way through the chart on the right, then head on down to the gear guide to see what combinations Zwift recommend using.
Gear Guide
As you’d expect there’s a really good guide on the Zwift site.
 It essentially gives you three options
BASIC = A turbo trainer with speed sensor
FLEXIBLE = A turbo trainer with a power meter
PREMIUM = A smart turbo trainer
Once you’ve worked your way through the flow chart to establish what gear you need, examples of products are below:
ALL
- A computer
- An ANT+USB dongle so your computer can receive the data from your equipment.
- An example of that would be Garmin Ant Chip
- The Zwift software available from Zwift.com (Free trial for 50km, $10 USD thereafter)
- A bike (yes, really!)
BASIC SETUP
Any Turbo Trainer
There are lots of different types of trainer out there.
I’m not going to attempt to take you through them all here, but if you want to read more there is a fantastic site called turbobiketrainer.com that will give you every bit of information you ever wanted about trainers (plus a bit more!)
I personally picked mine up from Ebay a couple of years ago, and if you look around it is possible to get some fantastic bargains..
Speed Or Cadence Sensor
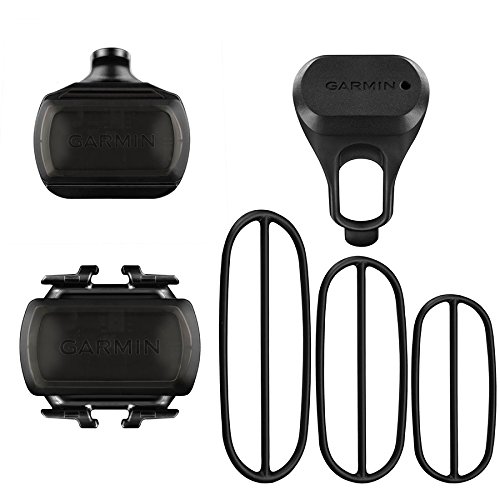
Garmin have recently released a fantastic speed and cadence sensor which is perfect for Zwift. They are ANT+ enabled and will allow you to get an accurate speed on your stationary trainer.
Unlike Garmin’s past cadence sensors they are incredibly simple to fit, and will have you up and running in no time.
FLEXIBLE SETUP
Any Turbo Trainer
There are lots of different types of trainers out there.
I’m not going to attempt to take you through them all here, but if you want to read more there is a fantastic site called turbobiketrainer.com that will give you every bit of information you ever wanted about trainers (plus a bit more!)
I personally picked mine up from Ebay a couple of years ago, and you can get some
A Power Meter
This is where the going the ‘flexible’ route starts to get more expensive.
Power meters are fantastic bits of kit, giving you really feedback on the work your are doing on the bike.
The challenge is they are expensive. Expect to pay prices about £500 to get a good quality one.
If you want more information on power meters I suggest looking here CyclingPowerMeters.com
PREMIUM SETUP
If you want the full on Zwift experience then there is no doubt ‘premium’ is the route to go.
For this, you need to go down the smart trainer route.
A smart trainer will link into Zwift and then automatically change the resistance when it needs to, on a virtual hill as an example. NOW THAT IS COOL!
Again the challenge with most of these is going to be the cost. If you already have turbo in your garage it is a big investment to pick up some of the units below, and you’re not going to be finding any in the below £200 price bracket either.
Below is a list of the smart trainers compatible with Zwift, and I have put beside them the best price I could find on the internet (1st December 2015)
- Wahoo KICKR £948.99
- Wahoo KICKR SNAP £499.99
- Racermate Computrainer £1080
- CycleOps Powerbeam Pro £639.95
- Tacx Bushido Smart ANT+ T2780 (needs ANT+ FE-C update) £356.99
- Tacx Vortex Smart ANT+ T2180 (needs ANT+ FE-C update) £280
- Tacx i-Genius Multiplayer Smart T2010 £625
- Tacx Genius Smart T2080 £478
- Tacx IRONMAN® Smart T2060 £550
- Tacx Smart Neo £1,074
- BKOOL (needs ANT+ FE-C update) £449
- Elite Qubo Digital Smart B+ £270
- Elite Real Turbo Muin Smart B+ £370
- Elite Qubo Power Smart B+ £235
What Route Did I Take?
Given I had alot of the equipment already, I have decided to go down the basic route to start with.
If I really get into Zwift I will consider buying a smart trainer for the ultimate experience, but let’s give it a couple of months first!
Summary
I am really excited about getting going with Zwift.
My Ant+ dongle arrives any day now, and for the first time ever I am looking forward to getting the turbo trainer set up and ready to go.
Will this prove to be uniformed optimism!?
Keep an eye out for my next few articles, where I am going to take you through my first experiences of Zwift.
Thanks for reading and happy cycling!
Ben

