Table of Contents
The second race of Zwift Racing League 2025/26 Round 4 happens Tuesday, April 14, and we’re in Watopia for an attritional multi-lap points race on The Classic, a replica of the first Zwift route ever created.
Don’t understand how ZRL points races work? Read our explainer >
There’s much to discuss, including crucial course segments, powerup usage, bike decisions, and strategic options. Let’s go!
Looking at the Route
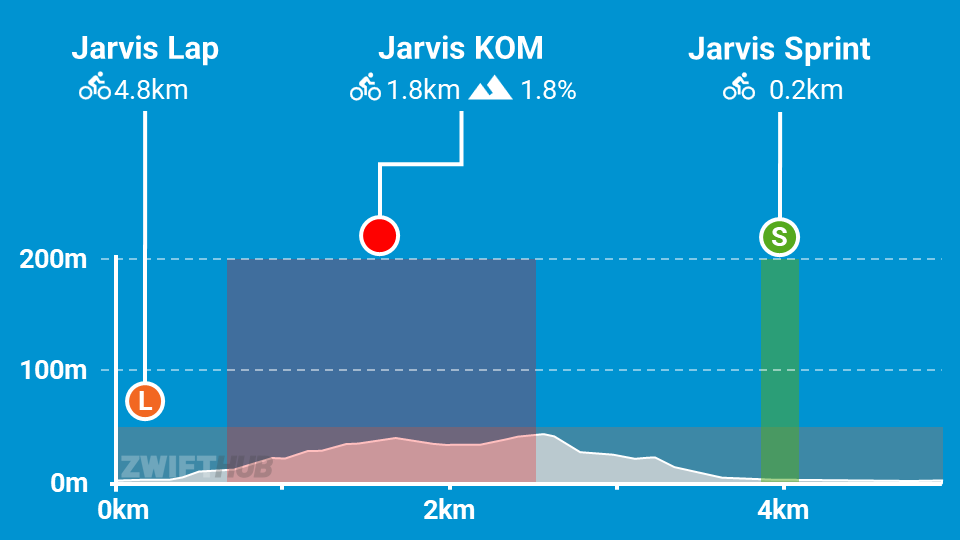
The route is a simple counterclockwise loop of Watopia’s Jarvis Island. The circuit includes a short sprint plus a draggy KOM which will prove decisive:
The race will begin with a ~4 km lead-in from Watopia’s downtown start pens, taking riders around the upper half of the Volcano Circuit and onto the Jarvis loop.
Late-breaking update: riders will get a feather powerup in the start pens.
I wouldn’t expect any big moves here, as riders will be keeping their powder dry for the points segments up the road.
A note about powerups: as explained below, WTRL tells me riders will receive Aero Boosts at the Jarvis KOM arch, Feathers at the Jarvis Sprint arch, and Draft Boosts at any other arches. That means you’ll receive a draft boost at the downtown Watopia lap banner just after starting, and at the Jarvis lap banner each lap. These leads to some interesting strategic choices, which I discuss more below in the Powerups section.
The first points segment we’ll encounter is the Jarvis KOM. This climb is 1.8 km long, averaging 1.8%, but keep in mind that average gradient number is affected by a bit of downhill that begins 1 km into the climb:
It’s better to think of this KOM as two short climbs (the first 1 km long at 2.7% and the second 400 meters long at 2.5%) separated by 500 meters of descent/flat. This is a very draftable climb, especially at race speeds, so take advantage of the draft (and maybe your Draft Boost powerup) to conserve effort.
A quick 1.2 km descent from the KOM’s crest brings will bring us to the start of the circuit’s sprint segment, the Jarvis Sprint:
This is a flat (-0.1%), 200-meter sprint, and we’ll be hitting it with a big head of steam. This one will be fast and short, so consider yourself warned: you’ll probably need to start the sprint positioned near the front of the pack if you want to finish near the front.
The Jarvis lap arch comes less than 900 meters after the Jarvis Sprint arch, and you’ll get a Draft Boost powerup here if you aren’t currently holding onto a powerup.
That’s one lap. A/B riders will complete 6 laps, C/D will complete 4.
One final note on the finish: since the Jarvis lap arch finish line is less than 900 meters after the final Jarvis Sprint arch, you can expect the effort to continue after the final sprint segment. It’s going to be a fast, hard finish!
Powerups
- Draft Boost at the lap arch
- Aero Boost at the Jarvis KOM arch
- Feather at the Jarvis Sprint arch

Draft Boost (van): increases the draft effect you are experiencing for 40 seconds.
Use at higher speeds (flats and descents) when you are already drafting off another rider (since this powerup only helps when you are drafting.) This could be employed on the downhill/flat bit of the KOM, or any other fast part of the course.

Aero Boost (helmet): makes you more aerodynamic (reduces your CdA by 25%) for 15 seconds.
Use at higher speeds (flats and descents). Everyone will be using this on the Jarvis Sprint points segment, so you probably don’t stand a chance of a good result without it! Trigger it a few seconds before the sprint begins, as it will probably take you less than 15 seconds to cover the actual sprint segment.

Lightweight (feather): reduces your weight by 10% for 30 seconds.
Use on climbs, when weight matters the most. The feather is best used on the Jarvis KOM – particularly the second stage of the climb, when riders will be on the limit.
Riders will need to decide if they use the feather just after receiving it at the sprint arch (in order to get the Draft Boost powerup at the lap arch), or hold onto it for the climb. Since using the feather just after the sprint is almost the same as throwing it away, the question boils down to: would you rather have the Draft Boost on the KOM, or the feather?
Bike Recommendations
For wheels, I’d recommend two different top performers. Choose your advantage:
- DT Swiss ARC 1100 DICUT 65: these are the more aero wheels, beating the Wake 6560 by 3.9 seconds across an hour of flat riding. These are optimized for the Jarvis Sprint.
- Princeton Carbonworks Wake 6560: these are the lighter wheels, beating the DICUT 65 by 9.6 seconds across an hour of climbing. These are optimized for the Jarvis KOM.

More Route Recons
J Dirom
Nathan Krake
Beccah Niesen
Strategic Options
Points Distributions, The Classic
6 Laps
4 Laps
How will these races unfold? What strategies will teams employ? Here’s what I predict:
- Honey, I Shrunk the Peloton: Some teams will choose to attack the KOM again and again, and this will cause the elastic to stretch and eventually snap for some riders.
- First Lap FTS: Fastest Through Segment top 5 times will probably all be set on the first lap. Why? Because the pack draft will be largest then, and everyone will push hard on the initial lap’s segments. Riders will simply be too tired to better their times on subsequent laps from a smaller group.
- Save the Sprinters: Teams with strong sprinters may try to keep the KOM as slow as possible to increase their sprinters’ chance of surviving the climb and grabbing points on the sprint.
- A Long, Hard Finish: The final KOM will feature big attacks by riders with punchy w/kg. Then you may get a moment to rest on the short descent that follows… but that final flat ~1km through the sprint segment to the finish line is going to be mayhem.
Your Thoughts
Any insights or further thoughts on this race? Share below!
