A few months back, Jesper from ZwiftHacks and Jonathon from ZwiftHype announced the release of Pedal Games, “a collection of mini games and info panels to users of all kinds of virtual cycling platforms.”
In some ways, you can think of Pedal Games as similar to Sauce for Zwift, in that it provides game overlays that let you customize your indoor cycling experience. But Pedal Games also offers lots of fun stuff that Sauce does not, and it’s a free app!
So today, I want to run through a quick intro to what Jesper and Jonathon have built, because it really is quite an amazing Zwift community project. Let’s go!
Getting Set Up
Prerequisites
Pedal Games is a Windows application that requires Windows 10 or 11 to run.
You’ll also need indoor cycling software (such as Zwift), since Pedal Games is just an add-on to whatever cycling software you use. Pedal Games works particularly well with Zwift and TrainingPeaks Virtual, but supports getting data via ANT+, MQTT, WebSocket, HTTP, and UDP, which means in theory it can be combined with just about any platform.
Signup
To get started, head to pedalgames.online and click to Sign Up. You’ll need to create an account, download the app, then sign into it to get started.
Setup
Once you’ve signed in, you’ll need to set up your basic user info (FTP, Max HR, and weight) on the homescreen. You can then set the power source to Zwift and start up Zwift.
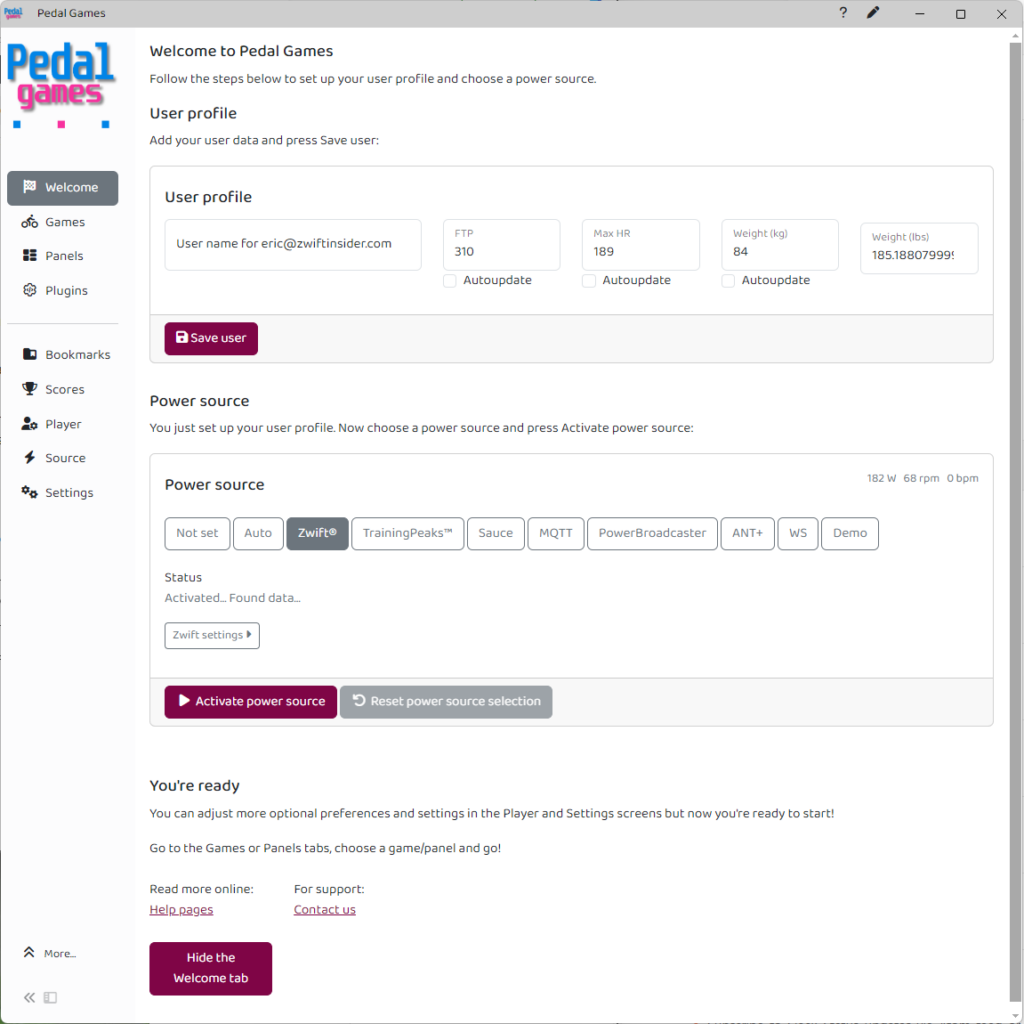
When you see “You’re ready” at the bottom, you’re ready to go! Start up your Zwift session…
Mini Games
Let’s begin by looking at some of the mini games, since these are what’s most new and different about Pedal Games vs Sauce for Zwift.
The app includes a pile of mini games, which you access by clicking “Games” from the main home screen.
See full list of games on the Pedal Games website >
The games are created to encourage you to hold a particular target power, cadence, or heart rate – and various combinations of those. Each game includes a HUD element you can drag and drop to wherever you’d like on your screen.
Let’s start with a simple example, great for recovery days:
Underwatter
So at its simplest, a game will have you try to stay above or below a particular target. As you hit the target, time accumulates. Your goal is to accumulate as much as possible in the target zone.
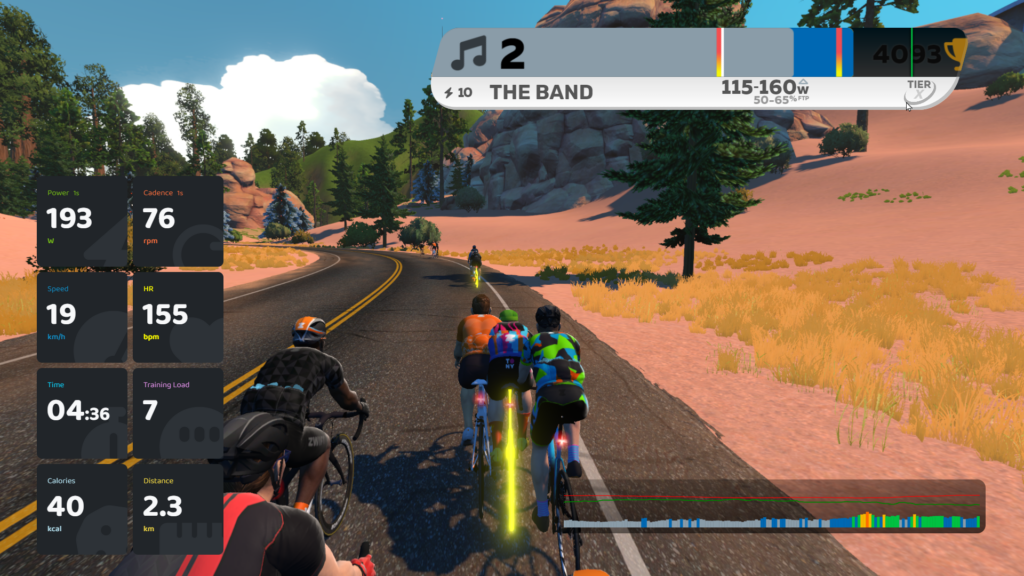
Underwatter has you stay under a particular power target. “The Band” has you try to keep your power in a particular range:
The Band
“Spin” is a similar idea, but the target is cadence-based, not power-based. With spin, you’re trying to keep your cadence at or above the target:
Spin
Things get more interesting when you mix and match power, target, and/or cadence targets. “Under The Radar”, for example, has you work on your efficiency by requiring you to stay above a certain power threshold while keeping your heart rate below a certain target.
Unstructured Training
The big idea with these mini games is “unstructured training.” Instead of a structured ERG workout that requires you to hold particular power numbers for precise time intervals, these games push you to accumulate time at target power in a more flexible way.
What’s the value of unstructured vs structured training? Jonathon Levie explains it very well:
I’m pretty good at 1 minute power. I had a series of coached training sessions to improve that. The workout was 20s on (700w?), 40s off, for about 10 minutes. Rest, then another set.
First week’s session was impossible. I get it, it’s the coach’s guess and he’s going off what I should be able to do based on my 1 minute power. We dropped the power for next week. The intervals felt okay, but the rest felt like it ended sooner and sooner. I completed the first set, but had nothing for the second set and didn’t even try.
We lowered the power for the next week. I felt slightly better during the first set, and attempted to start the second set, and quit. Was I improving? I was making it farther each week, as we lowered the power. Was I motivated? Nope, I wanted to quit cycling. If I can’t complete a session to improve the one thing I’m great at after 3 weeks, then feels hopeless.
When I first livestreamed Pedal Games a few years back, I had set the game’s target power to 700w. To score, just ride higher than that. I expected short efforts with long recoveries. I found that as soon as my HR was ready I was sprinting again. Recoveries felt perfect, I was in control. It was all self selected intervals and recoveries.
Looking at the power data after, I was sprinting for about 20s at 700w, then took around 40s to recover before going again, all while laughing and riding the keyboard.
That was the workout I couldn’t do coached. Why?
Because the coached workouts are written backward. You are going to do #w for #s and recover for #s. But that recipe may not be what you’re capable of, or capable of that day. Riding to score over #w means the workout is being written to fit the rider’s legs that day. Slightly shorter attack, or slightly longer recovery, and suddenly the athlete is capable of doing much more than their coach thought was possible. Rather than feeling like a failure, I rode this feeling like I was winning a race the whole time and in control!
Later, a coach showed me their own impossible workout through PG and was in disbelief…
These mini games are, in many ways, similar to XERT’s XSS Buckets idea. Instead of super structured intervals, just work to accumulate time at a particular power level. Fill the buckets.
I think the world of cycling training is only beginning to dip its toe into this “unstructured training” idea, and I really hope Zwift jumps into that fray in some way soon.
Custom HUD Panels
Pedal Games also includes a pile of “info panels” that you can use to customize your Zwift HUD, sort of like what Sauce for Zwift offers. There are lots of panels available, including:
- Standard Zwift HUD data like power, cadence, HR, speed, gradient, etc
- Various Lap Data Trackers (a much-requested Zwift feature)
- ETA for Zwift Routes (how long until I finish this route? Handy in races…)
- Draft Info (some really interesting stuff here…)
- Efficiency Score (Weighted Average Power, divided by the Average Heart Rate)
- Calories/min
- Ride On Counter
- And many, many more
See full list of info panels on Pedal Games website >
Here’s a quick video showing how you can start using these info panels in Zwift:
Right-clicking any of the panels gives you access to a pile of customization options like transparency, size, etc.
Here’s another video showing how to use the draft-related panels in Pedal Games:
Wrapping It Up
There’s a lot more to Pedal Games than what I’ve summarized above, but I hope this post gave you a good idea of what the app offers and how to start using it. Jesper and Jonathon have been working on this app for years, so it’s been fun to finally start using it and seeing what two of the greatest minds in the Zwiftiverse have come up with. Well done, guys!
Questions or Comments?
Share below!
